Instrukcja obs³ugi PRALKA Spis treci PL Polski,1 GB English,13 PL Instalacja, 2-3 Rozpakowanie i wypoziomowanie, 2 Pod³¹czenie do sieci wodnej i elektrycznej, 2-3 Pierwszy cykl prania, 3 Dane techniczne, 3 Opis pralki, 4-5 Panel kontrolny, 4 wiate³ka sygnalizuj¹ce, 5 Uruchomienie i Programy, 6 Krótko mówi¹c: jak nastawiæ program, 6 Tabela programów, 6 Potrzeby indywidualne, 7 WIL 85 Nastawienie temperatury, 7 Nastawienie wirowania, 7 Funkcje, 7 rodki pior¹ce i bielizna, 8 Szufladka na rodki
Instalacja Nale¿y zachowaæ niniejsz¹ ksi¹¿eczkê instrukcji dla przysz³ych konsultacji. W razie sprzeda¿y, oddania, czy przeniesienia pralki w inne miejsce nale¿y upewniæ siê, by przekazana zosta³a ona razem z instrukcj¹, aby nowy w³aciciel zapoznaæ siê móg³ z dzia³aniem urz¹dzenia i odpowiednimi informacjami. PL Nale¿y uwa¿nie przeczytaæ instrukcjê obs³ugi, gdy¿ zawiera ona wa¿ne informacje dotycz¹ce instalacji oraz w³aciwego i bezpiecznego u¿ytkowania pralki.
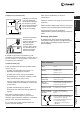
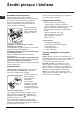
Pod³¹czenie rury usuwania wody PL wielokrotnych. Kabel nie powinien mieæ zgiêæ ani nie powinien byæ zgnieciony. Instalacja 65 - 100 cm Pod³¹czyæ rurê usuwania wody, bez zginania jej, do przewodu ciekowego lub do cieku w cianie, które powinny znajdowaæ siê na wysokoci od 65 do 100 cm od pod³ogi; Nie u¿ywaæ przed³u¿aczy ani wtyczek Kabel zasilania elektrycznego mo¿e byæ wymieniony wy³¹cznie przez upowa¿nionego technika specialistê.
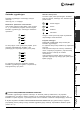
Opis pralki Panel kontrolny PL Przyciski wiate³ka sygnalizuj¹ce FUNKCYJNE wiate³ko W£¥CZENIE/ ZABLOKOWANE DRZWICZKI Przycisk W£¥CZENIE/ WY£¥CZENIE Pokrêt³o Szufladka rodków pior¹cych Przycisk PROGRAMÓW START/RESET Pokrêt³o Pokrêt³o TEMPERATURY WIROWANIA Szufladka na rodki pior¹ce: S³u¿y do wsypania rodków pior¹cych i dodatkowych (zobacz str. 8). wiate³ka sygnalizuj¹ce: umo¿liwiaj¹ ledzenie stanu zaawansowania programu prania.
wiate³ka sygnalizuj¹ce Nastawione opónienie uruchomienia: Jeli zosta³a wybrana funkcja Delay Timer (zobacz str. 7), po nastawieniu programu zacznie migotaæ wiate³ko sygnalizacyjne, wskazuj¹ce nastawione opónienie: Instalacja wiate³ka sygnalizuj¹ce dostarczaj¹ wa¿nych informacji.
Uruchomienie i Programy Krótko mówi¹c: jak nastawiæ program PL 5. Nastawiæ szybkoæ wirowania (zobacz str. 7). 6. Wsypaæ rodek pior¹cy i rodki dodatkowe (zobacz str. 8). 7. Uruchomiæ program, przyciskaj¹c przycisk START/RESET. Aby anulowaæ program, nale¿y trzymaæ przyciniêty przycisk START/RESET przez conajmniej 2 sekundy. 8. Po zakoñczeniu programu wiate³o sygnalizacyjne W£¥CZENIE/ZABLOKOWANE DRZWICZKI zacznie migotaæ, co wskazuje, ¿e mo¿na otworzyæ drzwiczki.
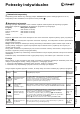
Potrzeby indywidualne C Nastawienie temperatury Temperaturê prania nastawia siê, obracaj¹c pokrêt³o TEMPERATURY (zobacz Tabelê programów na str. 6). Temperaturê mo¿na zredukowaæ, a¿ do prania w zimnej wodzie ( ). PL Instalacja Nastawienie wirowania Opis Obracaj¹c pokrêt³o WIROWANIE, mo¿na nastawiæ szybkoæ odwirowywania dla wybranego programu.
rodki pior¹ce i bielizna Szufladka na rodki pior¹ce PL Dobre rezultaty prania zale¿¹ równie¿ od w³aciwego dozowania rodka pior¹cego: wsypuj¹c go za du¿o, wcale nie poprawia siê wydajnoci prania, lecz przyczynia siê do odk³adania siê nalotów na wewnêtrznych czeciach pralki i do zanieczyszczania rodowiska. 4 1 2 3 Wysun¹æ szufladkê i wsypaæ do niej rodki pior¹ce i dodatkowe w nastêpuj¹cy sposób U¿ycie pojemniczka dodatkowego 4 wyklucza mo¿liwoæ prania wstêpnego.
Zalecenia i rodki ostro¿noci Pralka zosta³a zaprojektowana i wyprodukowana Ogólne zasady bezpieczeñstwa Niniejsze urz¹dzenie zaprojektowane zosta³o do u¿ytku domowego, a nie zawodowego i nie nale¿y zmieniaæ jego przeznaczenia ani funkcji. Nie dotykaæ pralki, stoj¹c przy niej boso lub maj¹c rêce czy stopy mokre lub wilgotne. Nie otwieraæ szufladki na rodki pior¹ce w trakcie prania. Nie dotykaæ usuwanej wody, gdy¿ mo¿e byæ ona bardzo gor¹ca.
Konserwacja PL Wy³¹czenie wody i pr¹du elektrycznego Czyszczenie pompy Zamkn¹æ kurek dop³ywu wody po ka¿dym praniu. Zmniejsza siê w ten sposób zu¿ycie instalacji hydraulicznej pralki oraz niebezpieczeñstwo przecieków. Pralka wyposa¿ona jest w pompê samooczyszczaj¹c¹, która nie wymaga zabiegów konserwacyjnych. Mo¿e siê jednak zdarzyæ, ¿e ma³e przedmioty (monety, guziki) wpadn¹ do przedsionka ochronnego pompy, znajduj¹cego siê w jej dolnej czêci.
Anomalie i rodki zaradcze Mo¿e siê zdarzyæ, ¿e pralka nie dzia³a. Zanim wezwie siê Serwis Techniczny (zobacz str. 12) nale¿y sprawdziæ, czy problemu tego nie da siê ³atwo rozwi¹zaæ samemu, pomagaj¹c sobie poni¿szym wykazem. Wtyczka nie jest w³¹czona do gniazdka, lub jest wsuniêta niedostatecznie, tak ¿e nie ma kontaktu. W domu brak jest pr¹du. Cykl prania nie zaczyna siê. Drzwiczki nie s¹ dobrze zamkniête. Nie zosta³ przyciniêty przycisk . Nie zosta³ przyciniêty przycisk START/RESET.
Serwis Techniczny Przed zwróceniem siê do Serwisu Technicznego: Sprawdziæ, czy problemu nie mo¿na rozwi¹zaæ samemu (zobacz str. 11); Ponownie nastawiæ program i sprawdziæ, czy problem zosta³ rozwi¹zany; W przypadku negatywnym skontaktowaæ siê z upowa¿nionym orodkiem Serwisu Technicznego pod numerem podanym na karcie gwarancyjnej. PL Nigdy nie zwracaæ siê do nieupowa¿nionych techników. Serwis Techniczny Nale¿y podaæ: rodzaj defektu; model urz¹dzenia (Mod.); numer seryjny (S/N).
Instructions for use WASHING MACHINE Contents GB English GB Installation, 14-15 Unpacking and levelling, 14 Electric and water connections, 14-15 The first wash cycle, 15 Technical details, 15 Washing machine description, 16-17 Control panel, 16 Leds, 17 Starting and Programmes, 18 Briefly: how to start a programme, 18 Programme table, 18 Personalisations, 19 WIL 85 Setting the temperature, 19 Setting the spin speed, 19 Functions, 19 Detergents and laundry, 20 Detergent dispenser, 20 Bleach cycle,
Installation GB Keep this instruction manual in a safe place for future reference. Should the appliance be sold, transferred or moved, make sure the instruction manual accompanies the washing machine to inform the new owner as to its operation and features. Read these instructions carefully: they contain vital information on installation, use and safety.
Do not use extensions or multiple sockets. Connecting the drain hose The power supply cable must never be bent or dangerously compressed. The power supply cable must only be replaced by an authorised serviceman. GB Installation 65 - 100 cm Connect the drain hose, without bending it, to a draining duct or a wall drain situated between 65 and 100 cm from the floor; Warning! The company denies all liability if and when these norms are not respected.
Washing machine description Control panel GB FUNCTION Buttons Leds ON-OFF/ DOOR ON-OFF LOCK Button Led PROGRAMME Knob Detergent dispenser START/RESET Button TEMPERATURE SPIN SPEED Knob Knob Detergent dispenser: to add detergent and fabric softener (see page 20). TEMPERATURE knob: to set the temperature or the cold wash cycle (see page 19). LEDS: to find out which wash cycle phase is under way.
Leds Delay set: If the Delay Timer function has been enabled (see page. 19), once you have started the programme, the LED corresponding to the delay set will begin to flash: Installation The LEDS provide important information. This is what they can tell you: Cycle phase under way: During the wash cycle, the LEDs gradually illuminate GB on to indicate the cycle phase under way: Prewash Wash Rinse Note: during draining, the LED corresponding to the Spin cycle phase will be turned on.
Starting and Programmes Briefly: starting a programme GB 6. Add the detergent and any fabric softener (see page 20). 7. Start he programme by pressing the START/RESET button. To cancel it, keep the START/RESET button pressed for at least 2 seconds. 8. When the programme is finished, the ON-OFF/ DOOR LOCK Led will flash to indicate that the appliance door can be opened. Take out your laundry and leave the appliance door ajar to allow the drum to dry thoroughly. Turn the washing .
Personalisations Setting the temperature Turn the TEMPERATURE knob to set the wash temperature (see Programme table on page 18). The temperature can be lowered, or even set to a cold wash ( ). GB Installation Setting the spin speed Detergents Functions Programmes . The spin speed can be lowered, or the spin cycle can be excluded altogether by selecting symbol The washing machine will automatically prevent you from selecting a spin speed higher than the maximum speed for each programme.
Detergents and laundry GB Detergent dispenser Preparing your laundry Good washing results also depend on the correct dose of detergent: adding too much detergent won't necessarily make for a more efficient wash, and may in fact cause build up on the interior of your appliance and even pollute the environment. Divide your laundry according to: - the type of fabric/the symbol on the label. - the colours: separate coloured garments from whites. Empty all pockets and check for loose buttons.
Precautions and advice The crossed out "wheeled bin" symbol on the product reminds you of your obligation, that when you dispose of the appliance it must be separately collected. General safety Consumers should contact their local authority or retailer for information concerning the correct disposal of their old appliance. This appliance has been designed for nonprofessional, household use and its functions must not be changed.
Care and maintenance Cutting off the water or electricity supply GB Turn off the water tap after every wash. This will limit the wear of your appliance's water system and also prevent leaks. Unplug your appliance when cleaning it and during all maintenance operations. Cleaning your appliance The exterior and rubber parts of your appliance can be cleaned with a soft cloth soaked in lukewarm soapy water. Do not use solvents or abrasives.
Troubleshooting Your washing machine could fail to work. Before calling for Assistance (see page 24), make sure the problem can't easily be solved by consulting the following list. The water inlet hose is not connected to the tap. The hose is bent. The water tap is not turned on. There is a water shortage. The water pressure is insufficient. The START/RESET button has not been pressed. The washing machine continuously loads and unloads water.
Service 195062595.00 03/2007 - Xerox Business Services Before calling for Assistance: Check whether you can solve the problem on your own (see page 23); Restart the programme to check whether the problem has been solved; If this is not the case, contact an authorised Technical Service Centre on the telephone number provided on the guarantee certificate. GB Always request the assistance of authorised servicemen. Service Notify the operator of: the type of problem; the appliance model (Mod.