Kullanma Kýlavuzu ÇAMAÞIR MAKÝNESÝ Ýçindekiler TR Türkçe, 1 GB English,13 TR Montaj, 2-3 Ambalajdan çýkartma ve yerleþtirilmesi, 2 Su ve elektrik baðlantýsý, 2-3 Ýlk yýkama, 3 Teknik bilgiler, 3 Çamaþýr makinesini tanýyalým, 4-5 Kontrol paneli, 4 Iþýklý göstergeler, 5 Çalýþtýrma ve programlar, 6 Programýn baþlatýlmasý, 6 Program tablosu, 6 Kiþisel ayarlar, 7 WIXL 101 Sýcaklýk ayarý, 7 Sýkma hýzý ayarý, 7 Fonksiyonlar, 7 Deterjanlar ve çamaþýr, 8 Deterjan bölmesi, 8 Beyazlatma iþlemi, 8 Çamaþýrýn h
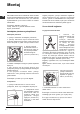
Montaj 64 Bu kullanma kýlavuzunun saklanmasý daha sonradan da okunup faydalý olabilmesi açýsýndan önemlidir. Çamaþýr makinesinin nakli durumunda da, yeni sahibinin faydalanabilmesi için bu kýlavuz makine ile beraber saklanmalýdýr. Saðlýklý yerleþtirme, çamaþýr makinesine saðlam bir duruþ kazandýracaðý gibi, çalýþmasý esnasýndaki sarsýntý, gürültü ve hareketlilikleri de önleyecektir. Zeminde halý olmasý halinde, ayak ayarýný makinenin altýnda havalandýrma olabilecek þekilde yapýnýz .
Boþaltma hortumunun takýlmasý 65 - 100 cm TR Kablonun ezilmemesi ve katlanmamasý gerekir. Su giriþ kablosu yalnýzca Indesit Yetkili Servis teknisyenler tarafýndan deðiþtirilmelidir. Montaj Boþaltma hortumunu, katlanmasýný önleyerek, yerden 65 ile 100 cm yükseklik arasýndaki bir duvar tahliyesine takýnýz; Uzatma kablosu ve çoklu prizler kullanmayýnýz. Dikkat! Bu þartlara uyulmamasý halinde firma hiçbir sorumluluk kabul etmez.
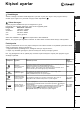
Çamaþýr makinesini tanýyalým Kontrol paneli 64 Iþýklý göstergeler FONKSÝYON tuþlarý AÇMA-KAPAMA/KAPI KÝLÝDÝ göstergesi AÇMA/KAPAMA tuþu PROGRAM düðmesi Deterjan Bölmesi BAÞLAT/TEKRAR BAÞLAT tuþu SIKMA HIZI AYAR düðmesi Deterjan ve diðer katký maddeleri için Deterjan Bölmesi (bkz. sayfa 8). Iþýklý göstergeler: yýkama programýnýn aþamalarýný gösterir. Zaman ayarý programlandý ise, yani gecikmeli program baþlangýcý ayarlanmýþ ise, programýn baþlamasý için kalan süreyi gösterir (bkz. sayfa 5).
Iþýklý göstergeler Iþýklý göstergeler önemli bilgiler iletirler. TR Montaj Zaman ayarý programlanmýþ: Zaman ayarý yani makinenin çalýmaya baþlama saatini erteleme devreye sokuldu ise (bkz. sayfa 7), gösterge yanacak ve çalýþma baþlangýcý için kalan süreyi gösterecektir: Yýkama aþamalarýnýn izlenmesi: Yýkama programý esnasýnda ýþýklý göstergeler sýrayla yanarak o andaki yýkama aþamasýný gösterecektir. Ön yýkama Yýkama Durulama Taným Sýkma Not: su boþaltýlmasý esnasýnda sýkma göstergesi yanacaktýr.
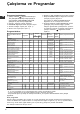
Çalýþtýrma ve Programlar Programýn baþlatýlmasý 64 6. Deterjan ve katký maddelerini koyunuz (bkz. sayfa 8). 7. BAÞLAT/TEKRAR BAÞLAT düðmesine basmak suretiyle programý çalýþtýrýnýz. Ýptal etmek için BAÞLAT/TEKRAR BAÞLAT düðmesine en az 2 saniye basýlý tutunuz. 8. Program bittiðinde AÇMA-KAPAMA/KAPI KÝLÝDÝ göstergesi yanýp sönerek kapaðýn açýlabilir olduðunu gösterecektir. Çamaþýrlarýnýzý çýkartýnýz ve tamburun kurumasý için kapaðý aralýk býrakýnýz. düðmesine basarak Çamaþýr makinesini kapatýnýz. 1.
Kiþisel ayarlar C Sýcaklýk ayarý Yýkama sýcaklýðýný SICAKLIK AYAR düðmesini çevirerek seçiniz (bkz sayfa 6 daki program tablosu). Sýcaklýk ayarý soðuk su ile yýkanacak seviyeye kadar düþürülebilir ( ). TR Montaj Sýkma hýzý ayarý Taným Seçilen programýn SIKMA HIZI ayarý bu düðmenin ile yapýlýr.
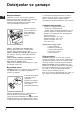
Deterjanlar ve çamaþýr Deterjan bölmesi 64 Yýkamanýn iyi sonuç vermesi doðru miktarda deterjan kullanýlmasýna da baðlýdýr: aþýrý deterjan kullanarak daha temiz çamaþýrlar elde edilemeyeceði gibi makinenin aksamýna zarar verilir, çevre kirliliðine neden olunur. 4 1 2 3 Deterjan bölmesini açýnýz ve deterjan ile katký maddelerini aþaðýdaki þekilde koyunuz. hazne 1: ön yýkama için deterjan (toz) Deterjaný koymadan önce 4 numaralý ilave haznenin takýlý olmadýðýný kontrol edin.
Önlem ve tavsiyeler Çamaþýr makinesi uluslar arasý güvenlik standartlarýna uygun olarak üretilmiþtir. Bu uyarýlar güvenlik açýsýndan önemli olup, dikkatlice okunmalýdýrlar. Bu cihaz profesyonel olmayan, ev tipi kullaným için dizayn edilmiþtir ve kullaným amacý deðiþtirilmemelidir. Fiþi çýkarýrken, kablodan çekerek deðil, fiþi tutarak çýkartýnýz. Makine çalýþýrken deterjan bölmesini açmayýnýz.
Bakým ve temizlik 64 Su ve elektrik baðlantýsýný kesiniz Pompa temizliði Su musluðunu her yýkamadan sonra kapatýnýz Böylece sistemin aþýnmasý önlenir ayrýca da su kaçaðý tehlikesi ortadan kalkar. Çamaþýr makinesinin pompasý kendini temizleyen bir özelliðe sahip olup, ayrýca temizlik gerektirmez. Ancak, bazý küçük cisimler (madeni para, düðme) pompanýn alt kýsmýndaki koruyucu bölmeye düþebilirler. Bakým ve temizlik iþlemleri esnasýnda çamaþýr makinesinin fiþini çekiniz.
Sorunlar ve çözümleri Çamaþýr makinesi çalýþmýyor olabilir. Servisi aramadan önce (bkz. sayfa 12), aþaðýdaki liste yardýmýyla kolayca çözümlenecek bir sorun olup olmadýðýna bakýnýz. TR Muhtemel nedenler / Çözümler: Çamaþýr makinesi çalýþmýyor. Fiþ prize takýlý deðil veya tam temas etmiyor. Evde elektrik yok. Yýkama iþlemi baþlamýyor. Kapak iyi kapalý deðil. Düðmeye basýlmadý. BAÞLAT/TEKRAR BAÞLATdüðmesine basýlmadý. Su musluðu açýk deðil.
Servis Ariston Yetkili Servisini aramadan önce: Arýzayý kendiniz çözüp çözemeyeceðinize bakýnýz (bkz. sayfa 11); Programý tekrar baþlatarak, sorunun çözülüp çözülmediðini görünüz; Aksi takdirde, garanti belgesi ile verilen servis listesinde belirtilen telefon numaralarýndan size en yakýn yetkili servisi arayýnýz. 64 Kesinlikle, yetkili olmayan tamircilere müracaat etmeyiniz. Servis Bildiriniz: arýza tipini; makinenin modelini (Mod.); seri numarasýný (S/N).
Instructions for use WASHING MACHINE Contents GB English GB Installation, 14-15 Unpacking and levelling, 14 Electric and water connections, 14-15 The first wash cycle, 15 Technical details, 15 Washing machine description, 16-17 Control panel, 16 Leds, 17 Starting and Programmes, 18 Briefly: how to start a programme, 18 Programme table, 18 Personalisations, 19 WIXL 101 Setting the temperature, 19 Setting the spin speed, 19 Functions, 19 Detergents and laundry, 20 Detergent dispenser, 20 Bleach cycle
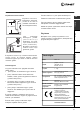
Installation GB Keep this instruction manual in a safe place for future reference. Should the appliance be sold, transferred or moved, make sure the instruction manual accompanies the washing machine to inform the new owner as to its operation and features. Read these instructions carefully: they contain vital information on installation, use and safety. Unpacking and levelling Unpacking 1. Unpack the washing machine. 2. Check whether the washing machine has been damaged during transport.
Do not use extensions or multiple sockets. Connecting the drain hose The power supply cable must never be bent or dangerously compressed. The power supply cable must only be replaced by an authorised serviceman. GB Installation 65 - 100 cm Connect the drain hose, without bending it, to a draining duct or a wall drain situated between 65 and 100 cm from the floor; Warning! The company denies all liability if and when these norms are not respected.
Washing machine description Control panel GB FUNCTION Buttons Leds ON-OFF/ DOOR ON-OFF LOCK Button Led PROGRAMME Knob Detergent dispenser START/RESET Button SPIN SPEED TEMPERATURE Knob Knob Detergent dispenser: to add detergent and fabric softener (see page 20). TEMPERATURE knob: to set the temperature or the cold wash cycle (see page 19). LEDS: to find out which wash cycle phase is under way.
Leds Delay set: If the Delay Timer function has been enabled (see page. 19), once you have started the programme, the LED corresponding to the delay set will begin to flash: Installation The LEDS provide important information. This is what they can tell you: Cycle phase under way: During the wash cycle, the LEDs gradually illuminate GB on to indicate the cycle phase under way: Prewash Wash Rinse Note: during draining, the LED corresponding to the Spin cycle phase will be turned on.
Starting and Programmes Briefly: starting a programme GB 6. Add the detergent and any fabric softener (see page 20). 7. Start he programme by pressing the START/RESET button. To cancel it, keep the START/RESET button pressed for at least 2 seconds. 8. When the programme is finished, the ON-OFF/ DOOR LOCK Led will flash to indicate that the appliance door can be opened. Take out your laundry and leave the appliance door ajar to allow the drum to dry thoroughly. Turn the washing .
Personalisations Setting the temperature Turn the TEMPERATURE knob to set the wash temperature (see Programme table on page 18). The temperature can be lowered, or even set to a cold wash ( ). GB Installation Setting the spin speed . The spin speed can be lowered, or the spin cycle can be excluded altogether by selecting symbol The washing machine will automatically prevent you from selecting a spin speed higher than the maximum speed for each programme. Programmes Functions To enable a function: 1.
Detergents and laundry Detergent dispenser GB Good washing results also depend on the correct dose of detergent: adding too much detergent won't necessarily make for a more efficient wash, and may in fact cause build up on the interior of your appliance and even pollute the environment. 4 1 2 3 Open up the detergent dispenser and pour in the detergent and fabric softener, as follows.
Precautions and advice This appliance has been designed for nonprofessional, household use and its functions must not be changed. Disposing of an old washing machine: before scrapping your appliance, cut the power supply cable and remove the appliance door. This washing machine should only be used by adults and in accordance with the instructions provided in this manual. Saving energy and respecting the environment Never touch the washing machine when barefoot or with wet or damp hands or feet.
Care and maintenance Cutting off the water or electricity supply GB Turn off the water tap after every wash. This will limit the wear of your appliance's water system and also prevent leaks. Unplug your appliance when cleaning it and during all maintenance operations. Cleaning your appliance The exterior and rubber parts of your appliance can be cleaned with a soft cloth soaked in lukewarm soapy water. Do not use solvents or abrasives.
Troubleshooting Your washing machine could fail to work. Before calling for Assistance (see page 24), make sure the problem can't easily be solved by consulting the following list. The water inlet hose is not connected to the tap. The hose is bent. The water tap is not turned on. There is a water shortage. The water pressure is insufficient. The START/RESET button has not been pressed. The washing machine continuously loads and unloads water.
Service 195042286.01 09/2005 - Xerox Business Services Before calling for Assistance: Check whether you can solve the problem on your own (see page 23); Restart the programme to check whether the problem has been solved; If this is not the case, contact an authorised Technical Service Centre on the telephone number provided on the guarantee certificate. GB Always request the assistance of authorised servicemen. Service Notify the operator of: the type of problem; the appliance model (Mod.