Instructions for use WASHING MACHINE Contents GB English,1 RO Română,37 PL Polski,13 HU Magyar,25 GB Installation, 2-3 Unpacking and levelling Connecting the electricity and water supplies The first wash cycle Technical data Description of the washing machine, 4-5 Control panel Display Running a wash cycle, 6 Wash cycles and functions, 7 Table of wash cycles Wash functions WMD 722 Detergents and laundry, 8 Detergent dispenser drawer Preparing the laundry Special wash cycles Load balancing system P
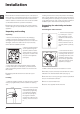
Installation GB ! This instruction manual should be kept in a safe place for future reference. If the washing machine is sold, transferred or moved, make sure that the instruction manual remains with the machine so that the new owner is able to familiarise himself/herself with its operation and features. ! Read these instructions carefully: they contain vital information relating to the safe installation and operation of the appliance. Unpacking and levelling Unpacking 1.
! Do not use extension cords or multiple sockets. Connecting the drain hose 65 - 100 cm Connect the drain hose, without bending it, to a drainage duct or a wall drain located at a height between 65 and 100 cm from the floor; GB ! The cable should not be bent or compressed. ! The power supply cable must only be replaced by authorised technicians. Warning! The company shall not be held responsible in the event that these regulations are not respected.
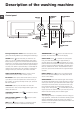
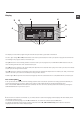
Description of the washing machine GB Control panel CLEANING ACTION ON/OFF button button SPIN SPEED button DISPLAY Detergent dispenser drawer WASH CYCLE SELECTOR MY CYCLE button START/PAUSE button with indicator light FUNCTION buttons buttons ANTI ALLERGY RINSE button DELAY TIMER button TEMPERATURE button CHILD LOCK button Detergent dispenser drawer: used to dispense detergents and washing additives (see “Detergents and laundry”).
Display GB Z B A X D C E Y F The display is useful when programming the machine and provides a great deal of information. The two upper strings A and B provide details of the wash cycle selected, the wash cycle phase in progress and all information relating to the progress status of the wash cycle. String C shows the time remaining until the end of the wash cycle in progress and, if a DELAYED START has been set, the time remaining until the start of the selected wash cycle.
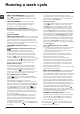
Running a wash cycle GB 1. SWITCH THE MACHINE ON. Press the On/Off button ; the text POWER ON will appear on the display and the START/PAUSE indicator light will flash slowly in a green colour. 2. LOAD THE LAUNDRY. Open the porthole door. Load the laundry, making sure you do not exceed the maximum load value indicated in the table of programmes on the following page. 3. MEASURE OUT THE DETERGENT.
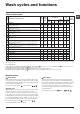
Wash cycles and functions Wash cycles Table of wash cycles Max. load Detergents Max. Max. (kg) Cycle temp. speed (°C) (rpm) Pre- Wash Bleach Fabric Nor- Eco duration Wash softener mal Wash Description of the wash cycle 1200 - - 4 - 90° 1200 - 7 - 60° 1200 - 7 7 40° 1200 - 7 7 60° 800 - 3 3 40° 800 - 3 3 40° 800 - 3 3 60° 1200 - - 3.
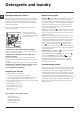
Detergents and laundry GB Detergent dispenser drawer Special wash cycles Good washing results also depend on the correct dose of detergent: adding too much detergent will not necessarily result in a more efficient wash, and may in fact cause a build up on the inside of your appliance and contribute to environmental pollution. Anti Stain : this programme is suitable to heavily-soiled garments with resistant colours. It ensures a washing class that is higher than the standard class (A class).
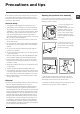
Precautions and tips ! This washing machine was designed and constructed in accordance with international safety regulations. The following information is provided for safety reasons and must therefore be read carefully. Opening the porthole door manually General safety • This appliance was designed for domestic use only.
Care and maintenance GB Cutting off the water and electricity supplies Caring for the door and drum of your appliance • Turn off the water tap after every wash cycle. This will limit wear on the hydraulic system inside the washing machine and help to prevent leaks. • Always leave the porthole door ajar in order to prevent unpleasant odours from forming. • Unplug the washing machine when cleaning it and during all maintenance work.
Troubleshooting Your washing machine could fail to work. Before contacting the Technical Assistance Centre (see “Assistance”), make sure that the problem cannot be not solved easily using the following list. GB Problem: Possible causes / Solutions: The washing machine does not switch on. • The appliance is not plugged into the socket fully, or is not making contact. • There is no power in the house. The wash cycle does not start. • • • • • The washing machine door is not closed properly.
Service GB Before calling for Assistance: • Check whether you can solve the problem alone (see “Troubleshooting”); • Restart the programme to check whether the problem has been solved; • If this is not the case, contact an authorised Technical Assistance Centre using the telephone number provided on the guarantee certificate. ! Always request the assistance of authorised technicians. Have the following information to hand: • the type of problem; • the appliance model (Mod.); • the serial number (S/N).
Instrukcja obsługi PRALKA Spis treści PL Polski PL Instalacja, 14-15 Rozpakowanie i wypoziomowanie Podłączenia hydrauliczne i elektryczne Pierwszy cykl prania Dane techniczne Opis pralki, 16-17 Panel sterowania Wyświetlacz W jaki sposób wykonać cykl prania, 18 Programy i funkcje, 19 Tabela programów Funkcje prania WMD 722 Środki piorące i bielizna, 20 Szufladka na środki piorące Przygotowanie bielizny Programy specjalne System równoważenia ładunku Zalecenia i środki ostrożności, 21 Ogólne zasady bez
Instalacja PL ! Należy zachować niniejszą książeczkę, aby móc z niej skorzystać w każdej chwili. W przypadku sprzedaży, odstąpienia lub przeniesienia pralki w inne miejsce należy zadbać o przekazanie instrukcji wraz z maszyną, aby nowy właściciel mógł zapoznać się z działaniem urządzenia i z dotyczącymi go ostrzeżeniami. ! Należy uważnie przeczytać instrukcję obsługi: za- wiera ona ważne informacje dotyczące instalacji oraz właściwego i bezpiecznego użytkowania pralki.
Podłączenie przewodu odpływowego 65 - 100 cm Podłączyć przewód odpływowy, nie zginając go, do rury ściekowej lub do otworu odpływowego w ścianie, które powinny znajdować się na wysokości od 65 do 100 cm od podłogi; ! Nie używać przedłużaczy ani rozgałęźników. PL ! Przewód nie powinien być pozginany ani przygnieciony. ! Przewód zasilania elektrycznego może być wymieniany wyłącznie przez autoryzowanych techników.
Opis pralki PL Panel sterowania Przycisk OPCJE PRANIA Przycisk ON/OFF Przycisk WIROWANIA Wyświetlacz Przycisk Przyciski MY CYCLE Szufladka na środki piorące PRZEŁĄCZNIKA PROGRAMÓW Przyciski FUNKCJI Przycisk TEMPERATURY Przycisk TYP PŁUKANIA Przycisk Przycisk URUCHOMIENIE OPÓŹNIONE Szufladka na środki piorące: do dozowania środków piorących i dodatków (patrz „Środki piorące i bielizna”). Przycisk ON/OFF : nacisnąć krótko przycisk w celu włączenia lub wyłączenia maszyny.
Wyświetlacz Z PL B A X D C E Y F Wyświetlacz potrzebny jest w celu programowania maszyny i dostarcza wielu informacji. W obu wierszach górnych A i B wyświetlane są: wybrany program prania, faza prania bieżącego oraz wszelkie wskazania związane ze stanem zaawansowania programu. W wierszu C wyświetlany jest czas pozostały do końca cyklu prania bieżącego oraz, jeśli zaprogramowano URUCHOMIENIE OPÓŹNIONE, czas brakujący do uruchomienia wybranego programu.
W jaki sposób wykonać cykl prania PL 1. WŁĄCZENIE MASZYNY. Nacisnąć przycisk , na wyświetlaczu pojawi się napis WŁĄCZENIE, kontrolka START/PAUSE zacznie powoli pulsować w kolorze zielonym. odzieży. Jeśli któreś z ustawień lub zmiana ustawienia nie jest możliwe, na wyświetlaczu pojawi się napis „ZABLOKOWANE”. 2. WKŁADANIE BIELIZNY. Otworzyć szklane drzwiczki. Włożyć bieliznę uważając, aby nie przekroczyć wielkości wsadu wskazanej w tabeli programów na następnej stronie. Ustawić rodzaj płukania.
Programy i funkcje Programy Tabela programów PrêdŒrodki pior¹ce koœæ Temp. max max. Wy- Œrodek (obro- Pranie (°C) tów na wstępne Pranie bie- zmiêklacz czaj¹cy minutê) Opis programu £aduCzas nek Eco trwamax wash nia (kg) cyklu 1200 - - 4 - 1200 - 7 - 1200 - 7 7 1200 - 7 7 800 - 3 3 800 - 3 3 800 - 3 3 1200 - - 3,5 3 800 - - 3 3 POŚCIEL I RĘCZNIKI (3): do bielizny poœcielowej i k¹pielowej.
Środki piorące i bielizna PL Szufladka na środki piorące Programy specjalne Dobry rezultat prania zależy również od prawidłowego dozowania środka piorącego: użycie jego nadmiernej ilości nie poprawia skuteczności prania, lecz przyczynia się do powstawania nalotów na wewnętrznych częściach pralki i do zanieczyszczania środowiska. ODPLAMIANIE: program odpowiedni do prania silnie zabrudzonej odzieży o trwałych kolorach. Program gwarantuje klasę prania wyższą od standardowej (klasa A).
Zalecenia i środki ostrożności ! Pralka została zaprojektowana i wyprodukowana zgodnie z międzynarodowymi normami bezpieczeństwa. Niniejsze ostrzeżenia zostały tu zamieszczone ze względów bezpieczeństwa i należy je uważnie przeczytać.
Utrzymanie i konserwacja PL Odłączenie wody i prądu elektrycznego Konserwacja okrągłych drzwiczek i bębna • Zamknąć kurek dopływu wody po każdym praniu. W ten sposób zmniejsza się zużycie instalacji hydraulicznej pralki oraz eliminuje się niebezpieczeństwo wycieków. • Przed przystąpieniem do czyszczenia pralki oraz do czynności konserwacyjnych wyjąć wtyczkę z gniazdka. • Drzwiczki pralki należy zawsze pozostawiać uchylone, aby zapobiec tworzeniu się nieprzyjemnych zapachów.
Nieprawidłowości w działaniu i sposoby ich usuwania Może się zdarzyć, że pralka nie działa. Przed wezwaniem Serwisu Technicznego (patrz „Serwis Techniczny”) należy sprawdzić, czy problemu nie da się łatwo rozwiązać przy pomocy poniższego wykazu. PL Nieprawidłowości w działaniu: Możliwe przyczyny / Rozwiązania: Pralka nie włącza się. • Wtyczka nie jest włączona do gniazdka lub jest wsunięta za słabo, tak że nie ma styku. • W domu nastąpiła przerwa w dostawie prądu. Cykl prania nie rozpoczyna się.
Serwis Techniczny PL Przed skontaktowaniem się z Serwisem Technicznym: • Sprawdzić, czy problemu nie można rozwiązać samodzielnie (patrz„Nieprawidłowości w działaniu i sposoby ich usuwania”); • Ponownie uruchomić program i sprawdzić, czy problem nie zniknął; • Jeśli nie, zwrócić się do autoryzowanego Serwisu Technicznego, dzwoniąc pod numer podany w karcie gwarancyjnej. ! Nigdy nie wzywać nieautoryzowanych techników. Należy podać: • rodzaj nieprawidłowości; • model maszyny (Mod.); • numer seryjny (S/N).
Használati utasítás MOSÓGÉP Összefoglalás HU Magyar HU Üzembe helyezés, 26–27 Kicsomagolás és vízszintbe állítás Víz- és elektromos csatlakozás Első mosási ciklus Műszaki adatok A mosógép leírása, 28-29 Kezelőpanel Kijelző A mosási ciklusok végrehajtása, 30 Programok és funkciók, 31 Programtáblázat Mosási funkciók WMD 722 Mosószerek és mosandók, 32 Mosószer-adagoló fiók A mosandó ruhák előkészítése Különleges programok A bepakolt ruhák kiegyensúlyozására szolgáló rendszer Óvintézkedések és tanácso
Üzembe helyezés HU ! Fontos, hogy megőrizze ezt a kézikönyvet, hogy mindig A pontos vízszintezés biztosítja a gép stabilitását, így az a működés során nem fog rezegni, zajt okozni, illetve elmozdulni. Szőnyegpadló vagy szőnyeg esetén a lábakat úgy állítsa be, hogy a mosógép alatt elegendő hely maradjon a szellőzésre. ! Figyelmesen olvassa el az utasításokat: fontos infor- Víz- és elektromos csatlakozás kéznél legyen.
A leeresztőcső csatlakoztatása 65 - 100 cm Csatlakoztassa a leeresztőcsövet a lefolyóhoz vagy a padlótól 65 és 100 cm közötti magasságban lévő fali szifonhoz anélkül, hogy megtörné; ! A kábel ne legyen se megtörve, se összenyomva. HU ! A tápkábelt csak engedéllyel rendelkező szakember cserélheti. Figyelem! A fenti előírások figyelmen kívül hagyása esetén a gyártó elhárít minden felelősséget.
A mosógép leírása HU Kezelőpanel MOSÁSI INTENZITÁS ON/OFF gomb gomb CENTRIFUGÁLÁS gomb Kijelző Mosószer-adagoló fiók PROGRAMVÁLASZTÓ MY CYCLE gomb gombok START/PAUSE jelzőlámpás gomb FUNKCIÓ gombok ÖBLÍTŐ PROGRAMOK HŐMÉRSÉKLET gomb gomb LEZÁRVA KÉSLELTETETT INDÍTÁS gomb gomb Mosószer-adagoló fiók: a mosószerek és adalékanyagok betöltésére szolgál (lásd „Mosószerek és mosandók”). ON/OFF gomb : a készülék be-, vagy kikapcsolásához nyomja meg röviden ezt a gombot.
Kijelző Z B HU A X D C E Y F A kijelző a készülék programozásához nyújt segítséget, és számos információt szolgáltat. A felső A és B feliratmező a kiválasztott mosási programot, a folyamatban lévő mosási fázist és az összes, a program előrehaladásával kapcsolatos információt jeleníti meg. A C feliratmező a folyamatban lévő mosási ciklus végéig hátralévő maradékidőt, illetve KÉSLELTETETT INDÍTÁS beállítása esetén a kiválasztott program elindulásáig hátralévő időt jeleníti meg.
A mosási ciklusok végrehajtása HU 1. A KÉSZÜLÉK BEKAPCSOLÁSA. Nyomja meg a gombot – a kijelzőn megjelenik az PROGRAM FOLYAMATBAN felirat, az START/PAUSE lámpa pedig lassan, zöld fénnyel villogni kezd. 2. A MOSANDÓ RUHÁK BEPAKOLÁSA. Nyissa ki az ajtót! Tegye be a mosandó ruhákat, ügyelve arra, hogy ne lépje túl a következő oldalon található programtáblázatban feltüntetett ruhatöltet-mennyiséget. 3. A MOSÓSZER ADAGOLÁSA.
Programok és funkciók Programok Programtáblázat HU Max. hőm (°C) Max. sebesség (ford./ perc) FOLTELTÁVOLÍTÁS 40° 1200 - - 4 - PAMUT ELŐMOSÁS (nyomja meg 1-szer a gombot): erősen szennyezett fehér ruhák. 90° 1200 - 7 - 1200 - 7 7 1200 - 7 7 800 - 3 3 800 - 3 3 800 - 3 3 1200 - - 3,5 3 800 - - 3 3 Szimbólum Programleírás ElőFehérMosás Öblítő mosás ítőszer Max.
Mosószerek és mosandók HU Mosószer-adagoló fiók Különleges programok A mosás eredményessége függ a mosószer helyes adagolásától is: ha túl sokat adagol belőle, a mosás nem lesz hatékonyabb, de hozzájárul ahhoz, hogy lerakódás képződjön a mosógépben, valamint a környezetet is jobban szennyezi. FOLTELTÁVOLÍTÁS: A program az ellenálló színnel rendelkező, erősen szennyezett ruhadarabok mosására szolgál. A program a normálnál jobb (A osztályú) mosóhatást biztosít.
Óvintézkedések és tanácsok ! A mosógép a nemzetközi biztonsági szabványoknak megfelelően lett tervezve és gyártva.
Karbantartás és ápolás HU A víz elzárása és az elektromos áram kikapcsolása • Minden mosás után zárja el a vízcsapot. Így kíméli a mosógép vízrendszerét és megszünteti a vízszivárgás kockázatát. • A mosógép tisztításakor, illetve karbantartásakor húzza ki a hálózati csatlakozódugót az aljzatból. A mosógép tisztítása B A mosószer-adagoló fiók tisztítása A fiók felemelésével és kifelé húzásával vegye ki a fiókot (lásd ábra). Folyó víz alatt mossa ki! Ezt a tisztítást gyakran el kell végezni.
Rendellenességek és elhárításuk Előfordulhat, hogy a mosógép nem működik. Mielőtt felhívná a szervizt (lásd „Szerviz”), ellenőrizze, hogy nem olyan problémáról van-e szó, amely a következő lista segítségével egyszerűen megoldható! HU Rendellenességek: Lehetséges okok / megoldás: A mosógép nem kapcsol be. • A hálózati csatlakozódugó nincs bedugva az aljzatba, vagy nem eléggé ahhoz, hogy jól érintkezzen. • Nincs áram a lakásban. A mosási ciklus nem indul el.
Szerviz HU Mielőtt a szervizhez fordulna: • Győződjön meg arról, hogy a hibát nem tudja saját maga is elhárítani (lásd „Rendellenességek és elhárításuk”); • Indítsa újra a programot, hogy lássa, elhárította-e a hibát; • Ellenkező esetben forduljon az engedéllyel rendelkező szakszervizhez a garanciajegyen található telefonszámon. ! Soha ne forduljon engedéllyel nem rendelkező szerelőhöz! Közölje: • a meghibásodás jellegét; • a mosógép típusát (Mod.); • a gyártási számot (S/N).
Instrucţiuni de folosire MAŞINĂ DE SPĂLAT RUFE Sumar RO Română RO Instalare, 38-39 Despachetare şi punere la nivel Racorduri hidraulice şi electrice Primul ciclu de spălare Date tehnice Descrierea maşinii de spălat, 40-41 Panoul de control Display Cum se desfăşoară un ciclu de spălare, 42 Programe şi funcţii, 43 Tabel de programe Funcţii de spălare WMD 722 Detergenţi şi rufe albe, 44 Compartimentul pentru detergenţi Pregătirea rufelor Programe optionale Sistemul de echilibrare a încărcăturii Precau
Instalare RO ! Este important să păstraţi acest manual pentru a-l putea consulta în orice moment. În caz de vânzare, de cesiune sau de schimbare a locuinţei, acesta trebuie să rămână împreună cu maşina de spălat pentru a informa noul proprietar cu privire la funcţionare şi la respectivele avertismente. ! Citiţi cu atenţie instrucţiunile: veţi găsi informaţii importante cu privire la instalare, la folosire şi la siguranţă. Despachetare şi punere la nivel Despachetare 1.
Conectarea furtunului de golire 65 - 100 cm Conectaţi furtunul de golire - fără a-l îndoi - la canalizare sau la racordul de golire prevăzut pe perete, la o înălţime de 65 - 100 cm de sol; Sprijiniţi-l de marginea căzii sau chiuvetei şi racordaţi şina de ghidare din dotare la robinet (a se vedea figura). Capătul liber al furtunului de golire nu trebuie să rămână cufundat în apă.
Descrierea maşinii de spălat RO Panoul de control Tastă Tastă ACŢIUNE CURĂŢARE ON/OFF Tastă CENTRIFUGARE DISPLAY Taste Sertarul detergenţilor SELECTARE PROGRAME Tastă cu led Tastă MY CYCLE Tastă TIP CLĂTIRE Tastă PORNIRE ÎNTÂRZIATĂ START/PAUSE Taste FUNCŢII Tastă TEMPERATURĂ Tastă BLOCARE TASTE Sertarul detergenţilor: pentru a introduce detergenţi sau aditivi (a se vedea “Detergenţi şi rufe albe”).
Display RO Z B A X D C E Y F Ecranul este util pentru a programa maşina şi a furniza numeroase informaţii. Pe cele două rânduri de sus, A şi B, apar programul de spălare ales, faza de spălare în curs de desfăşurare şi toate indicaţiile cu privire la stadiul de avansare a programului. Rândul C este dedicat timpului restant până la încheierea ciclului de spălare sau – dacă aţi programat pornirea maşinii la o anumită oră (PORNIRE ÎNTÂRZIATĂ) – timpul restant până la iniţierea spălării.
Cum se desfăşoară un ciclu de spălare RO 1. PUNEREA ÎN FUNCŢIUNE A MAŞINII. Apăsaţi tasta ; pe ecran va apărea mesajul PORNIRE ÎN CURS. Indicatorul START/PAUSE va emite un semnal intermitent de culoare verde. 2. INTRODUCEREA RUFELOR. Deschideţi uşa. Introduceţi rufele în maşină, fiind atenţi să nu depăşiţi cantitatea indicată în tabelul de programe (vezi pagina următoare). 3. DOZAREA DETERGENTULUI. Extrageţi sertarul şi turnaţi detergent în compartimentele respective, după indicaţiile din cap.
Programe şi funcţii Programe Tabel de programe Descrierea Programului Detergenþi Durata Viteza Sarcina Temp. Eco ciclului max. Max. max. Prede (rotaþii Deco- Balsam (Kg) Wash (°C) spalare pe minut) spã- Spãlare lorant rufe lare 40° 1200 4 1200 - 7 - 1200 - 7 7 1200 - 7 7 800 - 3 3 800 - 3 3 800 - 3 3 1200 - - 3,5 3 800 - - 3 3 LENJERIE,PROSOAPE (3): pentru prosoape ºi cearceafuri.
Detergenţi şi rufe albe RO Compartimentul pentru detergenţi Programe optionale Un rezultat bun la spălare depinde şi de dozarea corectă a detergentului: excesul de detergent nu garantează o spălare mai eficientă, ci contribuie la deteriorarea părţilor interne ale maşinii de spălat şi la poluarea mediului înconjurător. ANTIPATĂ: Programul este potrivit pentru rufe foarte murdare, cu culori rezistente. Programul asigură o clasă de spălare superioară faţă de clasa standard (clasa A).
Precauţii şi sfaturi ! Maşina de spălat a fost proiectată şi construită conform normelor internaţionale de protecţie. Aceste avertizări sunt furnizate din motive de siguranţă şi trebuie să fie citite cu atenţie. Norme de protecţie şi siguranţă generale • Acest aparat a fost conceput exclusiv pentru utilizarea în locuinţe unifamiliale.
Întreţinere şi curăţare RO Întreruperea alimentării cu apă şi curent electric • Închideţi robinetul de apă după fiecare spălare. Se limitează astfel uzura instalaţiei hidraulice a maşinii de spălat şi se elimină pericolul scurgerilor. • Scoateţi stecherul din priza de curent atunci când curăţaţi maşina de spălat şi când se efectuează lucrări de întreţinere. Curăţarea maşinii de spălat • Partea externă şi părţile din cauciuc pot fi curăţate cu o lavetă înmuiată în apă călduţă şi săpun.
Anomalii şi remedii Se poate întâmpla ca maşina de spălat să nu funcţioneze. Înainte de a apela serviciul de Service (a se vedea Asistenţă”), verificaţi dacă nu este vorba de o problemă uşor de rezolvat: Anomalii: Cauze posibile / Rezolvare: Maşina de spălat nu porneşte. • Stecherul nu este introdus în priza de curent, sau nu face contact. • Aveţi o pană de curent la domiciliu. Ciclul de spălare nu porneşte. • • • • • Uşa nu este bine închisă. Tasta ON/OFF nu a fost apăsată.
Asistenţă 195091172.03 07/2011 - Xerox Fabriano RO Înainte de a lua legătura cu Service-ul: • Verificaţi dacă puteţi rezolva singuri problema (a se vedea “Anomalii şi remedii”); • Porniţi din nou programul pentru a controla dacă inconvenientul a fost eliminat; • În caz negativ, luaţi legătura cu asistenţa tehnică autorizată la numărul telefonic indicat pe certificatul de garanţie. ! Nu apelaţi niciodată la persoane neautorizate. Comunicaţi: • tipul de anomalie; • modelul maşinii (Mod.