
Installation Instructions


Indyme Solutions, Inc.⬧ 8295 Aero Place ⬧ San Diego, CA 92123 USA +1.858.268.0717 ⬧ +1.800.829.6141 Page 4 of 6
Technical Document
430773-01
Rev. 5
Installation
The CB966 help button uses two 2/3A 3-volt lithium batteries. Always use the same type of battery for
optimum performance. DO NOT use rechargeable batteries in the help button. To replace the battery,
remove the help button from its mounting location, remove the old batteries from the battery holder,
and install the new lithium batteries. The help button does not lose the programmed characteristics
when the batteries are removed.
Location Considerations
Help buttons are typically located in areas where customers require assistance and service counters.
Stores and installers should be aware of the Americans with Disabilities Act (ADA) requirements for
accessibility.
Help buttons use a low powered transmitter, and operate best with a clear line of sight to the nearest
access point. Tall shelving, merchandise and metal signs can block or reduce the help button signals.
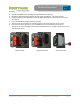
Help Button Assembly
The help button can be disassembled using a small Phillips screwdriver. Find the access holes on the
outside of the unit, insert the tool and remove two (2) screws, pull the front cover away and down from
the sign blade until the cover pops off. The electronics module and other side will remain in place.
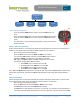
Install the Help button
1. Verify help button placement with the Store Manager and according to provided instructions.
Determine the best mounting method before installing the help button, verify address programming.
• Gondola end cap
• Gondola Shelf
• Wall Mount
2. The CB966 MUST be installed on a sign blade for all installations.
3. Indyme offers several different mounting kits for the CB966 Help Button, each of these includes specific
instructions for the included hardware.