Full HD Portable Visual Presenter Manual **Before operating this unit, please read these instructions completely**
Dear User, Thank you for buying our company’s portable presenter. To make you safely use this product and play its maximum role, please read these instructions completely before installation and use.
CONTENTS 1. Overview........................................................................................................................3 Features ......................................................................................................................3 2. Safety information ........................................................................................................5 3. Setting Up...................................................................................................
1. Overview The full HD portable visual presenter provides utility functions such as real-time projection, high-resolution photograph, full HD audio recording, computer dynamic image acquisition, external signal switching, multiplexed output, standby straight-in, and mass storage, etc. It can meet the demands of classroom teaching, extracurricular training, business meetings, document scanning, and scene recording, etc.
1080P audio video recording. The photographing adopts high-quality JPEG format, and the video recording uses the advanced H264 coding technology, which is featured with high-quality recording file and small storage capacity. With SD card slot, support 32G SD card, mass photo shoots and long HD video recording. The system uses independent photographing engine to guarantee 5 mega-pixel photographing even if the output resolution of the projection is XGA.
2. Safety information In use, the strength should be proper and even; upon adjusting all parts, it requires two hands. One is for holding it steadily, and the other is for waving, not too excessively, in order to avoid damaging the equipment. Please use the correct power — according to the description of operation instruction and marks on the product, the product power line is inserted into the proper power supply. The non-professional personnel are forbidden to dissemble the equipment.
3. Setting Up 3.1 Unpack Please check whether the following objects are in the carton. *Remote control, power adapter, CD Content might be different in different regions. *Remote control is equipped with battery. 3.
3.3 Folding The two body parts of the equipment are composed of any crooked gooseneck. When it is not used for long time, the equipment can be folded to reduce the space. For next time using, restore the use stage. 3.4 Fixation The equipment base has four M4 standard VESA installation screw hole with 75mm*75mm spacing. Warning: Upon fixing and installing, please firstly ensure whether the length of M4 screw, in order to screw in deeply to cause the damage of internal electric circuit.
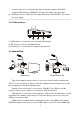
3.5 Interface 1 - LED light-compensating lamp. 2 - Camera. 3 - Infrared receiving window. 4 - MIC. 5 - Indicator light. 3.5.1 Rear interface This series of portable presenters is divided into HDMI model and double VGA model, and there are differences between the two in the rear interface. HDMI model Double VGA model DC5V:mains input, AC Adapter. VGA IN:external VGA signal output, connect to computer host or laptop.
computer state. If it is switched to the state of external computer, VGA OUT outputted VGA IN image, HDMI OUT still keeps the image of the presenter. Distributor circuit is installed inside double VGA model, and VGA OUT 1/2 outputs the same signal. 3.5.2 Side interface (1) USB interface: connected to the computer USB interface. (2) SD card slot: insert the standard SD card. (3) Security Slot: connected to the computer anti-theft lock. 3.
(user prepare by yourself) to connect the presenter and display devices, which can output high-definition images. If using the functions of photos and video, you must install the SD card. 3.7 Power-on 1. Insert power adapter into outlet. 2. In the case that the outlet has electricity, the equipment indicator light shows red, at which time, the equipment is in the standby state with low power consumption. Prompt: The standby power consumption is less than 0.5W.
3.8.2 Adjusting output resolution Press to view the resolution in [resolution] on display menu bar; if it is not the expected, please select the following operation: 1. Press menu key on the panel, the menu setting appears in the left of the display screen. 2. Press up and down key on the panel, move to the submenu [resolution]. 3. Press left and right key on the panel, move select box to the resolution you set, and press enter key. 4.
4. Operating 4.
4.2 Remote control panel 4.3 Turning on and off (Standby) Starting: press the key panel or power key of remote control to start, the indicator light is green, and the secondary light source will automatically start.
conduct signal straight-in between VGA IN and VGA OUT; under the condition that the system does not be started, the user can still access to the signal in VGA IN to project onto the display device on the VGA OUT. 4.5 Secondary light Press the light button to open and close, and this function is only effective under the condition that the equipment is on.
+ is operated to conduct MF. 4.8 Brightness control There are ways to perform brightness control in the following: Press and on the key panel to conduct the brightness operation. Press and on the remote control to operate brightness. Open setting menu, adjust the item “brightness” in submenu. 4.9 Image Freeze Press the key image freeze, and in the state of image freeze, press or to conduct image freeze.
4.11 One-key skip/Set preset point One-key skip: repeatedly press key to make the image to make the image achieve skip in the set preset point and the place of the last zoom operation. Set preset point: long press key, the system will store the current zoom place as the preset point. The one-key skip later will be achieved in the set preset point and the place of the last zoom operation.
In the process of recording, please don’t cut off power and pull and insert SD card. The equipment cannot realize the direct scanning and playback of photos and record files; if scanning and playback, please consult 4.13 one-key online. 4.13 One-key online When using one-key online, please ensure: The computer is connected with the equipment by USB cable. The equipment is installed with SD card.
Note: When 1080P display outputs, due to the restrictions of the system functions, USB camera cannot output the images with full width 2592*1944. If the following products or parts change have the above restrictions, the further notice will not be made. 4.15 High speed display The system might provide 1080P high-speed collection mode with 30 frame every second. If it needs to be set, open the setting menu, select “high speed” in the submenu “input mode”; this function will be valid after restarting.
4.17 Factory reset There are several ways to implement the operation of factory reset. Press + , and then popup enter dialog, select “enter” and then the restarting is valid. Entering the menu setting, move submenu to “factory reset setting”, select “reset”, the system will popup enter dialog, select “enter” and then the restarting is valid 4.18 Menu Setup Press to enter the menu to set, move through , press the implement selected operation.
5. Troubleshooting Problem What to do System cannot work normally Please ensure the power line has been completely inserted into the outlet with normal electricity. The black screen is Whether to use the right power adapter Whether the display screen is connected with power to work displayed normally. Whether the display screen cable is accurately connected with the output terminal.
relative small Check the menu items, and change output mode to precision mode The display screen is beyond the display Implement the factory reset setting, please see 3.8.2.
6. Replacing the remote control battery Warning: If the battery is not properly changed, it might cause the danger of explosion. Please use two button cells of AG10 1.5V. 1. Place remote control facing downwards on the surface. 2. Use fingers to hold the retaining ring towards inside and press it. Slide to open battery tank. Please see the diagram on the back of remote control. 3.
7. Technical information Sensor pixels Frame rate Zoom Focusing Intake area Hardware architecture Equipment structure VGA output Photo output Recording output USB output Photo format Recording format Image adjustment Image effects OSD Auxiliary lighting Standby straight-in Standby wakeup One-key jumping One-key digital interconnection Firmware update Logo replacement VGA interface input VGA interface output HDMI USB2.