
Owner manual


ISP-074-576-P1D 65
6. Enter the span gas concentration if the concentration displayed on the
2020ppbPRO is different than the concentration of the span gas cylinder.
Press the “New” key and follow the display prompts. For further information,
see page 45 for numeric value, duration, time, and date entry. If the span
concentration matches the span gas cylinder concentration, press the “Next”
key.
7. Connect the span gas to the 2020ppbPRO tube holder inlet. The
2020ppbPRO will take 60-90 seconds to set the span set point. When
finished with the calibration, the 2020ppbPRO will display “Calibration
complete”.
8. When the calibration procedure is finished, the display will show the lamp
condition assessment (i.e., GOOD, REPLACE SOON, BAD).
9. Replace the filter tube used during calibration with a fresh tube and the
instrument will be ready for sampling use.
NOTE: While the Cal status is active, all alarms are deactivated.
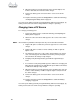
Preparing for Field Operation
Field Check List
When using the 2020ppbPRO for field operation, the following items should be
carried into the field to reduce or eliminate down time of the instrument.
If you are going to be in the field for a single 8-10 hour day, then you should include
the following accessories:
Table 3. Check List for Field Operation
Spare battery pack (Part No. MX700010 or MX700011)
Spare 10.6eV lamp (Part No. F1760150)
2020ppbPRO multi-tool (Part No. MX396012)
Water trap kit (Part No. A1790510)
Short sample probe (Part No. MX395001)
Calibration regulator (Part No. MX35006)
Tank(s) of calibration gas (Part No. MX350025)
Spare inlet filters (Part No. MX750100)
Carrying case (Part No. MX700260)
DC power cord (Part No. MX350004)
A1790500 Tube Holder
F1760162 Dräger Tube, Intake sample conditioner
Quick Reference Guide (M1760148)
If you will be in the field for more than one day, you should include the following
additional items:
Table 4. Additional Field Items