
User guide


7 - 4
PN 074-566-P1B
Composer Elite Operating Manual
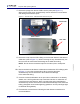
1 If not already removed, remove the plugs from the Acoustic Sensor’s two
VCR-2 service ports (see Figure 7-2). When removing the plugs,
simultaneously use two wrenches to avoid stress and damage
to the service ports.
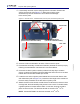
Figure 7-2 Acoustic sensor - inlet/outlet tubes, service ports, and helium injection ports
2 Connect a helium leak detector to either of the two service ports.
3 Evacuate the Secondary Containment Chamber (beneath the service port) by
following the leak detector manufacturer’s recommendations.
4 Connect the helium injection needle (included in the ship kit) to a helium
source. Immerse the needle in liquid and adjust the helium flow for a constant
bubble rate of at least two bubbles per second.
5 Locate the two helium injection ports farthest from the Acoustic Sensor inlet
and outlet tubes (refer to Figure 7-2). Insert the entire length of the needle into
the more easily accessible of the two helium injection ports.
6 Allow the helium to flow into the Acoustic Sensor for at least one minute. If there
is a large leak, the leak rate will quickly exceed 1x10
-9
cm
3
/s. For smaller leaks,
a gradual pressure increase will be visible. In this case, keep the needle in
place for three minutes. The leak rate should not exceed 1x10
-9
cm
3
/s.
NOTE: Contact INFICON if the leak rate exceeds 1x10
-9
cm
3
/s.
Helium Injection Ports
Outlet Tube
Inlet Tube
Service Ports
Helium Injection Ports
(farthest from inlet/outlet tubes)
(closest to inlet/outlet tubes)