USER GUIDE FOR INFINITIKLOUD MOBILE Contents Getting Started 2 Login 3 Connect to Storages 5 2.1 Connect InfinitiKloud Storage 5 2.2 Connect InfinitiKloud Wireless 10 Start Backup 15 Wifi Backup 17 Facebook Backup 24 Downloading Desktop Version 26 Air Transfer 29 Files 34 8.1 Files Vault 37 8.2 Hide Files 38 Emergency Documents 40 Settings 42 11.1 User Profile 43 11.2 Languages 44 11.3 Password Protection 45 11.4 Feedback 48 11.
InfinitiKloud User Guide Getting Started If you wish to back up your mobile phone/tablet personal data, we have created the InfinitiKloud app. There are 2 ways to download the app. For Android: ● Download it from this link: https://play.google.com/store/apps/details?id=com.infinitikloudmobile ● Open the Google Play Store and search “InfinitiKloud”, then download the app. For iOS: ● Download it from this link: https://apps.apple.
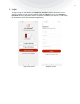
1. Login To begin using the InfinitiKloud, click Make an account located at the bottom of the screen to register a new account. Another option to register is to use your Google or Facebook account.
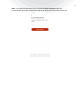
Note: If you forgot the password, you can choose Forgot Password under the password field. Input your email account and the reset password link will be sent to you.
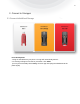
2. Connect to Storages 2.1 Connect InfinitiKloud Storage For Android phone: 1. Plug the InfinitiKloud to your phone. The app will automatically detect it. 2. A message will appear and ask for permission. Click Allow.
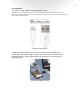
System pop-up after plugging in 3. The app will display some instructions. You can click OK to read through, or choose Skip.
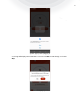
4. The app will show the BROWSE FILES IN OTHER APPS screen. Choose the Settings icon to show all memory sticks inside your phone. Instruction screens 5. Select the name of the flash storage currently plugged into your phone. In the image below, it is named IK.
6.
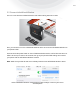
For iOS phone: 1. Prepare a charger adaptor and a lightning data cable. (Be advised that some cheap cables are for charging only and cannot transfer data. To check, connect the phone to a computer using the cable. If the phone can be detected, then the cable can transfer data) Lighting sample picture 2. Plug the charger adaptor into an outlet, then connect the male USB side of InfinitiKloud in the charger adaptor. Finally, connect the cable to the other end of InfinitiKloud Charge.
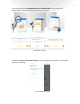
2.2 Connect InfinitiKloud Wireless There is a new wireless InfinitiKloud device that makes storing data even easier! First, you need to turn on the InfinitiKloud Wireless device and connect InfinitiKloud Wireless to your phone’s WiFi. Press and hold the power button on the InfinitiKloud Wireless device until its blue LED turns on. Allow it to start up for around 15 seconds, then go to your phone’s WiFi settings and connect your phone with the InfinitiKloud Wireless network.
Open the InfinitiKloud application, then choose Wifi storage in the dropdown list.
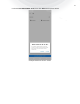
Note: If the IK application does not show the SD card capacity, plug in the SD card again. Wifi Storage connected with App IK Wireless Storage Settings: This is where you control the settings for the InfinitiKloud Wireless device, which includes Connect to internet, Configure Wifi password, and Change Wifi name.
More Settings in 3 dots section Configure to connect external Wifi
The InfinitiKloud Wireless backs up data in a similar way to other InfinitiKloud products. All data is stored inside the InfinitiKloud Wireless device on an SD card. Click Start Backup to begin the data transfer.
Files on the home Wifi Storage screen is where you will manage this data. Files screen in IK Wireless mode 3. Start Backup If you wish to back up all of your files to the InfinitiKloud, simply press Start Backup in the home screen.
Click Start backup and InfinitiKloud will immediately start backing up your files. This may take a couple of minutes, depending on the amount and size of your files.
Perform backing up files screen 4. Wifi Backup When you have multiple devices signed in with your account, and they are using the same network, you can back up data between them, wirelessly. ● ● To receive backup, connect your phone to an IK storage and hit Receive. To send backup, hit Send, select a receiving device and hit Backup. This feature will give a new way to send/receive files from other devices through the InfinitiKloud application. On the home screen, choose Wifi Backup.
Home screen Wifi send or receive screen Wifi devices list screen
Send to Other Device: Click Backup, then choose the file types. Make sure that the other device is using Infinitikloud app, the same email account, the same network wifi, and that you have already started Receive from other devices by clicking on Receive under it (see the picture above). Now, you can start to send your phone data to the selected device.
Wifi perform backing up screen
If you want to restore items from another device, scan for nearest devices and select the phone, then choose Restore. Wifi backup selecting device screen Restore Wifi screen Note: In the restore screen, you can only Save or view Detail of items.
Receive from Other Device: Select Receive, then wait for another phone to send files (lock back on Send to Other Device). Once it is done, all received files can show up in Files area.
Files screen after received
5. Facebook Backup On the home screen, go to Facebook Backup. Sign in with your account or use the current Facebook login. Select Timeline Photos or Video, then choose Back up.
Facebook backup screen
6. Downloading Desktop Version If you want to have the latest InfinitiKloud desktop version on your computer the next time you plug it in, simply connect InfinitiKloud to your mobile phone (please review the “Connect InfinitiKloud Storage” session). Then choose Download InfinitiKloud in the home screen.
Click Download InfinitiKloud for Windows or macOS to get the latest desktop version from the internet.
If you do not know how to use InfinitiKloud on desktop, click on “How to Use InfintiKloud” and follow the instructions.
7. Air Transfer This is a great feature that provides a way to communicate data from phone to phone for iOS and Android devices. On the home screen, choose Air Transfer.
Send data: Select Send. Scan the nearest phone, then touch on + icon to add files that you want to transfer.
Air transfer selection files screen
Press Send to begin the transfer, or you can update, remove and add more files.
Receive data: On the main air transfer screen, choose Receive, then select your place (Select Folder to save) to store the files (it can be internal storage, SD card or external storage).
Completed air transfer received screen 8. Files To view the backed up files, click Files in the menu bar. They will appear in the same folders and formats as they do on your device. You may look through your folders manually or use the search tool to find specific files. From there, you can view, export, and delete files. Keep in mind that deleting a file from the InfinitiKloud will not delete the file from your device. You can back up your data as much as you want.
Home screen Files screen with small icon Files screen
Another way to filter images or videos is by choosing Photos or Video in the header, then you can view all the backed up files as your selection. Touch on the 3 dots icon to enable the function menu bar. Hold your touch on a single item to enable multiple selection.
8.1 Files Vault This feature provides you with the best way to secure your files. On Home screen, go to Files and select one photo or file. Open Settings icon or hold click on it, then choose Encrypt. The encrypted file will display as an icon with key lock. If you want to unlock it, just select again and choose to decrypt. Note: Only the same email account can decrypt after being encrypted. The encrypted files cannot be read by other applications except for InfinitiKloud.
8.2 Hide Files This feature will make your files more private, rather than always appearing on the application. In Files area, select some item(s) and choose Settings in menu bar to show the list of functions, then click on Hide. Hide function in functions lift of Files area Once complete, the chosen file(s) will be hidden on the normal screen view in Files. You cannot search or find the file(s) in the list.
If you want to unhide your file(s), go to Settings in Home screen and choose Hidden files. Settings screen Hidden files in Settings screen Here, you can perform any actions as normal such as: delete, preview, share… Note: If you delete a folder in Hidden files, all files including visible and hidden will be removed from the InfinitiKloud storage.
9. Emergency Documents This feature helps you collect, store and recall critical documents for any emergency. Here's how you can store and access your Emergency Documents. ● ● ● ● ● On the home screen, choose Emergency in menu bar. Add a new person’s name whose information you wish to store. Click on this person’s name, then the documents type list will appear, and you can select the type of document you wish to add. You can take a photo, or select from your album to add into the document.
Emergency Document types screen Document Category screen Emergency Document files screen
10.
11.1 User Profile In Home screen, go to Settings and click on the email account area to edit. Choose Personal Information. Here, you can change password, edit first/last name. If you wish to update the avatar, click on this icon and choose to take a new picture or choose an old one from your gallery.
11.2 Languages To change the language, click Language inside Settings (in Home screen) and select your desired language. InfinitiKloud is available in English, German, French, Portuguese, Brazilian Portuguese, Spanish, Italian, Chinese, Japanese, Korean, Dutch, Danish, Norwegian, Finnish, Swedish, and Vietnamese.
11.3 Password Protection Password protection gives you the ability to lock your data inside the InfinitiKloud storage. The app will ask for a password before it shows any data. Set password (passcode): To set a password for added security, go to Settings and click Configure password. Switch Turn on password to the right to activate. Enter your chosen 4 to 6 digit password, then click Done. Re-enter the password to confirm. Once completed, the password will be required to access the InfinitiKloud app.
Input password (passcode) to Open the InfinitiKloud App: Click the InfinitiKloud icon. The password screen will prompt you to Enter Your password, then click Enter once done.
Change password (passcode): To change your password, go to Settings and click Configure password. Choose Change Password then enter the old password and click Done. Enter a new password of your choosing and click Done to complete. Password screen Password input screen Remove password (passcode): If you wish to remove password security, go to Settings and click Configure password. Switch Turn password off to the left to deactivate. Enter your old password and click Done.
11.4 Feedback Here is the place to send us your concerns, comments, and suggestions. Go to Settings and choose Feedback to send.
11.5 How to connect InfinitiKloud storage If you have any problems connecting to InfinitiKloud, take a look at this area. It is visible in Settings. How to connect screen 11.7 Support Use the information here to contact us if you have any questions or concerns about our products.