LCD PROJECTOR USER'S GUIDE
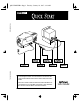
fold and tear here fold and tear here QK-START.FRA Page 1 Tuesday, January 28, 1997 9:18 AM Connecting the LitePro is summarized on the back of this card and described in detail in the LitePro 560/570 User’s Guide. R The User’s Guide contains instructions and illustrations for connections to all compatible computers. It also describes the remote control buttons and menu functions.
QK-START.FRA Page 2 Tuesday, January 28, 1997 9:18 AM 1 You must install the projection bulbs the first time you use the LitePro. 8 Refer to the “Read Me First” card or page 40 of the User’s Guide for instructions. 2 Place the LitePro on a flat surface within six feet of your power source and your computer. 3 4 5 Remove the lens cover. 6 Plug the “LCD” end of the LitePro cable into the “COMPUTER” connector on the side of the LitePro. Plug in the LitePro’s power cord.
COPY-FCC.FRA Page 1 Tuesday, January 28, 1997 9:27 AM Copyright © 1995 by In Focus Systems, Inc. Wilsonville, Oregon. All rights reserved.
COPY-FCC.FRA Page 2 Tuesday, January 28, 1997 9:27 AM Certifications UL 1950, CSA 950, EN 55022, EN 50082-1, EN 60950 FCC Warning This equipment has been tested and found to comply with the limits for a Class A digital device, pursuant to Part 15 of the FCC Rules. These limits are designed to provide reasonable protection against harmful interference when the equipment is operated in a commercial environment.
COPY-FCC.FRA Page 3 Tuesday, January 28, 1997 9:27 AM Declaration of Conformity We, In Focus Systems, Inc., 27700B SW Parkway Ave. Wilsonville, Oregon 97070 USA, declare under our sole responsibility that the: LitePro 560 and LitePro 560LS LCD projector LitePro 570 and LitePro 570LS LCD projector to which this declaration relates, are in conformity with the following standards: EN 55022. . . . . . . . . . . . . . . . . . .Information Technology Equipment Emission Standard EN 50082-1 . . . . . . . . . . . .
0060-05.
SAFETY.FRA Page iii Tuesday, January 28, 1997 9:29 AM Safety Summary Please read these instructions before using your LitePro projector. Failure to comply with these instructions could result in fire, electrical shock, personal injury or equipment damage. These graphics are used throughout this manual to draw your attention to important information about the LitePro: Information that may be unusual or unexpected. Information that helps you avoid damage to your equipment.
SAFETY.FRA Page iv Tuesday, January 28, 1997 9:29 AM Safety Summary have not been safety-tested with the LitePro. Never use a power cord if it has become damaged or frayed. Contact your In Focus dealer or call In Focus if you need to replace your LitePro power cord. Grounding The LitePro is grounded through the grounding conductor on the power cord. To avoid electric shock, plug the power cord into a properly wired receptacle. Do not defeat the purpose of the grounding-type plug.
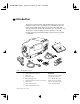
INTRO.FRA Page 1 Tuesday, January 28, 1997 9:30 AM Introduction The In Focus Systems LitePro 560 and 570 LCD projectors provide 640x480 resolution with compatibility up to 800x600. The LitePro’s active matrix liquid crystal display (LCD) is based on Thin Film Transistor (TFT™) technology. It can display up to 16.7 million colors. The LitePro is ideal for high-performance business, CAD and imaging applications that demand high resolution and exceptional color quality. Figure 1. Shipping Box Contents 1. 2.
INTRO.FRA Page 2 Tuesday, January 28, 1997 9:30 AM Introduction Compatibility The LitePro is compatible with a wide variety of computers: • IBM PC and compatibles, including laptop computers: in VGA graphics mode at all screen refresh rates; in SVGA and VESA up to 800x600 resolution at 56Hz and 60Hz refresh rates. • IBM PS/2 in VGA and MCGA modes.
INTRO.FRA Page 3 Tuesday, January 28, 1997 9:30 AM Introduction Remote Control Programmer Kit The Remote Control Programmer Kit that was shipped with your LitePro allows you to program the LitePro’s remote control to perform up to four different operations on your computer. Refer to the Remote Control Programmer User’s Guide for more information. Usage Guidelines • Do not look directly into the projection lens when the LitePro is turned on! The bright light may harm your eyes.
CONNECT.FRA Page 5 Tuesday, January 28, 1997 9:53 AM Setting Up the LitePro This chapter describes how to position the LitePro projector for optimum viewing and how to connect it to your equipment. 1. If you are setting up the LitePro for the first time, you’ll need to install the two projection lamps that were shipped with it. Refer to ”Replacing the Projection Lamps” on page 40 for instructions. 2. Place the projector on a flat surface.
CONNECT.FRA Page 6 Tuesday, January 28, 1997 9:53 AM Setting Up the LitePro • If you are installing the projector on the ceiling, refer to the Ceiling Mount Installation Guide for recommendations. (The Ceiling Mount Kit is sold separately; refer to ”Accessories” on page 53 for order information.) 3. Remove the lens cover. 4. Plug the power cord into the LitePro, then plug it into your electrical outlet. (A surge-protected power strip is recommended if power surges are common in your area.) 5.
CONNECT.FRA Page 7 Tuesday, January 28, 1997 9:53 AM Setting Up the LitePro 8. Connect the LitePro cable to the monitor connector on your computer according to the instructions below. Follow the instructions that apply to your computer. The resolution of the LitePro’s image is 640x480. Images between 640x480 and 800x600 resolution are displayable, but will be compressed. Images above 800x600 are not displayable.
CONNECT.FRA Page 8 Tuesday, January 28, 1997 9:53 AM Setting Up the LitePro • If you have a Macintosh desktop computer with a separate monitor, attach one of the Mac adapters to the “VGA” end of the LitePro cable. Then plug the Mac adapter into the monitor connector on the computer. If you want to display your presentation on your monitor as well as on the projection screen, attach the “Monitor” end of the LitePro cable to the other Mac adapter.
CONNECT.FRA Page 9 Tuesday, January 28, 1997 9:53 AM Setting Up the LitePro • If you have an IBM-compatible laptop computer, plug the “VGA” end of the LitePro cable into the external video connector on the computer as shown below. power switch “Monitor” end of LitePro cable “VGA” end of LitePro cable Figure 6. Connecting an IBM-compatible laptop computer The LitePro connects to a laptop computer through the computer ’s external monitor port.
CONNECT.FRA Page 10 Tuesday, January 28, 1997 9:53 AM Setting Up the LitePro • If you have an Apple PowerBook computer, you’ll need the video-out cable that came with your PowerBook and one of the Mac adapters that came with the LitePro. Connect the video-out cable to the video-out port on the back of the PowerBook. Connect the Mac adapter to the video-out cable. Connect the LitePro cable to the Mac adapter as shown below.
CONNECT.FRA Page 11 Tuesday, January 28, 1997 9:53 AM Setting Up the LitePro 10. If you have a LitePro 570, you can connect it to your computer ’s sound board. Use the LitePro’s audio/video cable to connect the left and right channels of your sound board to the left and right connectors on your LitePro. (Be sure to plug the audio cable into the same SOURCE area that your computer is plugged into.
CONNECT.FRA Page 12 Tuesday, January 28, 1997 9:53 AM Setting Up the LitePro • If your video player provides an S-Video signal, its video-out connector is a slightly larger, round, four-pin S-Video jack. You cannot use the audio/video cable that came with the LitePro; you will need to obtain an S-Video cable. Plug your SVideo cable into the S-Video connectors in the “SOURCE 3” or “SOURCE 4” areas on the connector panel as shown below.
CONNECT.FRA Page 13 Tuesday, January 28, 1997 9:53 AM Setting Up the LitePro 12. If you have a LitePro 570, you can connect the it to an audio source. Plug the red and white connectors on the LitePro’s audio/video cable into the corresponding audio connectors on your video player. Plug the other red and white connectors into the corresponding “SOURCE 3” or “SOURCE 4” audio connectors on the LitePro as shown below. Figure 10.
CONNECT.FRA Page 14 Tuesday, January 28, 1997 9:53 AM Setting Up the LitePro 13. If you have a LitePro 570, you can connect it to an externally amplified speaker system. Plug your audio cable into the “Audio Out” connectors on the LitePro. You must use an amplified external speaker with the LitePro. A non-amplified (passive) speaker will not work. Figure 11.
CONNECT.FRA Page 15 Tuesday, January 28, 1997 9:53 AM Setting Up the LitePro 14. If you have a LitePro 570, you can connect it to a microphone. Insert the microphone cable into the 3-prong XLR microphone jack on the LitePro. Always keep the source volume at its lowest level when installing the microphone. For setting the microphone level, refer to”Volume and Audio Lock” on page 36. Figure 12. Connecting a microphone 15. Turn on your monitor. 16.
CONNECT.FRA Page 16 Tuesday, January 28, 1997 9:53 AM Setting Up the LitePro 17. Turn on the projector by pressing the “|” side of the power switch on the side of the projector. • While the projector is on, you can switch the projection lamp off by pressing the standby button on the remote. • After about 5 seconds, the projector test pattern appears. (If it does not, refer to ”Troubleshooting” on page 47.
USING.FRA Page 17 Tuesday, January 28, 1997 9:55 AM Using the LitePro This section describes how to use and make adjustments to the LitePro 560/570. It also provides a reference to the remote control buttons and the menu commands. Basic Image Adjustment • If the image is not completely displayed, adjust the height of the LitePro (page 18) or use the arrow buttons to center the image (page 21). • If the image is out of focus, rotate the lens to focus it (page 18).
USING.FRA Page 18 Tuesday, January 28, 1997 9:55 AM Using the LitePro Focusing the Image To focus the image, rotate the projection lens until the image is clear. Rotate the lens clockwise for a longer focusing distance. Rotate it counterclockwise for a shorter focusing distance. Adjusting the Height Your LitePro is equipped with a self-locking, quick-release elevator foot. If the projected image seems wider at the bottom than at the top, extend the elevator foot until the distortion is corrected.
USING.FRA Page 19 Tuesday, January 28, 1997 9:55 AM Using the LitePro Switching to the Spare Lamp The LitePro was shipped with two projection lamps. To avoid breaking during shipping, they are not installed at the factory. You must install them before you can use the LitePro. Refer to the “Read Me First” document that was shipped with your LitePro for instructions. “Replacing the Projection Lamps” on page 40 also describes this procedure.
USING.FRA Page 20 Tuesday, January 28, 1997 9:55 AM Using the LitePro Using the Remote Control Buttons Figure 14. Remote Control Buttons menu Pressing menu accesses the LitePro’s on-screen menus. There are three menus: Menu 1, Menu 2 and the Audio Menu. Menu 1 always displays first. Refer to “Using the Menus” on page 24 for more information about the menus. When a menu is displayed, pressing menu again removes it from the screen. When you remove a menu, the LitePro saves any changes you made.
USING.FRA Page 21 Tuesday, January 28, 1997 9:55 AM Using the LitePro arrow buttons The operations of the arrow buttons depend on what is displayed. When a menu is displayed, the left and right arrow buttons move the highlight bar to select a menu function. The up and down arrow buttons adjust or change the value of the highlighted function. The arrow buttons are auto-repeating; they repeat their function as long as you hold down the button.
USING.FRA Page 22 Tuesday, January 28, 1997 9:55 AM Using the LitePro prev LP 560LS & LP 570LS: When a LiteShow presentation is displayed, press the prev button to go back to the previous slide in your presentation. Refer to the LiteShow User’s Guide for information. mute LP 570 & LP570LS: Pressing mute enables and disables both the external and internal audio functions. mic LP 570 & LP 570LS: Pressing mic enables and disables the microphone.
USING.FRA Page 23 Tuesday, January 28, 1997 9:55 AM Using the LitePro prog The prog button is programmable. You can program it to perform any one of these functions. • Clear Black • RS-232 • Clear White • Sync • LS (LiteShow) Grab • Palette • Mic • Mute • Loudness • Text Mode Refer to “Prog Button” on page 32 for descriptions of these operations and instructions on how to program the button. standby The standby button switches the projection lamp off. Press any button to turn it back on.
USING.FRA Page 24 Tuesday, January 28, 1997 9:55 AM Using the LitePro Using the Menus The LitePro has three menus: Menu 1, Menu 2, and the Audio Menu. Menu 1 Menu 1 allows you to adjust the brightness, tint, synchronization (sync), and display positioning. Each of the these menu settings is described in “Menu 1 Functions” starting on page 26. To display Menu 1: • Press the menu button on the remote. Figure 15.
USING.FRA Page 25 Tuesday, January 28, 1997 9:55 AM Using the LitePro Figure 16. Menu 2 The Audio Menu LP 570 & LP 570LS: The Audio Menu contains controls for the LitePro 570’s audio functions. Each of these is described later in this manual in “Audio Menu Functions” starting on page 36. To display the Audio Menu: 1. Press the menu button on the remote to display Menu 1. 2. Press the left or right arrow buttons until “Audio” is highlighted. 3. Press select/enter. Figure 17.
USING.FRA Page 26 Tuesday, January 28, 1997 9:55 AM Using the LitePro • In Menu 2 and the Audio Menu, you can also use select/enter to select/de-select a function or to increase the value of a function. Removing the Menu from the Screen Press the menu button to remove the menu from the screen. Resetting Menu Functions to the Default Settings To reset all menu settings to their factory default values, select Reset from Menu 2. Refer to page 30 for more information about Reset.
USING.FRA Page 27 Tuesday, January 28, 1997 9:55 AM Using the LitePro Sync The LitePro adjusts signal synchronization automatically for most computers. But if the projected computer image looks fuzzy, streaked or noisy, try adjusting the sync from this menu. To adjust the Sync: 1. Press the menu button to display Menu 1. 2. Use the right or left arrow buttons to highlight “Sync”. 3. Press the up or down arrow buttons to adjust the Sync.
USING.FRA Page 28 Tuesday, January 28, 1997 9:55 AM Using the LitePro Menu 2 Functions Rear Projection When you select Rear Projection, the LitePro reverses the image so you can project from behind the screen as shown here. To enable or disable to rear projection mode: 1. Press the menu button to display Menu 1. 2. Use the right or left arrow buttons to highlight “Menu 2”. 3. Press select/enter to display Menu 2. 4. Use the right or left arrow buttons to highlight “Rear Projection”. 5.
USING.FRA Page 29 Tuesday, January 28, 1997 9:55 AM Using the LitePro Test Pattern If the test pattern is turned on, it displays when the LitePro is first powered on and also when no computers or video players are connected to the LitePro. If the test pattern is turned off, it displays only when the LitePro is first powered on. As long as the test pattern is turned off, the only way to display it is to unplug the power supply cord, then plug it back in again.
USING.FRA Page 30 Tuesday, January 28, 1997 9:55 AM Using the LitePro To enable Auto Standby: 1. Press the menu button to display Menu 1. 2. Use the right or left arrow buttons to highlight “Menu 2”. 3. Press select/enter to display Menu 2. 4. Use the right or left arrow buttons to highlight “Auto Standby”. 5. Press select/enter to cycle through the settings. Reset The Reset function changes all the menu function settings back to the factory default states.
USING.FRA Page 31 Tuesday, January 28, 1997 9:55 AM Using the LitePro Source Enable When you have more than one source (computer or video player) connected to the LitePro, you switch between them by pressing the select/enter button on the remote. If you have a source connected that you don’t want to display, use the Source Enable function to disable that source. That source will then be skipped when you press select/ enter. If you disable a source, you will not be able to display it.
USING.FRA Page 32 Tuesday, January 28, 1997 9:55 AM Using the LitePro Prog Button Use the Prog Button function to assign an operation to the remote’s prog button. You can assign any one of these functions. • Clear Black and Clear White make the entire screen black or white, respectively. Press any key to return to your image.) • LP 560LS & LP 570LS: LS Grab captures the current image and saves it on your LiteShow disk. Refer to your LiteShow User’s Guide for more information.
USING.FRA Page 33 Tuesday, January 28, 1997 9:55 AM Using the LitePro Language The Language function changes the language in which the LitePro menus are displayed. You can choose from English, French, German, Spanish or Italian. The default is English. To change the language of the menus: 1. Press the menu button to display Menu 1. 2. Use the right or left arrow buttons to highlight “Menu 2” 3. Press select/enter to display Menu 2. 4. Use the right or left arrow buttons to highlight “Language”. 5.
USING.FRA Page 34 Tuesday, January 28, 1997 9:55 AM Using the LitePro Text Mode and Pixel Slice Some IBM-compatible computer display modes generate a 720 pixelwide image which extends beyond the LitePro’s 640 pixel-wide image area. For most computers, the LitePro automatically enables Text Mode, compressing the display to fit. But if you are displaying text that appears to be truncated on the right side, you may need to manually enable Text Mode.
USING.FRA Page 35 Tuesday, January 28, 1997 9:55 AM Using the LitePro To change the video type setting: 1. Press the menu button to display Menu 1. 2. Use the right or left arrow buttons to highlight “Menu 2”. 3. Press select/enter to display Menu 2. 4. Use the right or left arrow buttons to highlight “Video Type”. 5. Press select/enter until the type you want is displayed. Comp. Compress is only functional for PAL video displays.
USING.FRA Page 36 Tuesday, January 28, 1997 9:55 AM Using the LitePro Audio Menu Functions The Audio Menu is available on LP 570 & LP 570LS only. Volume and Audio Lock You can adjust the volume either with the volume button on the remote or from the Audio Menu. If you want to adjust the volume for all sources and the microphone at one time, it is probably easier to use the Audio Menu. (To adjust the volume using the remote, see “volume” on page 22.) To adjust the volume from the Audio Menu: 1.
USING.FRA Page 37 Tuesday, January 28, 1997 9:55 AM Using the LitePro Bass The Bass function adjusts the lower frequencies of your audio source. To adjust the bass for the selected audio source: 1. Press the menu button to display Menu 1. 2. Use the right or left arrow buttons to highlight “Audio”. 3. Press select/enter to display the Audio Menu. 4. Use the right or left arrow buttons to highlight “Bass”. 5. Press the up arrow button to increase the bass. Press the down arrow button to decrease the bass.
USING.FRA Page 38 Tuesday, January 28, 1997 9:55 AM Using the LitePro 6. If you want to adjust the internal-to-external speaker fade, press the right arrow button to highlight the “I/E” bar. Then use the up and/or down arrow buttons to adjust the fade. Loudness Enabling Loudness adjusts the audio quality by enhancing the bass portion of the sound. To enable or disable Loudness for the selected audio source: 1. Press the menu button to display Menu 1. 2.
MAINT.FRA Page 39 Tuesday, January 28, 1997 9:57 AM Maintenance This section describes how to: • clean the lens, • replace the projection lamps, • replace the batteries in the remote control, and • replace the fuse. Do not open the LitePro case! Opening the case will expose you to electric shock hazard! Except for the projection lamps, there are no user-serviceable parts inside! If you are having problems with your LitePro, refer to “Troubleshooting” on page 47 of this User’s Guide.
MAINT.FRA Page 40 Tuesday, January 28, 1997 9:57 AM Maintenance Replacing the Projection Lamps When a lamp fails, be sure to replace it with another EVD lamp (36 volt, 400 watt). These lamps provide the best performance and longest lamp life. You can order replacement lamps from In Focus. Refer to “Accessories” on page 53 for information. Follow these steps to replace the lamps. 1. Press the “Ο” side of the LitePro’s power switch. Then, allow the LitePro to cool thoroughly (at least 20 minutes).
MAINT.FRA Page 41 Tuesday, January 28, 1997 9:57 AM Maintenance Figure 18. Opening the Lamp Door WA RN LA ING PAR MP A N TS MA D ME YB T E H AL OT REC OM LAM ME P: A ND ED NSI-E LA V D VO GL RSIC MP - O 36V KAN ÜHBIR SRA 400 HT N N NE U MH W OC H H ND FL LX EIS ÄC 646 S S HE EIN 63 AT LA ME LAMP TEN TIO ETR TALL E ET N E E IQU LES NC ES OR P PIE E C EUVE CES HA UD NT ES ! Figure 19. Removing the Lamp 8. Without forcing it, insert the lamp all the way into the socket.
MAINT.FRA Page 42 Tuesday, January 28, 1997 9:57 AM Maintenance • Save the box. You may need it later to pack the lamps for shipping. 11. Close the lamp door. Never operate the LitePro with the lamp door open or removed. This disrupts the air flow, causing it to overheat. Bulb Guard Your LitePro is equipped with a lamp life detection system called Bulb Guard. When the operating lamp is near the end of its life or has become degraded, Bulb Guard causes the lamp to blink.
MAINT.FRA Page 43 Tuesday, January 28, 1997 9:57 AM Maintenance + - + Figure 21. Installing New Batteries Replacing the Fuse A power line surge or spike can blow the power supply fuse, causing the LitePro to stop working. If this happens, you’ll need to replace the fuse. Use only the specified power supply fuse. Using a different fuse may damage the LitePro. The correct fuse depends on the power line voltage in the country where you are operating the LitePro.
MAINT.FRA Page 44 Tuesday, January 28, 1997 9:57 AM Maintenance 4. Locate the fuse holder on the side of the LitePro between the power switch and the power cord connector as shown below. fuse Figure 22. Locating the Fuse 5. Using a small coin or a flat blade screwdriver, turn the fuse holder a quarter turn in the clockwise direction. 6. Pull the fuse holder out of the LitePro as shown in Figure 23. 7. Remove the blown fuse from the fuse holder. 8.
MAINT.FRA Page 45 Tuesday, January 28, 1997 9:57 AM Maintenance Figure 23. Removing the Fuse Holder Figure 24.
TROUBLE.FRA Page 47 Tuesday, January 28, 1997 9:59 AM Troubleshooting Do not open the LitePro case! Opening the case may cause electric shock! Except for the projection lamps, there are no userserviceable parts inside. If you are having problems with your LitePro, read through this section of this manual. Call In Focus Technical Support if necessary. They will refer you to an In Focus Authorized Service Provider.
TROUBLE.FRA Page 48 Tuesday, January 28, 1997 9:59 AM Troubleshooting If you call In Focus for assistance: • Display the menu (press the menu button on the remote). Write down the information that is displayed on the left side of the menu. (Refer to page 25 if you want to know more about these values.) • Find out what kind of graphics controller card is installed in your computer. (This is the circuit board inside your computer to which the LitePro is connected.
TROUBLE.FRA Page 49 Tuesday, January 28, 1997 9:59 AM Troubleshooting Problem: Image is not centered on the screen • Use the arrow buttons on the remote to center the image. (The menu must be off when you re-position the image. When the menu is displayed, the arrow buttons have a different function.) Refer to “arrow buttons” on page 21 for more information.
TROUBLE.FRA Page 50 Tuesday, January 28, 1997 9:59 AM Troubleshooting Problem: Image and menus are reversed left to right • Rear projection mode is probably set. To switch back to forward projection: 1. Press the menu button to display Menu 1. 2. Use the right or left arrow buttons to highlight “Menu 2”. 3. Press select/enter to display Menu 2. 4. Use the right or left arrow buttons to highlight “Rear Projection”. 5. Press select/enter to enable Rear Projection.
APPEN.FRA Page 51 Tuesday, January 28, 1997 10:00 AM Appendix Specifications Projection Lamps Type tungsten halogen EVD bulb, 400 watt, 36 volt Life Average 50 hours each Fuse 100 to 120V nominal line 10A, 250V, 3AB 220 to 240V nominal line 6.3A, 250V, 5x20mm Input Power Requirements 100 to 240 VAC, 7.2A to 2500 mA, 50 to 60 Hz. Remote Control Battery Two (2) AAA alkaline cells Range 25 feet (7.
APPEN.FRA Page 52 Tuesday, January 28, 1997 10:00 AM Appendix Temperature Operating Nominal 25°C Non-operating 0° to 60°C * Altitude Operating 0 to 10,000 feet (3048 meters) Non-operating 20,000 feet (6096 meters) Humidity Operating and nonoperating 10 to 90% RH, non-condensing Dimensions LitePro 560/570 20 x 11.5 x 8 inches (51 x 29 x 20 cm) Weight Unpacked 20 lbs. (8.8 kg) As shipped 30 lbs (12.7 kg) * 52 Maximum operating temperature depends on altitude.
APPEN.FRA Page 53 Tuesday, January 28, 1997 10:00 AM Appendix Accessories Contact your In Focus dealer to order. Refer to the In Focus Accessories Catalog for additional items.
APPEN.FRA Page 54 Tuesday, January 28, 1997 10:00 AM Appendix Cable Connector Pin Assignments The Y-shaped LitePro cable that shipped with your LitePro has three connectors, they are labeled “Monitor”, “Computer” and “LCD.” The pin assignments for these connectors are listed here. “LCD” Connector The end of the LitePro cable that plugs into the LitePro itself is a male 26-pin D-style connector. The table below lists its pin assignments.
APPEN.FRA Page 55 Tuesday, January 28, 1997 10:00 AM Appendix “Monitor” and “VGA” Connectors The pin assignments are the same for the “Monitor” and “VGA” connectors. The “Monitor” connector is a female video RGB, 15-pin micro-D-style connector. The “VGA” connector is a male video RGB, 15-pin micro-D-style connector. The table below lists the pin assignments for both connectors.
APPEN.FRA Page 56 Tuesday, January 28, 1997 10:00 AM Appendix Laptop Display Activation Chart The LitePro 560/570 connects to a laptop computer through the computer ’s external monitor port. Most laptop computers do not automatically activate their external monitor port when a device such as the LitePro is connected. The following chart lists the commands that activate the external monitor port for a variety of computers. If your computer is not listed here, refer to your computer’s documentation.
APPEN.
APPEN.FRA Page 58 Tuesday, January 28, 1997 10:00 AM Appendix * Computer Key command to activate port Key command to de-activate port 4500 FN-F5 FN-F5 setup screen option setup screen option Wyse software driver software driver Zenith FN-F10 FN-F10 These manufacturers have other models that automatically send video to the external CRT port when some type of display device is attached. ** These manufacturers offer more than one activation command depending on the computer model.
0060-05.
0060-05.
0060-05.
0060-05.
0060-05.bk : WARR-PN.FRA Page 63 Tuesday, January 28, 1997 9:23 AM LIMITED WARRANTY In Focus Systems Inc. (“In Focus”) warrants that each LitePro 560 and LitePro 570 (“the Product”) sold hereunder will conform to and function in accordance with the written specifications of In Focus. Said limited warranty shall apply only to the first person or entity that purchases the Product for personal or business use and not for the purpose of distribution or resale.
0060-05.bk : WARR-PN.
Planetenweg 91 NL-2132 HL Hoofddorp, The Netherlands 31 (0) 2503-23200 recycle on d paper printed 27700B SW Parkway Avenue Wilsonville, Oregon 97070-9215 USA 1-800-294-6400