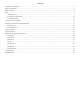
Contents Declaration of Conformity....................................................................................................................................................................... 3 Safety Considerations.............................................................................................................................................................................. 6 What’s Included...............................................................................................
Declaration of Conformity Manufacturer: InFocus Corporation, 13190 SW 68th Parkway, Portland, Oregon 97223-8368 USA We declare under our sole responsibility that this monitor conforms to the following directives and norms: • • • • EMC Directive 2004/108/EC: o EN 55022 o EN 55024 o EN 61000-3-2 o EN 61000-3-3 Low Voltage Directive 2006/95/EC Safety: IEC 60950-1:2005 R&TTE Directive: 1999/5/EC Trademarks Apple, Mac and Facetime are trademarks or registered trademarks of Apple, Inc.
Canada This Class A digital apparatus complies with Canadian ICES-003. Cet appareil numérique de la classe A est conforme à la norme NMB003 du Canada. INFORMATION FOR RADIO FREQUENCY DEVICES ONLY: This device complies with part 15 of the FCC Rules / RSS-210. Operation is subject to the following two conditions: (1) This device may not cause harmful interference and (2) this device must accept any interference received, including interference that may cause undesired operation.
Energy Star As an ENERGY STAR Partner, InFocus Corporation has determined that this product meets the ENERGY STAR guidelines for energy efficiency. ENERGY STAR® is a joint program of the U.S. Environmental Protection Agency and the U.S. Department of Energy aimed at saving money and protecting the environment through energy efficient products and practices. We are proud to offer our customers products with an ENERGY STAR compliant design.
Safety Considerations Please read and follow all safety instructions provided below and on the monitor before connecting the monitor to a power source. Failure to comply with safety instructions may result in fire, electrical shock, or personal injury and may damage or impair protection provided by the equipment. Please save all safety instructions. • This monitor is very heavy and should be moved and installed by at least two individuals.
• Unplug the monitor if you are not going to use it for an extensive period of time. • Unplug the monitor if you need to clean it with the included microfiber cleaning cloth. The screen may be wiped with the cleaning cloth when the power is off. Never use alcohol, solvents or ammonia-based liquids on this product. • Wash hands after handling the cables supplied with this product. • The monitor remote control, mouse and keyboard use batteries.
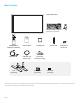
What’s Included 1920 x 1080 monitor Wireless Keyboard & Mouse* (Batteries not included) POWER HOME INPUT ON/OFF INPUT MENU RESIZE PIP POSITION SWAP AUDIO BRIGHTNESS CONTRAST OK BACK INFO i VOL UP Quick Setup Guide MUTE VOL DOWN Remote control (batteries not included) VGA cable, 4M Feet (set of two) Documentation Cleaning cloth USB cable, 3M (Type A to B) Security tool Thumb screws (set of four) Power cords (varies per country) Feet spacers (set of two) M6 Screws (set of six) *
Setup Installing the Feet 1) If you have not already done so, carefully place your monitor face-down on a clean, cushioned surface with the top edge hanging off of the cushioned surface by 4-5” (10-13cm). Do NOT place the monitor on its back. 2) Remove the monitor feet slot covers with a Philips screwdriver. Discard or save for future use.
Connecting to Other Devices A full range of digital and analog video inputs and audio source devices can be connected to the connection panels on the back and side of this monitor. Available jacks include: HDMI® (2), VGA, Component (RCA), S-Video, Composite, RS232, Audio in RCA (1 – R/L), Audio in 3.5mm (1), Audio Out (1 – R/L), RJ45 (2), USB-B (1) and USB-A (6).
Bezel Connector Panel Power button Keypad USB-A jacks USB-B jack Side Connector Panel Audio Out (L/R) RJ45 RS232 Audio In (L/R) USB-A Power LED Antennas PC Reset button Audio In (3.5mm) Bottom Connector Panel Power switch AC Power In AC Power Out HDMI® VGA Component S-video Composite (YPbPr) Connecting AC Power 1) Connect one end of the AC power cord to the AC In jack on the back of the monitor. 2) Connect the other end of the AC power cord to an AC outlet.
Turning the Monitor On/Off 1) Verify that the power cord is connected to a power outlet and that the power switch on the Bottom Connector Panel is ON. 2) Press the Power button located on either: a. the remote b. the right side of the monitor c. or the back of the monitor on the PC box. The front LED turns green. 3) Press the Power button again to put the monitor into Standby. The front LED turns red. You can also put your monitor to sleep using the keyboard. The front LED turns orange.
Setting up the Wireless Mouse and Keyboard Note: The wireless mouse and keyboard set is not included as a standard accessory for some countries. For initial setup and/or configuration, it may be easier to use a mouse and keyboard. Any standard wired or wireless mouse or keyboard connected through the monitor's USB ports can be used. Wireless Mouse 1) Turn the mouse over and remove the battery cover. 2) Remove the USB dongle from its holder in the battery compartment of the mouse.
Using the Remote The remote uses two (2) AAA batteries (not included). Install the batteries by removing the cover from the remote’s back, aligning the + and – ends of the batteries, sliding them in place and replacing the cover. To operate, point the remote at the monitor sensor at the bottom right-hand corner of the monitor. The range of optimum operation is about 26’ (8m) and within a horizontal and vertical angle of 30 degrees.
The remote has the following buttons: Power: Switches the power on or puts the monitor into Standby. POWER POWER Home: Changes the active source back to the embedded PC. HOME HOME INPUT MENU Input: Toggles the Source menu on and off, which allows the user to change sources. Options include: HDMI1, HDMI2, PC, VGA, Component, S-video and Video (composite). INPUT RESIZE PIP ON/OFF INPUT POSITION SWAP AUDIO Menu: Turns the OSD menu on and off. MENU Resize: Switches aspect ratios.
Info: n/a INFO i Vol up: Increases the audio volume. VOL UP OK MUTE Vol down: Decreases the audio volume. Mute: Switches the audio on or off. Using the Keypad The keypad, located on the right-edge of the monitor, has the following buttons: Menu button: Turns the OSD menu on and off. Left/Volume Decrease button: Decreases the audio volume when the OSD menu is off. Decreases the value of selected OSD items when the OSD menu is on.
OSD (On-Screen Display) Menu System The OSD provides the user the ability to control the monitor. To access the OSD, press the Menu button on the remote or the keypad located on the right-hand side of the monitor. Use the up and down arrows on the remote or keypad to scroll through the menu options and press OK to enter the highlighted menu. Use the up and down arrows and OK button to select the item you would like to adjust. Left and right arrow buttons are used to make adjustments.
Picture Menu PICTURE BRIGHTNESS CONTRAST SHARPNESS BLACK LEVEL NOISE REDUCTION TINT COLOR COLOR TEMPERATURE COLOR CONTROL ADAPTIVE CONTRAST PICTURE MODE PICTURE RESET < < Sel <> Adjust OFF 10000K 70 50 50 50 50 50 OFF STANDARD Enter Back Quit Brightness: changes the intensity of the image. Range: 0-100. (Default 70.) Contrast: controls the degree of difference between the lightest and darkest parts of the picture and changes the amount of black and white in the image. Range: 0-100. (Default 50.
Screen Menu SCREEN H POSITION V POSITION CLOCK CLOCK PHASE ASPECT RATIO CUSTOM ZOOM SCREEN RESET < < Sel <> Adjust 50 50 Enter Back Quit H Position: adjusts the horizontal position of the image. Range: 0-100. (Default 50.) V Position: adjusts the vertical position of the image. Range: 0-100. (Default 50.) Clock: adjusts the width of the image (For VGA input only). Range: 0-100. Clock Phase: adjusts the focus, clarity and stability of the image (For VGA input only). Range: 0-100.
Audio menu AUDIO BALANCE TREBLE BASS SPEAKER AUDIO SOURCE AUDIO RESET < < Sel <> Adjust INTERNAL PC Enter Back 50 50 50 Quit Balance: adjusts the balance between the left and right audio outputs. Range: 0-100. (Default 50.) Treble: adjusts higher pitched (treble) audio sounds. Range: 0-100. (Default 50.) Bass: adjusts lower-pitched (bass) audio sounds. Range: 0-100. (Default 50.) Speaker: controls whether both the internal and external speakers or just the external speakers are used.
PIP menu PIP PIP SIZE PIP AUDIO PIP RESET < < Sel <> SMALL MAIN Adjust Enter Back Quit PIP Size: changes the size of the PiP window used in the Corner-to-Corner configuration. Options include: Small (default), Middle and Large. PIP Audio: switches the audio source from the main source to the PiP source. Options include: Main (default) and Sub. PIP Reset: resets all PIP menu items to factory default settings. Options: Yes and No.
When the Main picture is PC, the following configurations are available: PiP PiP Main PiP PiP Corner-to-Corner When the Main picture is not PC, the following configurations are available: PiP PiP Main PiP Main PiP Main PiP Corner-to-Corner Main PiP PiP Side-by-Side Stretched Picture-on-Picture Side-by-Side Native To change the PiP source: Press remote PiP Input button. To swap the main and PiP sources: Press the remote’s PiP Swap button.
Configuration 1 CONFIGURATION 1 AUTO ADJUST POWER SAVE LANGUAGE SCREEN SAVING COLOR SYSTEM OPERATION MODE BLANK ENABLE BLANK SCREEN TYPE CONFIGURATION RESET FACTORY RESET < < Sel <> Adjust ENGLISH AIO ON BLACK Enter Back Quit Auto Adjust: automatically adjusts the display of an external VGA source image. Press OK on the remote to activate.
Configuration 2 CONFIGURATION 2 OSD TURN OFF INFORMATION OSD SLEEP TIMER OSD H POSITION OSD V POSITION MONITOR INFORMATION < < Sel <> Adjust 10 OFF 50 50 Enter Back 45 Quit OSD Turn Off: controls how many seconds the OSD menu remains on the screen Range: 5-120 (seconds). (Default: 45) Information OSD: controls how many seconds the Information OSD remains on the screen. Options include: Off and a range of 1-10 (seconds) in increments of 1.
Advanced Option ADVANCED OPTION INPUT RESOLUTION BLACK LEVEL EXPANSION GAMMA SELECTION SCAN MODE SCAN CONVERSION FILM MODE IR CONTROL KEYBOARD CONTROL TILING HEAT STATUS DATE AND TIME SCHEDULE MONITOR ID DDC/CI ADVANCED OPTION RESET < < Sel <> Adjust MIDDLE 2.2 UNDER SCAN PROGRESSIVE AUTO ON Enter Back Quit Input Resolution: sets the resolution of the VGA input. This is only required when the monitor is unable to detect the VGA input resolution correctly.
Troubleshooting Symptom Possible Solutions No power • Verify the power cord is properly connected to the power outlet and to the monitor. • Verify the power switch is ON and that the Power button on the remote or keypad has been turned on (the front LED should be green). • Plug another electrical device to the power outlet to verify that the outlet is supplying the proper voltage. • Check the Sleep Timer setting in the Configuration 2 OSD menu. Disable the Sleep Timer, if desired.
Touchpad functions are not function- • ing consistently Remote is not working Keypad and/or mouse is not working Remove all objects placed on the lip of the monitor and/or within 2” of the touchpad screen. • Disable PiP feature. • Power the monitor off and back on after a few seconds. Re-booting the monitor helps the touchpad to re-synchronize. • Make sure the batteries are installed in the proper orientation and are not dead.
Specifications To read the latest specifications on this product, be sure to visit our support website at www.infocus.com/support, as specifications are subject to change. Size (viewable) 54.6” (138.7 cm diagonal) Resolution 1920 x 1080 Refresh rate 60 Hz Viewing angle ±89˚ Display colors 1.07G (10-bit) Brightness 450 cd/m2 typical Pixel pitch 0.
Keyboard Dimension 321 x 142 x 25.4mm Weight ~350g excluding batteries Batteries Two (2) AAA alkaline Operating Voltage 2.0V~3.2VDC Power Consumption Operation Mode: 10mA; Sleep Mode: <60uA Battery Life 800 working hours continuous operation Operating Distance 10M without signal disturbance and no direction limit Mouse Dimension 59.2 x 103.6 x 34.8mm Weight ~68g excluding batteries Batteries Two (2) AAA alkaline Operating Voltage 2.0V~3.2VDC Power Consumption <8.
Limited Warranty InFocus Limited Warranty For InFocus Branded Hardware Products Only LIMITED WARRANTY. InFocus’s warranty obligations for the hardware products are limited to the terms set forth herein. InFocus warrants the InFocus-branded hardware products against defects in materials and workmanship under normal use for a period outlined in the Limited Warranty Periods section below from the date of retail purchase by the original end-user purchaser (“Warranty Period”).
temporary procedures or workarounds provided by InFocus while InFocus works on permanent solutions. • Allow InFocus to keep resident on your systems or sites certain system and network diagnosis and maintenance tools to facilitate the performance of warranty support (collectively referred to as “Proprietary Service Tools”); Proprietary Service Tools are and remain the sole and exclusive property of InFocus.
DIRECT, SPECIAL, INCIDENTAL OR CONSEQUENTIAL DAMAGES RESULTING FROM ANY BREACH OF WARRANTY OR CONDITION, OR UNDER ANY OTHER LEGAL THEORY, INCLUDING BUT NOT LIMITED TO LOSS OF USE; LOSS OF REVENUE; LOSS OF ACTUAL OR ANTICIPATED PROFITS (INCLUDING LOSS OF PROFITS ON CONTRACTS); LOSS OF THE USE OF MONEY; LOSS OF ANTICIPATED SAVINGS; LOSS OF BUSINESS; LOSS OF OPPORTUNITY; LOSS OF GOODWILL; LOSS OF REPUTATION; LOSS OF, DAMAGE TO, COMPROMISE OR CORRUPTION OF DATA; OR ANY INDIRECT OR CONSEQUENTIAL LOSS OR DAMAGE H
defective part must be returned to InFocus. In cases where it is required to return the defective part to InFocus, you must ship the defective part back to InFocus within a defined period of time, normally five (5) business days, and clearly display the Return Material Authorization (RMA#) on the outside of the shipping carton or a similar package affording an equal degree of protection. The defective part must be returned with the associated documentation in the provided shipping material.