Regulatory models ST-HB42A, ST-HB55A, ST-HB65A 11850138-0G
Contents Important Information................................................................................................................................................... 3 FCC Compliance Statement........................................................................................................................................... 3 Safety Information ...................................................................................................................................................
Connecting a Computer............................................................................................................................................... 22 Connecting PC Audio In ............................................................................................................................................. 22 Basic Operation .............................................................................................................................................................
Important Information FCC Compliance Statement This equipment has been tested and found to comply with the limits for a Class A digital device, pursuant to part 15 of the FCC Rules. These limits are designed to provide reasonable protection against harmful interference when the equipment is operated in a commercial environment.
Important Information (Continued) Safety Information To prevent fire or shock hazard, do not expose the monitor to rain or moisture. The high voltage in the monitor can be extremely dangerous. Do not open the monitor enclosure. Refer all servicing to qualified servicing personnel. Do not expose the monitor to rain or moisture. Do not remove the rear cover. Operate the monitor only with the type of power source indicated on the serial number/model plate.
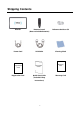
Shipping Contents Monitor Remote Control (Does not include batteries) Reference Guide on CD Power Cord VGA Cable Cleaning Cloth Registration Card Registration Card Quick Start Guide Quick Start Guide (Included Safety Instructions) 5 Warranty Card Warranty Card
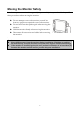
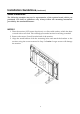
Moving the Monitor Safely In order to prevent monitor damage and/or personal injuries, you should always follow these procedures when moving the monitor: Do not attempt to move the monitor yourself. At least two people are required to move the monitor. Do not hold onto the speaker grid when moving the monitor. Hold the monitor firmly when moving the monitor. Disconnect all accessories and cables before moving the monitor. . Caution: Keep children away from the monitor during installation.
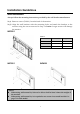
Installation Guidelines Wall Installation Always follow the mounting instructions provided by the wall bracket manufacturer. Step1. Remove screws (Table 1) from the back of the monitor. Step2. Align the wall brackets with the mounting holes and attach the brackets to the monitor using the screws removed in Step 1. Caution: Longer screws will damage the monitor.
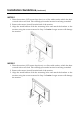
Installation Guidelines (Continued) Stand installation The following examples may not be representative of the optional stand, which you purchased. Use them as guidelines only. Always follow the mounting instructions provided by the stand manufacturer. INF6501 1. Place the monitor (LCD screen face down) on a flat, stable surface, which has been covered with a soft cloth. This will help prevent the monitor from being scratched. 2. Remove the screws (2 total) from the back of the monitor. 3.
Installation Guidelines (Continued) INF5501 1. Place the monitor (LCD screen face down) on a flat, stable surface which has been covered with a soft cloth. This will help prevent the monitor from being scratched. 2. Remove the screws (6 total) from the back of the monitor. 3. Align the stand brackets with the mounting holes and attach the brackets to the monitor using the screws removed in Step 2. Caution: Longer screws will damage the monitor. INF4201 1.
Connecting Power Environmental Specifications: Operating Temperature: 5˚C to +35˚C (Fahrenheit: 41˚F to 95˚F) Humidity: max.90% 1. 2. 3. Connect the power cord to the monitor before connecting to the AC power outlet. Turn on the power switch (INF6501 and INF5501 only). on the remote or monitor keypad to turn on or off.
Using the Remote Control Use the remote control by pointing it towards the remote sensor of the set. Objects between the remote control and remote sensor may prevent proper operation. Cautions regarding use of remote control Do not expose the remote control to shock. In addition, do not expose the remote control to liquids, and do not place in an area with high humidity. Do not install or place the remote control under direct sunlight. The heat may cause remote damage.
Using the Remote Control (Continued) Remote Control Overview No. Function Description Turns the monitor on and off. INFO Provides source and resolution information. VGA Selects the PC RGB source. HDMI 1 Selects the HDMI source 1. Selects the HDMI source 2. HDMI 2 Selects the Component source. COMP VIDEO Selects the Composite Video source. S-V Selects the S-Video source. Changes the size and position of the SS-POSITION SplitScreen windows (Large PIP, Medium PIP, Small PIP, Side-by-Side).
Using the Remote Control (Continued) Replacing remote batteries 1. 2. Remove the battery cover Slide back and remove the battery cover in the direction of the arrow. Insert the batteries Align and insert two AAA batteries according to their plus and minus ports (as indicated in the remote control). 3. Close the battery cover Replace the battery cover in the direction of the arrow and snap it back into place.
Identification of Controls Front panel Power Press this button to turn the monitor ON or OFF. Source (ENTER) Press this button and use the arrow buttons (S T) to navigate to the desired input source. Press SOURCE again to select the highlighted source. Menu/Exit Press MENU/EXIT to access the on-screen menu system and use the arrow buttons (S TW X) to navigate through the menu system. Press MENU/EXIT again to go back to the previous menu or exit from the menu system entirely.
Identification of Controls (continued) Rear panel INF6501 INF5501 15
Identification of Controls (continued) INF4201 1. HDMI 1/2: provides an uncompressed, all-digital audio/video interface between the monitor and any HDMI-equipped audio/video component, such as a set-top box or DVD player. 2. VGA: Connect to a PC or other analog RGB output device such as a video conferencing device. 3. PC Audio input: Connect to a PC audio output device. 4.
Connection Connecting a VCR or DVD player How to connect: Connect the Audio/Video cable between the Audio (L/R)/Video ports on the monitor and VCR. To play a VHS tape or CD/DVD: 1. Turn on the monitor. The monitor will automatically search for the source signal. If multiple sources are active, press VIDEO (composite video) or S-V (S-video) on the remote. 2. Turn on the VCR (or DVD player) and set the tape/CD/DVD to play. See the device’s user manual for more information.
Connection (Continued) Connecting a Camcorder How to connect: Connect the Video/S-V Audio cables between the Audio (L/R)/Video ports on the monitor and camcorder. To Playback Camcorder: 1. Turn on the monitor. The monitor will automatically search for the source signal. If multiple sources are active, press VIDEO (composite video) on the remote. 2. Turn on the camcorder and set it to output the source. For details, refer to the camcorder user manual.
Connection (Continued) Connecting an HDMI device How to connect a device using HDMI Connection: Connect the HDMI cable between the HDMI interface on the monitor and HDMI on the device. To play from the device using HDMI: 1. Turn on the monitor. The monitor will automatically search for the source signal. If multiple sources are active, press HDMI1 or HDMI2 on the remote. 2. Turn on the HDMI device and set it to output the source. For details, refer to the device’s user manual.
Connection (Continued) Connecting Component Video To connect a device using component video: Connect the Component Video cable between the Y, Cb/Pb, Cr/Pr input ports on the monitor and Y, Cb/Pb, Cr/Pr output port on the device. Connect the Audio cable between the AUDIO input ports on the monitor and AUDIO output ports on the device. To play component video from an external device: 1. Turn on the monitor. The monitor will automatically search for the source signal.
Connection (Continued) Connecting Optical Digital Audio How to connect: Connect an optical digital audio cable between the SPDIF Out port on the monitor and the optical digital audio input port on the amplified speaker system or other optical digital audio output device (for use with HDMI sources).
Connection (Continued) Connecting a Computer How to connect: 1. Connect a VGA cable between the VGA port on the computer and the VGA port on the monitor. 2. Connect an Audio cable between the Audio output on the computer and audio port on the monitor. To play video from a computer: 1. Turn on the monitor. The monitor will automatically search for the source signal. If multiple sources are active, press VGA on the remote. 2. Turn on the computer.
Basic Operation Turning the monitor on 1. 2. Insert the power cord into monitor and into the power outlet. Press the power button on the monitor (or using the remote control) to power-on the monitor. Turning the monitor off With the power on, press the power button on the monitor (or the remote control) to put the monitor in a standby mode. To turn off power completely, disconnect the AC power cord from the power outlet.
Basic Operation (Continued) PIP/SplitScreen mode 1. 2. Select the main source – Using the remote, press the desired source button (VGA, HDMI1, HDMI2, COMP, VIDEO or S-V). Turn on PIP/SplitScreen mode: Using the remote, press SPLITSCREEN (SS). SPLITSCREEN Main Large PIP Middle PIP Small PIP 3. 4. To select the PIP/SplitScreen subsource: Using the remote, press SS-SOURCE and use the arrow buttons (S T) to navigate to the desired subsource. Press ENTER.
Basic Operation (Continued) 6. 7. To switch audio between the main source and the subsource: Using the remote, press SS-AUDIO. Note: For additional PIP/SplitScreen functionality, press MENU and navigate to the Display Settings menu. Use the arrow buttons (S T) to navigate to the desired SplitScreen feature and press ENTER. Press X to toggle through the associated options and press ENTER to select the highlighted option. Main Source Sub Source 8.
Using the Menus Menu Overview Image Settings (1/2) Audio Settings Image Settings (2/2) Basic Settings Display Settings Advanced Setting System Status 26
Using the Menus (Continued) Navigating through the Menu System 1. 2. 3. With the power on, press MENU. The Image Settings menu will display. Within the menu, use S,T,W, X, and ENTER to navigate through the menus and adjust options. Press MENU to return to the previous menu. To exit the menu system, press EXIT. Image Settings Menu This menu is used for making common image adjustments.
Using the Menus (Continued) Image Settings Menu (continued) Gamma Options: Off, 2.2 Default: 2.2 Color Temp Options: User, 5000K, 6500K, 7500K and 9300K. Default: Dependent on Picture mode Red Gain Set Color Temperature to “User Mode” in order to adjust this setting. Range: 128~384 Default: 256 Green Gain Set Color Temperature to “User Mode” in order to adjust this setting. Range: 128~384 Default: 256 Blue Gain Set Color Temperature to “User Mode” in order to adjust this setting.
Using the Menus (Continued) Display Settings Menu This menu is used for common source adjustments. Main The Display Setting Mode. Aspect Ratio Changes the picture aspect ratio Press e,f to select the following options: Options: Auto, Native, 4x3, 16x9, 16x10 and Letter Box.
Using the Menus (Continued) Audio Settings Menu This menu is used for adjusting volume settings. Volume Adjust the sound. Press e or f, select the desired level, and then press ENTER. Range: 0~100 Default: 50 Bass Adjust the sound in low tones (bass). Press e or f, select the desired level, and then press ENTER. Range: 0~20 Default: 10 Treble Adjust the sound in high tones (Treble). Press e or f, select the desired level, and then press ENTER.
Using the Menus (Continued) Basic Settings Menu This menu is used to make initial set-up adjustments to the OSD (On-Screen Display) menu and other on-screen messages. These adjustments are not normally changed often. OSD Transparent Set the menu transparency. Press e or f to select the desired level, and then press ENTER. Range: 0~100 Default: 0 OSD Location Adjust the menu location on the monitor (Up, Down, Left, Right). OSD Zoom Options: On, Off Default: Off OSD Rotation Select the OSD Rotation.
Using the Menus (Continued) Advanced Settings Menu This menu provides more complex adjustments for the user to modify, if desired. Auto Adjustment Forces the monitor to reacquire and lock to the input signal. This is useful when the signal quality is marginal. Note: This feature does not continually reacquire the signal. Options: No, Yes Default: No Image Position Image location can be adjusted (Only VGA Mode).
Using the Menus (Continued) System Status Menu This read-only menu provides information on the active sources and the latest firmware version.
Specifications INF6501 Item Specification Resolution 1920 x 1080 (HD monitor format) Brightness 450 cd/m² Contrast Ratio 5000 Response time (GTG) 5.5 ms 16:9 Aspect Ratio LCD panel Backlight Life Time Horizontal Sync. Vertical Sync.
Specifications (Continued) INF5501 Item Specification Resolution 1920 x 1080 (HD monitor format) Brightness 450 cd/m² Contrast Ratio 5000 Response time (GTG) 4.5 ms 16:9 Aspect Ratio LCD panel Backlight Life Time Horizontal Sync. Vertical Sync.
Specifications (Continued) INF4201 Item Specification Resolution 1920 x 1080 (HD monitor format) Brightness 400 cd/m² Contrast Ratio 5000 Response time (GTG) 6.5 ms 16:9 Aspect Ratio LCD panel Backlight Life Time Horizontal Sync. Vertical Sync.
Maintenance Regular maintenance of the monitor is recommended. Dust the rear cover of the monitor regularly using a soft, dry cloth. Dust on the rear cover may cause the cooling system of the monitor to fail. To remove stubborn dust, only use a moistened (not dripping) cloth which has been dipped in a mild detergent solution. See important notes below. To clean the LCD surface, apply a non-abrasive camera lens cleaner to a soft, dry cloth.
Troubleshooting Problem Possible Solution No power • Verify the power cord is properly connected to the power outlet and to the monitor. • Verify the monitor power switch is ON (INF5501 and INF6501 only) and that the power button (all models) is ON. • Plug another electrical device (like a radio) to the power outlet to verify that the outlet is supplying the proper voltage. No picture • Verify that connections between the source and the monitor have been made correctly.