39 Quick Start Guide English For other languages, see booklet Français – voir la brochure Deutsch – siehe Broschüre Español – ver folleto Italiano – vedi opuscolo Nederlands – zie boekje Português – consulte livreto Svenska – se häftet Русский – см. буклет 한국어 – 소책자참조 中文(简体)– 见手册 *36.8ES01G002-A* P/N 36.
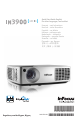
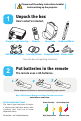
Please read the safety instructions booklet before setting up the projector. Unpack the box 1 Here's what's included: Projector with Lens Cap Remote Carry Case LiteBoard Wand PU SH USB Power Adapter Two USB Cables Computer Cable Power Cable Save the box and packing materials. Put batteries in the remote 2 The remote uses 2 AA batteries. 1 2 + - + 3 Please dispose of batteries in an environmentally proper manner. Buy a Full-Featured Remote and Other Custom Accessories www.infocus.
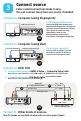
Connect source 3 Color-coded connections make it easy. You can connect more than one source if needed. Connect to: Computer (using DisplayLink) For Windows and Macintosh USB Cable (included) VGA 1/2 composite s-video Composite S-Video VGA 1 VGA 2 Computer OR Connect the USB cable between your computer and the projector's DisplayLink connector. See the DisplayLink Software User's Guide for details on setup, compatibility, features, and troubleshooting; download it at www.infocus.
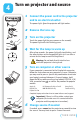
Turn on projector and source 1 onnect the power cord to the projector C and to an electrical outlet The power light on the projector will light amber. 2 Remove the lens cap 3 Turn on the projector Touch the power light (or press power on the remote). The power light will start blinking green. 4 Wait for the lamp to warm up After a few seconds, the power light will stop blinking, and the other buttons on the keypad will light up. It can take a minute for the lamp to reach full brightness.
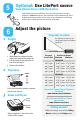
Optional: Use LitePort source 6 Adjust the picture View photos from a USB flash drive Copy JPEG pictures to a USB flash drive, then plug the drive into the projector’s LitePort connector. The slideshow starts automatically. Press arrow keys to change slides, press select to see thumbnails and change folders, press select again to return to the slideshow. Projector Location 1 Height 1 As distance increases, the image gets larger and moves upwards.
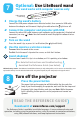
7 Optional: Use LiteBoard wand The wand works with computer sources only USB connector behind flap 1 Charge the wand’s battery 2 Connect the computer and projector with USB 3 Turn on the wand Connect the USB power adapter to an electrical outlet, then connect a USB cable between the adapter and the wand. Unplug the cable when the light turns off. 4 i Connect the other USB cable between your computer and the projector’s DisplayLink connector (see step 3 ).
TROUBLESHOOTING If there is no picture or the picture is blank If the power light is off, make sure the power cord is connected and plugged into a live electrical outlet. If the power light is amber and not blinking, touch the power light (or press power on the remote). Check video source and cables. Make sure the video source (computer, DVD player, VCR, etc.) is turned on and cables are securely connected between the source and the projector.
Questions? We’re here to help! Visit us at: www.infocus.com/support We’re here to support you with your new purchase. We can help you with… • Determining screen sizes • Documentation in other languages • Connecting your sources (TV, DVD, Cable/Satellite, Game, etc.