Installation Guide LP 750 Series Ceiling Mount Installation Guide LP 750 Series Installationhandbuch zur Deckenbefestigung English . . . . . . . . . . . . .1 Deutsch . . . . . . . . . .
010-0195-00 Copyright © 1998 by In Focus, Inc. Wilsonville, Oregon. All rights reserved. Copyright © 1998 by In Focus, Inc. Wilsonville, Oregon, USA. Alle Rechte vorbehalten.
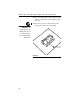
CEILING MOUNT INSTALLATION GUIDE The LP 750 LiteMountTM makes it easy to hang your projector from the ceiling for fixed installation use in meeting, auditorium and training room settings. A unique quick-release feature allows you to take the projector down in seconds to replace the lamp or move the projector to another location. You must determine the suitability of this product for your intended use and assume all risk and liability in connection therewith.
Placing the Projector Placing the Projector Refer to the LP 750 User’s Guide for image distances and sizes to determine where to install the ceiling mount to meet your projection needs. Contents The LP 750 Ceiling Mount package contains: 1 Installation Guide NOTE: The maximum load the ceiling mount can support is 50 pounds. 2 ceiling mount base box dimensions: 9.6” x 6.0” x 1.4” (24.5 x 15.2 x 3.5 cm) weight: 1.8 lbs (0.8 kg) 3 projector mounting bracket dimensions: 10.2” x 9.9” x 1.7” (25.9 x 25.2 x 4.
Install the Ceiling Mount Base Box on the Ceiling Instructions for installing the ceiling mount on the LiteMount False Ceiling Plate and the LiteMount Pipe Tubing Extension are given in this installation guide. If you have not purchased either of these products, consult a professional contractor or other facilities professional to ensure a safe installation. Please refer to the LiteMount False Ceiling Plate and LiteMount Pipe Tubing Extension installation instructions for lists of included hardware.
In stal l t he Ce il ing Mou nt B ase B ox on th e Cei li ng 3 Place the ceiling plate or pipe extension in the ceiling so that the base box hangs down into the room. 4 Route the projector’s cables through your ceiling and out the hole in the ceiling. WARNING: If the dropped ceiling is an airhandling plenum, be sure the cables are plenumrated, or install the cables within conduit.
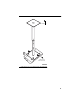
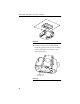
false ceiling plate make sure this surface faces front FIGURE 2 Install the base box to the LiteMount Pipe Tubing Extension 5
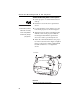
Attach the Mounting Plate to the Projector Attach the Mounting Plate to the Projector 1 Set the projector on a table with the bottom side up. CAUTION: Use only the hardware that is provided with the LP 750 Ceiling Mount. Using different hardware may damage your projector. 2 Insert the 2 screws into the 2 quick release sleeves. 3 Loosely attach the screws and sleeves to the holes in the projector as shown in Figure 3. 4 Align the keyholes in the mounting bracket with the screws in the projector.
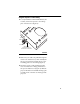
Hang the Projector on the Ceiling 1 Loosely install the 12 mm knurled knobs, flat washers, and conical spacers to the 2 hinge pins on the base box (Figure 4). spacer washer knurled knob slide projector bracket here between the base box and the spacer FIGURE 4 Attach knurled knobs to the side of the base box 2 Make sure your cables are pulled through the center hole of the base box, then carefully lift the projector and turn it upside down so the mounting plate faces the ceiling (Figure 5).
Hang the Projector on the Ceiling FIGURE 5 Install the projector in the ceiling base box 4 Insert the remaining two 12 mm knurled knobs through the rear slots in the mounting bracket and into the threaded holes on the sides of the base box.
5 Adjust the angle of the projector so that it will project correctly. Refer to your LP 750 User’s Guide for detailed information on projection angles and image sizes. 6 Tighten all the knurled knobs to secure the projector in position. 7 Check all fasteners to make sure they are properly tightened. 8 Connect the power cord and the cables to the projector. (Refer to your LP 750 User’s Guide for information about connecting the cables.
Inverting the Image When you need to remove the projector or replace the lamp: 1 Disconnect all cables. 2 Hold the projector from underneath. 3 Remove the knurled knob that holds the projector to the mounting plate. 4 Slide the projector to release it from the quick release bolts. The projector will come off of the mounting plate. The mounting plate will still be attached to the base box. 5 Replace the lamp as described in your LP 750 User’s Guide if needed.
Limited Warranty In Focus Inc. warrants that each “ceiling mount” sold hereunder will conform to and function in accordance with the written specifications of In Focus. Said limited warranty shall apply only to the first person or entity that purchases the Product for personal or business use and not for the purpose of distribution or resale. The product may contain recycled components that are in new condition. Said warranty shall continue for a period of one (1) year from the date of such purchase.
INSTALLATIONSANLEITUNG FÜR DIE DECKENBEFESTIGUNG Mit dem LiteMountTM der LP-Serie 750 können Sie Ihren Projektor mühelos zur permanenten Verwendung in Besprechungs-, Vortrags- und Schulungsräumen an der Decke befestigen. Sie müssen die Eignung dieses Produkts für den beabsichtigten Verwendungszweck überprüfen und übernehmen das gesamte Risiko und die volle Haftung in Zusammenhang mit diesem Produkt. In Focus empfiehlt, daß Ihnen ein Berufshandwerker bei der Befestigung dieses Geräts behilflich ist.
Plazierung des Projektors Plazierung des Projektors Um die optimale Deckenbefestigungsposition für Ihre Projektionsansprüche zu bestimmen, schlagen Sie bitte die Bildentfernung, die Bildgröße und den Projektionswinkel im LP 750 Benutzerhandbuch nach. Lieferumfang Das Paket mit der Deckenbefestigung für LPProjektoren der Serie 750 enthält folgendes: 1 Installationsanleitung HINWEIS: Die maximale Belastung des Deckenhalterung beträgt 22,7 kg.
Den Deckenbefestigungssockel an der Decke montieren Anweisungen für die Montage der Deckenbefestigung auf der LiteMount-Zwischendeckenplatte und der LiteMount-Rohrverlängerung sind in der vorliegenden Installationsanleitung enthalten. Wenn Sie keines dieser beiden Produkte erworben haben, wenden Sie sich an einen Berufshandwerker, um eine sichere Montage zu gewährleisten. Eine Liste der mitgelieferten Befestigungsteile finden Sie in der Installationsanleitung zur LiteMount-Zwischendeckenplatte.
Lieferumfang 3 Montieren Sie die Deckenplatte bzw. die Rohrverlängerung so an der Decke, daß der Sockel in den Raum herabhängt. 4 Führen Sie die Projektorkabel durch die öffnung in der Decke. WARNUNG: Handelt es sich bei der abgehängten Decke um einen Luftverteilerkasten, sollten die Kabel in einem Kabelkanal verlegt werden.
Sockelvorderseite nach vorne zur Leinwand gerichtet ist ABBILDUNG 2 Befestigung des Sockels an der LiteMount-Rohrverlängerung 17
Lieferumfang Die Montageplatte am Projektor befestigen 1 Stellen Sie den Projektor mit der Unterseite nach oben auf einen Tisch. Richten Sie die Löcher in der Montageplatte an den Löchern im Projektor aus. ACHTUNG: Verwenden Sie nur die mit der Deckenbefestigung für Projektor der Serie 750 2 Führen Sie die beiden Schrauben in die beiden Schnelltrennmuffen ein (Abbildung 3). 3 Befestigen Sie die Schrauben und Muffen in den Löchern vorne am Projektor, wie in Abbildung 3 gezeigt.
Den Projektor an der Decke aufhängen 1 Stecken Sie die Rändelknopf, Unterlegscheiben und Abstandshalter an jeder Seite des Sockels zusammen, wie in Abbildung 4 gezeigt. Abstandshalter Unterlegscheibe Rändelknopf Projektorbügel hier schieben ABBILDUNG 4 Anbringung von Rändelknopf an der Seite des Sockels 2 Heben Sie den Projektor vorsichtig hoch, und drehen Sie ihn um, so daß die Befestigungsplatte zur Decke hin zeigt.
Lieferumfang ABBILDUNG 5 Befestigung des Projektors am Deckensockel 4 Setzen Sie die beiden letzten 12-mm-Rändelknopf durch die Schlitze im Befestigungsbügel in die Löcher auf der Sockelseite ein. Ziehen Sie sie von Hand an.
5 Stellen Sie den Winkel des Projektors so ein, daß Bilder ordnungsgemäß projiziert werden. 6 Ziehen Sie die Rändelknopf an, um den Projektor in der gewünschten Position zu befestigen. 7 Überprüfen Sie alle Befestigungsteile, um sich zu vergewissern, daß sie ordnungsgemäß angezogen sind. 8 Schließen Sie das Netzkabel sowie die Kabel am Projektor an. (Das LP 750-Bedienerhandbuch enthält Anweisungen zum Anschließen der Kabel.
Das Bild inver tieren So die Lampe austauschen: 1 Halten Sie den Projektor von unten fest. 2 Entfernen Sie den Rändelknopf, mit dem der Projektor an der Befestigungsplatte montiert ist. 3 Schieben Sie den Projektor, um ihn von den Schnelltrennmuffen zu lösen. Daraufhin kann der Projektor von der Befestigungsplatte abgenommen werden. Die Befestigungsplatte ist weiterhin mit dem Sockel verbunden. 4 Die Lampe austauschen, wie im LP 750-Bedienerhandbuch beschrieben.
Eingeschränkte Garantie In Focus Inc. garantiert, daß jede Deckenbefestigung ("Produkt"), die unter dieser Garantie verkauft wird, den schriftlichen Spezifikationen von In Focus entspricht und dementsprechend funktioniert. Die eingeschränkte Garantie gilt nur für die erste Person bzw. Organisation, die das Produkt zur persönlichen bzw. geschäftlichen Verwendung und nicht zum Zweck der Verteilung bzw. des Wiederverkaufs erwirbt. Die genannte Garantie gilt für einen Zeitraum von einen (1) Jahre ab Kaufdatum.
27700B SW Parkway Avenue Wilsonville, OR 97070-9215 USA 1-800-294-6400 9 Raffles Place #27-01 Republic Plaza Singapore 048619 65-334-9005 http://www.infocus.