
User's Manual Part 2
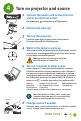


1
Height
1
Hold down the release button
under the front of the projector.
2
Lift the front of the projector to
the desired height.
3
Release the button.
2
Keystone
Press the keystone buttons to
make the picture square.
3
Zoom and focus
Adjust zoom fi rst, then focus the
center of the image.
Projector Location
Zoom
(rear)
Focus
(front)
As distance increases, the
image gets larger and moves
upwards.
6
1
2
Ceiling mount?
To fl ip the image, turn on the Ceiling
Mount setting in the Setup menu.
Interactive Screen Size and Distance
Calculator
www.infocus.com/calculator
Buy a Screen and Other Custom
Accessories
www.infocus.com/store
Lens center line
Diagonal
Screen Size
Distance to Screen
Minimum Maximum
7'10"/2.4m
10'5"/3.2m
11'8"/3.6m
19'6"/5.9m
60"/1.5m
80"/2.0m
90"/2.3m
150"/3.8m
8'7"/2.6m
11'6"/3.5m
12'11"/3.9m
21'6"/6.6m
6'6"/2.0m
8'8"/2.7m
9'10"/3.0m
16'4"/5.0m
60"/1.5m
80"/2.0m
90"/2.3m
150"/3.8m
7'4"/2.2m
9'8"/2.9m
10'11"/3.3m
18'1"/5.5m
IN3092LB
IN3904LB
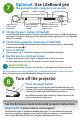
5
Optional: Use LitePort source
View photos from a USB flash drive
Copy JPEG pictures to a USB flash drive, then plug the drive into the
projector’s LitePort connector. The slideshow starts automatically.
Press arrow keys to change slides, press select to see thumbnails and
change folders, press select again to return to the slideshow.
Adjust the picture