INSTALLATION INSTRUCTIONS Short Throw Wall Mount PRJ-WALLKIT-13
PRJ-WALLKIT-13 Installation Instructions DISCLAIMER InFocus and its affiliated corporations and subsidiaries (collectively "InFocus"), intend to make this manual accurate and complete. However, InFocus makes no claim that the information contained herein covers all details, conditions or variations, nor does it provide for every possible contingency in connection with the installation or use of this product.
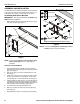
Installation Instructions PRJ-WALLKIT-13 LEGEND Tighten Fastener Pencil Mark Apretar elemento de fijación Marcar con lápiz Befestigungsteil festziehen 上紧紧固件 Stiftmarkierung 铅笔标记 Serrez les fixations 旋緊扣件 Marquage au crayon 鉛筆標記 Serrare il fissaggio 패스너 조이기 Segno a matita 연필 표시 Apertar fixador ดึงสายรัดให ้แน่น Marcar com lápis ดินสอทําเครือ ่ งหมาย Loosen Fastener Drill Hole Aflojar elemento de fijación Perforar Befestigungsteil lösen 松开紧固件 Bohrloch 钻孔 Desserrez les fixations
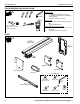
PRJ-WALLKIT-13 Installation Instructions TOOLS REQUIRED FOR INSTALLATION Hardware required, NOT INCLUDED: Steel Stud Install 5/32" (included) 1/2" 1/2" - steel stud 3/8" / 5/16" - concrete 7/32" - wood stud • 4 - Toggler® 1/4-20 (BB) Snap-Toggle 4 - Grade 2 or better 1/4-20 x 1-3/4" Phillips pan head screws 4 - Grade 2 or better 1/4" washer • Concrete Install • 4 - Fischer UX 10 x 60 anchors [P/N 077871], OR • Toggler A8/AF8 anchors Wood Stud Install and Concrete Install • 4 - Grade 2 or better 5/16 x
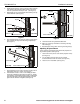
Installation Instructions PRJ-WALLKIT-13 Site Requirements WARNING: IMPROPER INSTALLATION CAN LEAD TO EQUIPMENT FALLING CAUSING SERIOUS PERSONAL INJURY OR DAMAGE TO EQUIPMENT! The figure below identifies the minimum requirements for installation of mount onto a steel stud structure. If the structure or its components do not meet these requirements contact the mount manufacturer for specific instructions before attempting installation.
PRJ-WALLKIT-13 Installation Instructions ASSEMBLY AND INSTALLATION The PRJ-WALLKIT-13 short throw projector mount is designed to be mounted to solid concrete, hollow concrete block, 2" x 4" wood studs (16" on center), or steel studs (16" on center). Assembling Wall Plate to Brackets 1 x 4 (dual stud) 2 x 2 (single stud) IMPORTANT ! : This step must be taken for BOTH single AND dual stud installations! 1. (G) Attach wall plate (B) to two dual stud brackets (G) using four 5/16" lock nuts (HF).
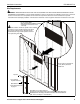
Installation Instructions PRJ-WALLKIT-13 Wood Studs Steel Studs 1. Using a stud finder and wall plate/bracket assembly, mark four preliminary mounting holes (dual stud) over center of wood studs, or two mounting holes (single stud) in wall plate. (See Figure 3) 2. Drill one 7/32" hole at marked location in wall. (See Figure 3) 3.
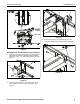
PRJ-WALLKIT-13 4. 5. Installation Instructions Holding plastic straps on anchor, pull anchor away from wall until channel rests flush behind wall making sure anchor channel is positioned vertically on stud. (See Figure 6) Slide plastic cap on anchor towards wall until flange of cap is flush with wall. (See Figure 6) x4 10 Steel Stud Steel stud Drywall x4 Drywall Plastic Cap 4 5 anchor x 4 Anchor Metal Channel (G) (side view) Anchor Metal Channel (side view) Figure 6 6.
Installation Instructions 2 PRJ-WALLKIT-13 Wall plate hook (B) (A) x1 2 3 x4 (G) Projector arm slots Figure 11 3. 1 Fasten short throw arm (A) to wall plate (B) using two 1/4-20 x 3/4" button head cap screws (HD). (See Figure 12) x2 3 (HD) x 2 Figure 9 Installing Short Throw Projector Arm to Bracket 1. Attach arm adjust plate (C) to wall plate ensuring that adjust plate tabs fit into notches on wall plate. Insert and slightly tighten one 1/4-20 x 1-1/4" button head cap screw (HE).
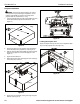
PRJ-WALLKIT-13 Installation Instructions Projector Installation 6 WARNING: Exceeding the weight capacity can result in x4 serious personal injury or damage to equipment! It is the installer’s responsibility to make sure the weight of the projector does not exceed 25 lbs (11.3 kg). 1. Insert and slightly tighten two M4 x 8mm Phillips pan head screws (HA) into the projector threaded inserts.
Installation Instructions PRJ-WALLKIT-13 Adjustments 2 Height Adjustment 1. Loosen two Phillips screws (one on left, one on right). (See Figure 17) 2. Turn the button head cap screw on top of mount clockwise to raise the mount (counterclockwise to lower the mount). (See Figure 17) 3. Tighten two Phillips screws. (See Figure 17) x1 OR (raise) (lower) Pitch Adjustment NOTE: Use a level to make this process easier. 4. 1 Loosen two Phillips screws (one on right, one on left). (See Figure 17) 5.
PRJ-WALLKIT-13 Installation Instructions Cable Management (Optional) 3. 1. Route cables/cords from projector through opening on projector arm and route to wall. (See Figure 18) 2. Guide cables/cords from wall end of projector arm upward or downward through slots in wall plate. (See Figure 18) Add end cap (D) to end of short throw projector arm. (See Figure 20) 3 2 (D) x 1 2 (projector not shown) 1 Figure 20 Projector Projector arm opening Figure 18 Add Plastic Covers 1.
Installation Instructions Visit the InFocus support site at www.infocus.
PRJ-WALLKIT-13 14 Installation Instructions Visit the InFocus support site at www.infocus.
Installation Instructions Visit the InFocus support site at www.infocus.
Installation Instructions InFocus Corporation 13190 SW 68th Parkway, Ste 200 Portland, OR 97223 8800-002462 Rev00 ©2013 InFocus Corporation www.infocus.