
Installation instructions


SP-WALLKIT-01 Installation Instructions
12 Visit the InFocus support site at www.infocus.com/support
Figure 23
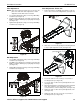
8. Slide outer cover of mount (A) back against mounting
bracket.
9. Reinstall two #8-32 x 3/4" Phillips pan machine screws (F)
through holes on sides of outer cover. (See Figure 24)
Figure 24
Cable Management (Optional)
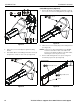
1. Remove two #8-32 x 3/4" Phillips pan machine screws (F)
to free outer cover from mounting bracket. (See Figure 25)
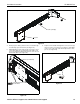
Figure 25
2. Slide outer cover of mount (A) away from mounting bracket.
(See Figure 25)
NOTE: In most cases, cable management covers will NOT
need to be removed in order to route cables from
projector to the wall mount. But for some thick cables,
removing the covers may be necessary.
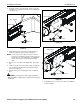
3. Remove cable management covers (if necessary) from
short throw projector arm. (See Figure 26)
Figure 26
(C) x 2
3 7
4 6
or
5
(F) x 2
9
(F) x 2
1
2
(bottom view)
small cable cover
large cable cover
3
3
projector