
Installation instructions


SP-WALLKIT-02 Installation Instructions
6 Visit the InFocus support site at www.infocus.com/support
Assembly and Installation
The SP-WALLKIT-02 short throw projector mounts can be
mounted to concrete, concrete block, wood studs or steel studs.
They can be mounted to studs up to 16" apart. For studs more
than 16" apart, the SP-WALLADPT-24 accessory (not
evaluated and tested by Underwriters Laboratories®) can be
used to mount projector.
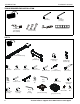
Mounting Wall Bracket
Concrete or Concrete Block
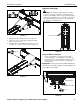
1. Determine mounting location on wall.
2. Using mounting bracket (B) as a template, mark four holes
at the holes in bracket. (See Figure 1)
3. Drill four 3/8" holes at marked locations in wall. (See Figure 1)
Figure 1
4. Install four concrete anchors (K) into drilled holes. (See
Figure 2)
5. Install four 5/16 x 2-1/2" hex head lag screws (L) through
four 5/16" washers (M), outer holes of mounting bracket (B)
and into concrete anchors (K). (See Figure 2)
Figure 2
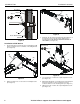
Wood Studs
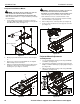
1. Determine mounting location on wall. Use a stud finder to
locate studs. For studs less than 16" apart, mounting
brackets will have to be adjusted. See Adjustments section
for details.
2. Draw a dotted line down the center of the studs to be used
for mounting.
3. Line up inner four holes on mounting bracket (B) with center
of studs at desired mounting location. (See Figure 3)
4. Using mounting bracket (B) as a template, mark four holes
at the holes in bracket. (See Figure 3)
5. Drill four 7/32" holes at marked locations in wall. (See
Figure 3)
Figure 3
6. Install four 5/16 x 2-1/2" hex head lag screws (L) through
four 5/16" washers (M), holes of mounting bracket and into
drilled holes. (See Figure 4)
Figure 4
2
3
x 4
x 4
(front view)
(B)
(B)
(L) x 4
5
(M) x 4
(K) x 4
4
(front view)
(B)
wood studs
4
5
x 4
x 4
(L) x 4
6
(M) x 4
(B)