
Installation Manual


MINIMUM 18" MINIMUM 18"
72" (1.8m) MINIMUM
HEIGHT FROM FLOOR
Detail of C-Series Multi-Position
Mounting Bracket Tab
WARNING: Positions selected
must meet all clearances from
combustibles (refer to page 2)
6-3/8" (15.2cm)
LEVEL HERE
WALL
CEILING
60º MAX.
60º MAX.
AIM POINT
WALL OR CEILING SWIVEL
MOUNTING BRACKETS (PAIR)
6" MOUNTING SURFACE
TO REAR OF HEATER
8" WIDE
LENGTH VARIES DEPENDING ON
MODEL (MAX. 61-1/4")
INSULATED HOUSING
WALL
CEILING
30º MAX.
60º MAX.
AIM POINT
WALL OR CEILING SWIVEL
MOUNTING BRACKETS (PAIR)
6" MOUNTING SURFACE
TO REAR OF HEATER
8" WIDE
LENGTH VARIES DEPENDING ON
MODEL (MAX. 61-1/4")
INSULATED HOUSING
4
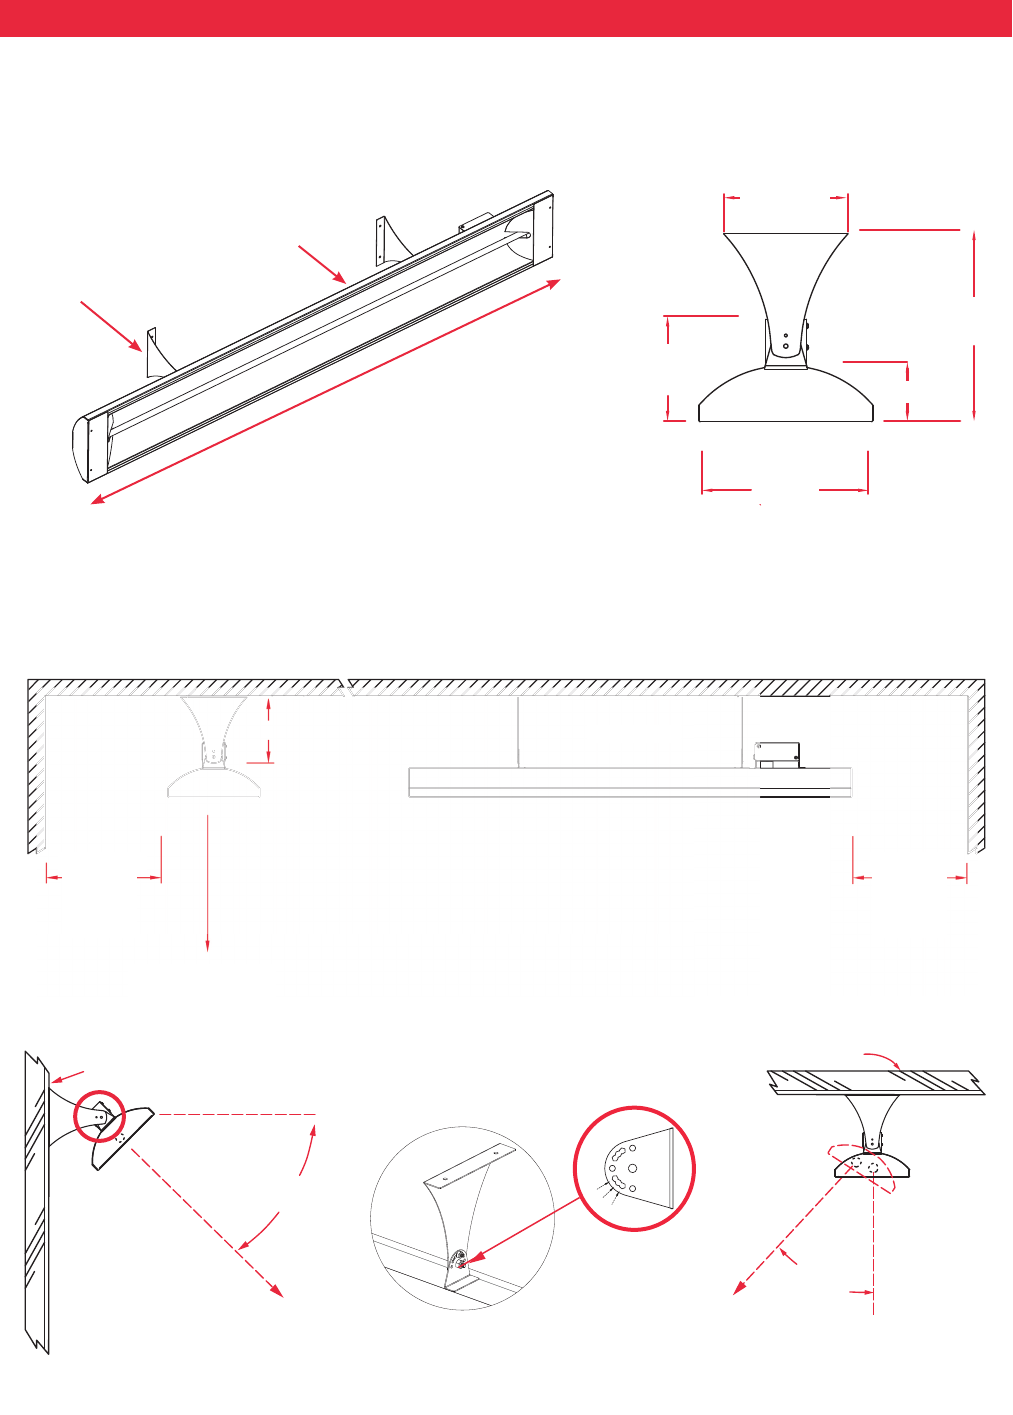
MOUNTING INSTRUCTIONS
These models may be chain or bracket mounted to any ceiling or horizontal surface. Installation must be such that 18"
(45.7cm) minimum clearance is maintained around the heater on all four sides and 36" (91.4cm) directly in front. A
minimum of 6" (15.24cm) of clearance provided by mounting brackets is required behind the plane of the face. Heater
can be hung using chains or custom brackets. Heater must be level, but can be rotated around its horizontal axis.
Heater must be installed with the quartz tube horizontally level. For maximum tube life, use a carpenter’s level tool to
fi nd the optimum level position for the heater’s body. It's important to always maintain the minimum clearances from
the heater body to any combustible materials.
2-1/2" (6.4cm)
8-3/16"
(20.2cm)
4-3/4"
(12cm)
SWIVEL MOUNTING BRACKETS
(CEILING OR WALL MOUNT)
LENGTH WILL VARY
DEPENDING ON MODEL
INSULATED HOUSING
6" (15.2cm)
8-7/8"
(22.5cm)
(45.7cm)
FROM SIDE
(45.7cm)
FROM SIDE
30º
60º
45º