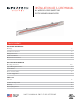
INSTALLATION USE & CARE MANUAL ALL WEATHER SL-SERIES QUARTZ TUBE ELECTRIC INFRARED RADIANT HEATER TABLE OF CONTENTS IMPORTANT INFORMATION Warnings 2 Installation Instructions 3 Wiring Instructions 3 Outdoor Installation 3 Maintenance Instructions 3 APPLICATION INFORMATION Mounting Instructions 3-4 Typical Wiring (Schematics) 4 General Notes 5 Areas Covered (Table) 5 Location Suggestions 7 PARTS LIST Parts List 6 Trouble Shooting Guide 6 Warranty 8 Warranty Registration 8 SAVE
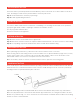
WARNINGS READ ALL INSTRUCTIONS BEFORE USING HEATER Unit may be a source of possible shock. NEVER attempt to service heater without disconnecting its power source. Source of possible ignition. CAUTION High Temperature, risk of fire, keep electrical cords, drapery, furnishings and other combustibles at least 3 feet (0.9m) from the front of heater and away from sides and rear. MOUNTING HEIGHT/CLEARANCES CLEARANCE FROM COMBUSTIBLES: MIN. 6" CLEARANCE BEHIND HEATER MIN. 18" FROM SIDES AND ENDS OF HEATER MIN.
INSTALLATION INSTRUCTIONS This heater must be permanently installed and hard wired by a licensed electrician in accordance with local electrical codes. Assembly procedure must be performed with no electrical power to unit. Step 1: Check UL/CE label on heater for proper voltage. Step 2: Follow supplied wiring instructions WIRING INSTRUCTIONS The heater is drilled and threaded for standard 1/2" conduit fittings.
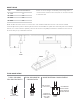
BRACKET SPACING MODEL Heater can also be hung in a horizontal position using chains or custom brackets. Heater must be level, but can be rotated around its horizontal axle. MINIMUM SPACING BETWEEN BRACKETS SL 16XX 12" SL 24XX 20" SL 30XX 30" SL 40XX 30" NOTE: DO NOT mount the heater on a vertical axis. Such installation will reduce the life of the element and will automatically void the product’s warranty. Heater must be installed with the quartz tube horizontally level.
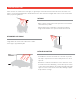
REPLACEMENT ELEMENT INSTALLATION Remove two screws from one end of trim and slide trim off opposite end to remove. Remove end reflectors. Open element clips at each end of the heater and carefully install the quartz tube. Remove one nut from end of element. Install wire by sliding high temperature ring terminal on to element screw and replace nut. NOTE: Hold ceramic element firmly while tightening nut to prevent damage to element. Nut should be tightened snug.
REPLACEMENT PARTS PART NUMBER PART DESCRIPTION QUANTITY 13-7004, 13-7002, 13-7000 Body Reflector Set (SL 16/24/30/40) 1 13-7008 End Reflector 2 13-7034, 13-7032, 13-7030 Lead Wire Set (SL 16/24/30/40) 1 13-7020, 13-7022 Bracket Set (Stainless Steel, Bronze) 1 13-7014, 13-7012, 13-7010 Grill (SL 16/24/30/40) 1 13-7028, 13-7026, 13-7024 Stainless Steel Trim (SL 16/24/30/40) 1 Need help? To order replacement elements for your Infratech heating system, please contact us via phone or visit t
LOCATION SUGGESTIONS Unless heaters are installed over 12 ft. high, it is generally recommended that all radiant heaters be mounted on an angle to assure that radiant warmth is distributed from the sides rather than straight down on the heads and shoulders of the people being warmed. OUTDOORS · When outdoors, hang heater under protective roof or weather cover whenever possible. · Even though heater is all-weather construction, it will last longer and look better if it is protected from rainand snow.
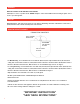
LIMITED PRODUCT WARRANTY Model #: Date of Purchase: Serial #: Purchased From: Thank you very much for purchasing a INFRATECH Quartz Tube Electric Heater. We have designed this heater to provide you and your family with many years of great outdoor experiences. Please fill in the Model and Serial number as well as date of purchase in the areas indicated above. Please save this information for future reference.