AXIUM PRINTER User Guide
Contents 1_Introduction 4 2_Presentation 5 2_1 Content of the box 5 2_1_1 Printer 5 2_2 Overview on the Axium Printer 3_Use of the terminal 6 7 3_1 Switching off the terminal 7 3_2 Advance paper 8 3_3 Meaning leds 8 4_Installation 9 4_1 Recommendations 9 4_2 USB Printer connections 4_2_1 USB 10 10 4_3 Opening trap door 10 4_4 Battery 11 AXIUM PRINTER 4_4_1 Main characteristics 11 4_4_2 Installing the battery 11 4_4_3 Charging the battery 11 4_4_4 Changing the battery 12
4_5 Paper roll 14 4_5_1 Main characteristics of INGENICO 14 paper roll 4_5_2 Installing paper roll 15 4_6 Installing Belt Attach 16 5_Recommendations 17 5_1 Safety 17 6_Standards 19 7_FCC/IC Compliance 20 7_1 Federal Communications Commission (FCC) Statement 20 7_2 Industry Canada (IC) Statement 21 8_Troubleshooting AXIUM PRINTER 21 3 Copyright© 2019 Ingenico All rights reserved 900035197 R11 000 03/0119
1_Introduction We hope that you will be fully satisfied with your new terminal Axium Printer. Please select by yourself in this documentation items related to your model. Read this guide to understand and make the best use of your terminal. It presents you the necessary information about use, installation, maintenance, safety and security recommendations. WARRANTY / SECURITY Use only the power supply included with the product to ensure best performance and safety.
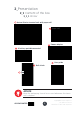
2_Presentation 2_1 Content of the box 2_1_1 Printer Axium Printer terminal unit with paper roll Paper roll Power adapter A battery pack disconnected User guide Belt attach Pin ADVICE Keep the packaging. It must be re-used whenever the terminal is shipped.
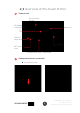
2_2 Overview of the Axium Printer Terminal unit Easy loading printer Bluetooth indication led Power Led Advance paper key ON key NFC pairing area Charging USB type C connector Compartment where are located: the battery pack AXIUM PRINTER 6 Copyright© 2019 Ingenico All rights reserved 900035197 R11 000 03/0119
Weight (without paper roll with battery) 167g Dimensions (L x w x h) 102x84x46 mm Electrical mains network 100-240VAC / 50-60 Hz Class VI equipment Connections on terminal Type C USB Power connector 3_Use of the Axium Printer ADVICE Before to use the terminal, always check if the roll of paper is present. 3_1 Switching off the Axium Printer If the battery is empty completelly, the terminal automatically shuts off.
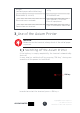
3_2 Advance paper Advance the paper by pressing “advance paper key”.
4_Installation 4_1 Recommendations Location of the Axium printer The printer should be placed far from any very hot zones, protected from vibrations, dust, damp and electromagnetic radiation (computer screen, anti-theft barrier etc.).
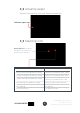
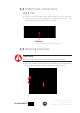
4_2 USB Printer connections 4_2_1 USB There is an USB connector (USB type C) on the left side of the Axium printer terminal (see below picture). This connector manages the battery charge. USB type C Connector used for PC travel charger, etc... 4_3 Opening trap door CAUTION Switch off the terminal before opening the trapdoor. Flip the printer and unclip the trapdoor by pushing on the clip with as shown with the arrows on the picture.
4_4 Battery 4_4_1 Main characteristics Characteristics Li-ion 2250 mAh Charge (power supply-1.0A) 50% capacity in 1:15; full capacity in 2:30 4_4_2 Installing the battery WARNING Check that the terminal is not connected to the main electric network.
4_4_3 Charging the battery When does the battery need to be charged? On initial start-up, charge the battery for 4 hours under the environmental conditions stated above When used with a terminal power supply: connect the power supply to Axium printer power connector. How does the battery need to be charged? For the power state of the printer, please refer to § 3.
4_4_4 Changing the battery It is imperative to use a battery authorized by Ingenico. There is danger of explosion if battery used is not approved by Ingenico. Turn it off by pressing “ON key” for about one second Remove the battery trapdoor (see section 4.3“opening trap door”) Lift the battery and remove it from its compartment Carefully disconnect battery, following the instructions below. Connect and install the new battery by following the instructions in section 4.4.
4_5 Paper roll 4_5_1 Mains characteristics of INGENICO paper roll R40 paper roll characteristics Precisions Colour White Width 58 mm Diameter 42 mm Length About 18 metres The thermal paper can be deteriorated by poor storage conditions, so we recommend you to avoid: / storage in hot wet places (near air-conditioner, humidity higher than 85%) / exposure to sunlight or ultraviolet for long periods / contact with organic solvents (solvent type adhesive) / direct contact with materials containing plas
4_5_2 Installing paper roll Open the paper compartment by pulling on each side of the printer and pull the cover to the rear of the terminal. Insert the paper roll in the compartment following the directions shown on the below picture Pull the paper up to the top of the terminal Maintain the paper and close the lid Press simultaneously on both upper corners of the paperflap, as shown by arrows on picture, until it clips into position when the paper is empty, power led flash quickly in red.
4_6 Installing Belt Attach Disconnect the battery by following the instructions in section 4.4.4 Insert the belt attach Remove the silicon part Insert the pin on the belt attach Pull the attach belt until you click Install the battery by following the instructions in section 4.4.
5_Recommendations 5_1 Safety Powering down the Axium Printer : Disconnect the Printer power supply block adapter from the electrical mains network. Battery Axium printer is fitted with battery specially designed for this terminal. Only use the appropriate chargers and batteries listed in the Ingenico’s catalogue. Do not short-circuit the battery. Do not attempt to open the battery container. Used batteries must be disposed of at the appropriated sites.
DC Power jack polarity In door user only International Efficiency Marking Protocol (Energy Star Level 5) On airplanes Your handset must be switched off by removing the battery pack. Remove the battery from the terminal when on an airplane. Non-compliance with these safety rules may result in legal action and/or a ban on later access to cellular network services.
6_Standards Environment (WEEE, Batteries and Packaging) This product is labeled in accordance with European Directives 2002/96/EC concerning Waste Electrical and Electronic Equipment (WEEE) and 2006/66/EC concerning Batteries and Accumulators. Those provisions are requiring producers and manufacturers to become liable for take-back, treatment and recycling upon end of life of equipment and batteries.
7_FCC/IC Compliance 7_1 Federal Communications Commission (FCC) Statement This device complies with Part 15 of the FCC Rules. Operation is subject to the condition that this device does not cause harmful interference. 15.21 CAUTION : This equipment may not be modified, altered, or changed in any way without signed written permission from “INGENICO”. Unauthorized modification may void the equipment authorization from the FCC and will void the “INGENICO” warranty. 15.
7_2 Industry Canada (IC) Statement. This device complies with Industry Canada licence-exempt RSS standard(s). Operation is subject to the following two conditions: 1) this device may not cause interference, and 2) this device must accept any interference, including interference that may cause undesired operation of the device. Under Industry Canada regulations, this radio transmitter may only operate using an antenna of a type and maximum (or lesser) gain approved for the transmitter by Industry Canada.
“This Document is Copyright © 2019 by INGENICO Group. INGENICO retains full copyright ownership, rights and protection in all material contained in this document. The recipient can receive this document on the condition that he will keep the document confidential and will not use its contents in any form or by any means, except as agreed beforehand, without the prior written permission of INGENICO.