Terminal User Guide iCT220 & ML30
Contents Section Title Page 1. Introduction 2 2. Important Safety Instructions 2 3. Declaration of Conformity 5 4. Installing the Terminal 6 5. Using the Terminal 9 6. Starting a Transaction 13 7. Sale Transactions 13 8. Setting the Referral Password 18 9. Refunds 19 10. Purchase with Cashback 20 11. Cash Advance 21 12. Purchase with Gratuity (Restaurants) 21 Refund with Gratuity 23 13. 14. Pre-Authorisation 24 15.
1. Introduction This guide will detail how you install and use your ICT220 terminal with ML30 PINpad, including safety information and instructions on transaction processing, printing reports and general maintenance of the terminal. 2. Important Safety Instructions Take care when unpacking, and inspect the product for any obvious external, or suspected internal damage. When in doubt, do not proceed to install or operate equipment. Contact your supplier.
External Power Supply • This apparatus is intended for use when supplied with power from a low voltage external power supply. • Only an Ingenico approved power supply (CE Marked) specified for use with this Terminal may be used. • Since this product does not have a disconnect device (ON/OFF switch), the Terminal and Power Supply must be installed near a suitable power socket which is easily accessible.
MODEM General Description The Terminal has an integral modem that allows the Terminal to transfer transaction data to card companies host computer systems. The internal modem supports: CCITT V22bis/V22/V21/V32, V32bis, V34 data transfer protocols. It has an automatic dialling facility. Disclaimer This equipment has been designed for connection to the local Public Switched Telephone Network (PSTN). The apparatus must not be subjected to any modification, in any material way, unless authorised by Ingenico.
3. Declaration of Conformity The CE marking indicates that the product supplied complies with the basic requirements of European Directive 1999/5/CE known as the R&TTE Directive concerning RF equipment and telecommunications terminals with respect to: • • The protection of the health and safety of the user and any other person. The protection requirements with respect to electromagnetic compatibility.
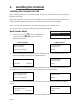
4. Installing the Terminal Installing the Terminal via PSTN Before switching the power on at the mains socket, plug the pre-connected telephone cable into your telephone wall socket. Position the terminal in a clear area where the display can be read and the keypad and card swipe are easily accessible. Position the PINpad where it will be easily accessible to the cardholder. Ensure you have your Merchant ID to hand. This can be found on your Welcome Letter.
PLEASE NOTE: If you have Call Waiting and select NO when prompted, the terminal will be unable to dial for authorisation when a call message is waiting. 3. Key in your Merchant Number and press the GREEN button. Terminal Installation Key in Merchant No. and then press ENTER Ready The terminal will start to dial Ingenico terminal configuration system (GEMS) and a number of communication messages will be displayed.
Installing the Terminal via Ethernet (IP) Before switching the power on at the mains supply, ensure that the Ethernet cable is connected to the ETH port on the terminal’s connector box, and to your router or network point. Position the terminal in a clear area where the display can be read and the keypad and card swipe are easily accessible. Position the PINpad where it will be easily accessible to the cardholder. Ensure you have your Merchant ID to hand. This can be found on your Welcome Letter.
Once the call to GEMS has completed the installation of the PINpad is complete. Installation of the terminal is now complete and the terminal will display the READY prompt. When you see the display below press the GREEN button. READY Merchant Number 12345678 Before you start using the terminal confirm that the date and time are correct. If this needs to be amended refer to Section 28 of this guide for details. 5.
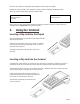
Swiping a Card The card should be swiped through the PINpad with the black magnetic stripe facing the terminal and running along the bottom of the card. You will be required to swipe the card if the chip cannot be read or if the customer has a card with only the magnetic swipe. Make sure that the bottom of the card runs firmly along the bottom of the card swipe and that the card is swiped at an even speed.
Using the Menus The Transaction Menu enables you to perform a transaction on the terminal. At the READY prompt press the MENU button. The first option on the list will be highlighted. The actual options shown may differ from those shown here. TRANSACTION MENU Refund Purchase with Cashback Force Sale PLEASE NOTE: Only three options can be displayed on the terminal screen at any one time. Use the keys to view the available options. Press the GREEN button to select a highlighted option.
Entering Letters You may need to enter letters using your terminal. Most numeric buttons have alphabetical characters allocated to them. e.g. the number 2 button has A, B and C allocated to it e.g. the number 5 button has J, K and L allocated to it To enter a letter press the relevant number button and then the MENU button to scroll through the letters until you select the character required. To enter the next letter you must again select the relevant number button.
6. Starting a Transaction IMPORTANT INFORMATION Your terminal may be configured to start a transaction by either entering the transaction amount first or by inserting/swiping the payment card. If your terminal is configured to accept Contactless payments it will always expect you to enter the transaction amount first for whichever type of transaction you are performing.
3. 4. Your terminal may be configured to allow Cashback, if Cashback is required press the GREEN button. SALE Cashback? If Cashback is not required press the YELLOW button and continue from step 4. Enter = YES If Cashback was required, enter the Cashback amount and press the GREEN button. PWCB Key in Cash Amount If Cashback is not configured, continue from step 4 below. and then press ENTER Clear = NO 0.
8. You will now be prompted to remove the customer’s card. The terminal will then print a MERCHANT receipt which must be kept for your records. SALE Please Remove Card REMOVE CARD Printing MERCHANT RECEIPT Please Wait... Tear Off MERCHANT RECEIPT Press ENTER if OK Press MENU to Reprint 9. Press the GREEN button and the terminal will return to the READY prompt. PLEASE NOTE: For security reasons and depending on the terminal configuration the full card number may not be printed on the receipts.
Sale (Swiping a card) 1. The customer should hand their card to you to swipe through the terminal. Once the card has been swiped the terminal will check the card. Terminal Displays SALE Insert or Swipe Card to Continue (or press Cancel key) 2. PINpad Displays INSERT CARD OR HAND CARD TO OPERATOR You may be prompted to confirm the last four digits of the card number. Key in the last four numbers from the customer’s card and then press the GREEN button.
7. Pass this receipt to the customer for their records. Tear Off CUSTOMER RECEIPT Press ENTER if OK Press MENU to Reprint 8. PLEASE WAIT The transaction is now complete and the terminal will return to the READY prompt. Voice Referrals Sometimes transactions will require you to obtain a voice referral from the Authorisation Centre.
If the YELLOW button is pressed, the terminal will display ‘Not Authorised’ and print a ‘Not Authorised’ receipt. The terminal will then return to the READY prompt. SALE Authorisation given? ENTER=YES CLEAR=NO SALE Key in Auth. Code and then press ENTER 4. If the GREEN button is pressed, enter the authorisation code provided by the Authorisation Centre and press the GREEN button. The terminal will now print the receipts and then return to the READY prompt. 8.
9. 1. Refunds At the READY prompt, press the MENU button. Use the key to highlight REFUND and then press the GREEN button. 2. TRANSACTION MENU Refund Purchase with Cashback Force Sale Either key in the amount of refund transaction and then press GREEN button or swipe/insert card into the PINpad and then key in the refund amount. Terminal Displays PINpad Displays REFUND Insert or Swipe Card to continue (or press Cancel key) PROCESSING PLEASE WAIT REFUND Key in Amount: 0.
3. If the value is above the Contactless Limit you will be asked to swipe/insert card. Normal card checks will be performed. If refunds are supervisor protected then you will be asked to swipe the supervisor card or key in the supervisor code. REFUND Present, Insert, Swipe Card to Continue (or press Cancel key) 5:00 AMOUNT £9.50 PRESENT OR INSERT CARD 10.
11. Cash Advance Please note that this option is only available for certain types of business. Please contact Customer Services for further information. PLEASE NOTE: Only certain types of cards allow Cash Advance. 1. At the READY prompt, press the MENU button. Using the key, select Cash Advance and then press the GREEN button. 2. Either key in the transaction amount and then press GREEN button or swipe/insert card in the terminal and then key in the transaction amount.
3. The customer will be asked to confirm the amount. They should press the GREEN button to accept or the YELLOW button to reject. Amount 20.00 Customer to confirm Amount Press ENTER to assist AMOUNT £20.00 ENTER TO Accept CLEAR TO Reject If the customer rejects the amount you will be prompted to press the GREEN button to re-enter the amount. 4.
The terminal will dial for authorisation and a number of messages will appear on the screen. If authorisation is obtained the terminal will print the customer’s receipt. Press the GREEN button if the receipt has printed correctly. If the receipt is not correct, press the MENU button for a re-print. The customer will be prompted to remove their card. The terminal will then print a MERCHANT receipt which should be retained for your records.
5. If a gratuity has been added, enter the amount of the gratuity and press the GREEN button. REFUND Key in 0.00 and then press ENTER 6. PROCESSING PLEASE WAIT You may be asked to key in the Waiter ID from the original transaction and press the GREEN button. REFUND Original Waiter ID: PROCESSING PLEASE WAIT and then press ENTER The transaction will now proceed as a normal refund transaction. NOTE: Please see Section 9 for information on how to complete a Refund Transaction. 14.
15. Completion PLEASE NOTE: If the final bill is more than the total pre-authorised amount, a further pre-authorisation may be required for the difference which must be obtained prior to carrying out the completion transaction. The following procedure will complete a pre-authorised transaction when the final amount is confirmed with the customer. 1. At the READY prompt, press the MENU button. Using the key, highlight COMPLETION and then press the GREEN button 2.
You have swiped a customers card at the READY prompt and the terminal displays ‘CARD READ FAILURE’ OR If you have selected the Sale option from the Transaction menu and unsuccessfully swiped the card three times, and the terminal displays ‘Key in Card Number.’ 1. At the READY prompt press the MENU button. 2. Use the keys to highlight SALE and then press the GREEN button. 3.
8. The signed receipt should be kept for your records. The terminal will now print a receipt for the customer. Pass the receipt to the customer and the transaction is complete. 9. If this is a mail order transaction, the YELLOW button will be pressed when asked if the customer is present. If not entered earlier in the process, key in the amount of the transaction and press the GREEN button.
11. To accept the transaction press the GREEN button and a customer receipt will be printed. Press the GREEN button again and this will print a copy of the receipt for your records. AUTH CODE: nnnnn Press ENTER to Accept Press CLEAR to Decline To decline the transaction press the YELLOW button and a void receipt will be printed for the customer. Press the YELLOW button again and a void receipt will be printed for your records. 17.
19. PIN Entry Failure If an incorrect PIN has been entered the PINpad and terminal will display ‘INCORRECT PIN’. 1. The cardholder has three attempts to enter their PIN after which the terminal will display the message: ‘PIN TRIES EXCEEDED’ INCORRECT PIN ENTER PIN 2. If this message is displayed the customer will need to contact their card issuer. PIN TRIES EXCEEDED DO NOT REMOVE CARD 3. The transaction will continue and seek authorisation with a signature verification.
21. Clearing Mistakes If a mistake is made when entering numbers or letters, press the YELLOW button until the incorrect numbers or letters have been removed or press the RED button to erase all input. Now re-key the correct entry. 22. Printing Duplicate Receipts 1. At the READY prompt press the MENU button. Using the key, highlight DUPLICATE RECEIPT and then press the GREEN button. 2. Press the GREEN button to print a duplicate receipt.
24. Waiter Totals 1. At the READY prompt, press the MENU button twice. The TOTALS option will be highlighted and then press the GREEN button and the TOTALS menu will be displayed. 2. Use the buttons to view the available options and press the GREEN button when the Waiter Totals option is highlighted. 3. You will then be asked to swipe your Supervisor Card or enter your Supervisor code. 4. Press the GREEN button to print the totals.
5. You will now have the choice of selecting totals for ALL card types or selecting those card types you wish to bank. Press the GREEN button to reconcile ALL card types and the terminal will contact each acquirer before printing the report or press the YELLOW button to select the acquirers you wish to reconcile. Select card types to be banked Press ENTER for ALL Press CLEAR to SELECT PLEASE NOTE: This screen will only be displayed if your terminal is set up with more than one acquirer. 6.
27. Waiter ID’s (Restaurants) Default Waiter 0 A default waiter, Waiter 0: SHARED will be created automatically by the terminal. This can be used if you do not want to create individual Waiter ID’s. All Sale transactions with gratuity will add tips/gratuities to this waiter without the need for a waiter ID to be entered during transaction processing. The total of all ‘Waiter 0’ tips/gratuities will be printed as part of the Waiter Totals Report showing the total value of tips/gratuities performed.
1. Key in the Waiter ID code that is to be deleted and then press the GREEN button. DELETE Waiter Key in Code to Delete and then press ENTER 2. If you want to proceed to delete the Waiter, press the GREEN button. If not, press the YELLOW button. nn DELETE Waiter nn Enter = YES Clear = NO Changing a Waiter ID Follow steps one to five of Section 27 (Adding an Individual Waiter ID) and select Change Name from the WAITER SETUP menu. Now proceed as follows: 1. 2.
1. At the READY prompt press the MENU button twice. 2. Using the key highlight the SELECT FUNCTION option and then press the GREEN button. 3. Key enter the number 30 and press the GREEN button. You will then be asked to swipe the Supervisor Card or key in your Supervisor code. 4. The current date will be displayed. Re-key the correct date and press the GREEN button. SET DATE/TIME Enter Current Date The current time will be displayed. Re-key the correct time and press the GREEN button.
30. How to Change a Paper Roll 1. 2. 3. 4. 1. Hold the terminal securely in one hand. With the other hand using two fingers to lift the printer cover release as shown. 2. Unstick the end of the new roll. Leaving the end free, hold the paper roll and carefully place into the printer compartment. 3. Holding the free end of the paper and your terminal, close the printer cover carefully and push firmly until it locks. 4.
33. Helpful Hints Terminal Tips • Your terminal unit should be left in your retail premises and plugged into a 24 hour power supply and telephone line at all times. • If the terminal display is blank, ensure the terminal is plugged into the power supply. • If you have poor quality printing, change the paper roll. • Keep your Supervisor card in a secure place. Anyone with access to this card or code may perform unauthorised refunds.
34. Miscellaneous Prompts Below are explanations for some of the common prompts displayed by the terminal. PROMPTS Call Auth centre CAUSE/REASON REMEDY Assistance required. Call the Authorisation Centre on the number displayed by the terminal. Once you have spoken to the Authorisation Centre press the GREEN button and follow the prompts displayed by the terminal. Call Helpdesk Assistance required. Please contact your Helpdesk.
Ingenico Ridge Way Donbristle Industrial Park Dalgety Bay Fife KY11 9JU Part Number: DIV434692A_Cover