by Whirlpool Corporation ELECTRICRANGE For questions about features, operation/performance, accessories or service, call: 1-800-253-1301. parts, Table of Contents ................................................. To the installer: Please leave this instruction book with the unit. To the consumer: Please read and keep this book for future reference.
TABLEOF CONTENTS RANGE SAFETY ............................................................................. The Anti-Tip Bracket .................................................................... PARTS AND FEATURES ................................................................ COOKTOP USE .............................................................................. 3 3 5 6 Cooktop Controls .........................................................................
RANGESAFETY Your safety and the safety of others are very important. We have provided many important safety messages in this manual and on your appliance. Always read and obey all safety messages. This is the safety alert symbol. This symbol alerts you to potential hazards that can kill or hurt you and others. All safety messages will follow the safety alert symbol and either the word "DANGER" or "WARNING.
iMPORTANT SAFETY iNSTRUCTiONS WARNING: To reduce the risk of fire, electrical shock, injury to persons, or damage when using the range, follow basic precautions, including the following: [] WARNING: TO REDUCE THE RISK OF TIPPING OF THE RANGE, THE RANGE MUST BE SECURED BY PROPERLY INSTALLED ANTI-TIP DEVICES. TO CHECK IF THE DEVICES ARE INSTALLED PROPERLY, SLIDE RANGE FORWARD, LOOK FOR ANTI-TIP BRACKET SECURELY ATTACHED TO FLOOR, AND SLIDE RANGE BACK SO REAR RANGE FOOT IS UNDER ANTI-TIP BRACKET.
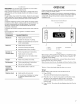
PARTSAND FEATURES This manual appearances covers several different of the features shown models. The range you have purchased may have some here may not match those of your model. or all of the items listed. The locations and Control Panels OFF )0: _o A ( B A. Right front control knob B. Right rear control knob C. Bake and broil oven control knob E F D. Oven temperature control knob E. Oven heating indicator light F. Surface heating indicator light G G. Right rear control knob H.
COOKTOPUSE To Remove: 1. Push in the edge of coil element toward the receptacle. Then lift it enough to clear the burner bowl. 2. Pull the coil element straight away from the receptacle. 3. Lift out the burner bowl. Fire Hazard Turn off all controls when done cooking. Failure to do so can result in death or fire. The control knobs can be set to anywhere between HI and LO. Push in and turn to setting. On some models, the surface cooking area Iocator shows which element is turned on.
IMPORTANT: Donotleaveemptycookware ona hotsurface cooking area,element orsurface burner. Idealcookware shouldhaveaflatbottom, straight sidesanda well-fitting lid,andthematerial should beofmedium-to-heavy thickness. Rough finishes mayscratch thecooktop. Aluminum andcopper maybeusedasacoreorbaseincookware. However, whenused asabasetheycanleavepermanent marksonthecooktop or grates. Cookware material isafactorinhowquicklyandevenly heatis transferred, whichaffects cooking results.
TheTimercanbesetinminutes andseconds orhoursand minutes andcountsdownthesettime.TheTimerdoesnotstart orstoptheoven. To Adjust Oven Temperature Calibration (on models with manual oven control): 1. Make sure the oven temperature control knob is in the Off position. Pull oven temperature control knob straight off and turn it over. To Set: 1. Press TIMER. The colon will flash during Timer programming. 2. 3. Press the "up" or "down" Press TIMER. arrow pads to set length of time.
IMPORTANT: Donotplacefoodorbakeware directly ontheoven doororbottom. Permanent damage willoccurtotheporcelain finish. RACKS NOTES: • Position racksbefore turningtheovenon. • Donotposition rackswithbakeware onthem, • Makesureracksarelevel. Tomovea rack,pullitouttothestopposition, raisethefront edge,thenliftout.Usethefollowing illustration andchartsasa guide. The bakeware material affects cooking results. Follow manufacturer's recommendations and use the bakeware size recommended in the recipe.
To Broil: 1. Push in and turn oven control knob to BROIL. Before baking androasting, position theracksaccording tothe "Positioning Racks andBakeware" section. Whenroasting, it is notnecessary towaitfortheoventopreheat before putting food in,unless recommended intherecipe. To Bake or Roast: 1. Push in and turn the oven control knob to the desired temperature setting. The OVEN ON and OVEN HEATING lights will turn on, and the set temperature will appear in the display for 5 seconds.
RANGECARE How the Cycle Works IMPORTANT: The heating and cooling of porcelain on steel in the oven may result in discoloring, loss of gloss, hairline cracks and popping sounds. The Self-Cleaning cycle uses very high temperatures, to a powdery ash. The oven is preset for a 3 hour 30 minute clean cycle, but the time can be changed. Suggested clean times are 2 hours 30 minutes for light soil and between 3 hours 30 minutes to 4 hours 30 minutes for average to heavy soil.
IMPORTANT: Before cleaning, make sure all controls are off and the oven and cooktop are cool. Always follow label instructions on cleaning products. Porcelain enamel only, not chrome • Dishwasher Gas Grate and Drip Pan Cleaner Part Number 31617 (not included): Soap, water and a soft cloth or sponge are suggested first unless otherwise noted.
STORAGE DRAWER ( on some models) WARMING DRAWER and TRAY ( on some models) Make sure drawer is cool and empty before cleaning. Make sure drawer is cool and remove tray. For more information, Cleaning Cleaning • see "Storage Drawer" section. Method: Method: • Mild detergent (for both) Mild detergent • All-Purpose Appliance Cleaner Part Number 31662 (not included): Drawer Liner (on some models) Remove all stored items from drawer and lift out drawer liner.
The storage drawer can be removed. Before removing, make sure drawer is cool and empty. 2. Lift up the front of the drawer to a level position. 3. Slowly push the drawer into the range until the drawer side rails engage with the gap in the drawer glides. To Remove: 1. Pull the storage drawer straight back past the drawer stop notch and the end of the side rails A. Engage drawer glide 4. A. Drawer stop notch B. End of side rail 2.
Oven cooking Is there proper air circulation around bakeware? See "Positioning Racks and Bakeware" section. results not what expected • Is the appliance level? Level the appliance. See the Installation Instructions. • Is the batter evenly distributed in the pan? Make sure batter is level in the pan. • Is the proper temperature set? Double-check the recipe in a reliable cookbook. • Is the proper length of time being used? Adjust cooking time.
WHIRLPOOLCORPORATIONMAJORAPPLIANCEWARRANTY ONE YEAR LIMITED WARRANTY For one year from the date of purchase, when this major appliance is operated and maintained according to instructions attached to or furnished with the product, Whirlpool Corporation or Whirlpool Canada LP (hereafter "Whirlpool") will pay for FSP replacement parts and repair labor to correct defects in materials or workmanship. Service must be provided by a Whirlpool designated service company. ITEMS WHIRLPOOL WILL NOT PAY FOR 1.