User Guide English ( 3 – 11 ) Guía del usuario Español ( 12 – 20 ) Guide d’utilisation Français ( 21 – 29 ) Guida per l’uso Italiano ( 30 – 38 ) Benutzerhandbuch Deutsch ( 39 – 47 ) Gebruikershandleiding Nederlands ( 48 – 56 ) Appendix English ( 58 – 59 )
User Guide (English) Introduction Features • • All-in-one, easy-to-use wireless microphone system for professional applications Dual-antenna UHF diversity receiver for increased reliability and signal consistency • UHF band operation (520–937.
Important Safety Precautions Please note: Alto Professional and inMusic are not responsible for the use of its products or the misuse of this information for any purpose. Alto Professional and inMusic are not responsible for the misuse of its products caused by avoiding compliance with inspection and maintenance procedures. Please also refer to the included safety and warranty manual for more information.
Features Transmitter Your Radius 100 includes one of the following transmitter systems: • Radius 100: a hand-held condenser vocal microphone transmitter • Radius 100H: a headset microphone and wireless belt-pack transmitter • Radius 100L: a lavalier microphone and wireless belt-pack transmitter • Radius 100M: a 1/4” (6.35mm) instrument adapter cable and wireless belt-pack transmitter Condenser Microphone Transmitter (Radius 100) 1.
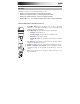
Belt-Pack Transmitter (for Radius 100H headset, Radius 100L lavalier microphone, or Radius 100M instrument cable) 1. Power/Mute Button: Press this button for 2 seconds to power the transmitter on or off. Press this button briefly to mute or unmute the transmitter. 1 2 2. Power/Mute LED: This light indicates the power or mute status: 6 4 • Red light: The transmitter is on. • Flashing red light: The transmitter is low on battery power. 3 7 • Blue light: The transmitter is muted.
Display 5 7 GR 1 2 3 4 6 9 Ch 1 2 3 4 5 6 7 8 FREQ MUTE SYNC 4 MHz RF AF CH MANUAL SCAN PRESET 11 1 2 3 8 10 1. Manual: This indicator appears when the receiver is in Manual Mode, where you can select the channel manually. Use the Up/Down buttons to cycle between the different modes. 2. Scan: This indicator appears when the receiver is in Autoscan Mode, where the receiver automatically selects the channel with the clearest and strongest reception. 3.
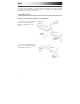
Operation To set up and use your Radius 100, follow the steps in this chapter in order. If you are setting up a system using multiple receiver-transmitter pairs, set up each pair one at a time, and keep each pair powered on as you set up others. 1. Set Up the Receiver Optional: Connect Rackmount Pieces and/or Antennas To use two receivers in a standard 19” rack, use the included rackmount brackets, coupling brackets, and screws.
Set Up the Receiver’s Connections, Mode, and Channel 1. Use the included power adapter to connect the receiver's power input to your power source. The receiver will power on automatically. 2. Use a standard XLR cable or 1/4” (6.35mm) to connect one of the receiver’s audio outputs to your mixer or amplifier system. Do not use both audio outputs at the same time; this can result in signal loss or increased noise. 3.
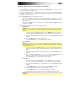
2. Set Up the Transmitter Condenser Vocal Microphone Transmitter: 1. Remove the transmitter’s battery compartment cover and insert 2 AA batteries into the compartment. Make sure the polarities of the batteries (+ and –) are correct. 2. Reattach the battery compartment cover. 3. Press the transmitter’s Power Button for 4 seconds to power the transmitter on or off. Wireless Belt-Pack Transmitter: 1. Remove the transmitter’s battery compartment door and insert 2 AA batteries into the compartment.
Troubleshooting Problem Solution The receiver does not produce any sound. Make sure the receiver’s power adapter is properly connected to the power input and a power source. Make sure the transmitter’s batteries are properly inserted and that their polarities (+ and –) are correct. Make sure the transmitter and receiver are set to the same frequency. Make sure the receiver’s audio output is properly connected to your mixer, amplifier system, etc.