
User's Guide


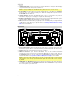


Table Of Contents
- User Guide (English)
- Guía del usuario (Español)
- Guide d'utilisation (Français)
- Guida per l'uso (Italiano)
- Benutzerhandbuch (Deutsch)
- Appendix (English)

7
Operation
Wireless Microphone Setup
To use a wireless mic, follow these setup
steps:
1. Connect the UHF antennas to Convoy.
2. Install 2 new AA alkaline batteries in the
wireless microphone.
3. Adjust the Line/Mic/Wireless Mic switch to
the Wireless Mic position for the channel
that you want to use with the wireless mic.
4. Pair the wireless mic to Convoy.
a. Turn on Convoy and the wireless mic.
b. Select a group and channel with the
best reception. Press and hold the Up
button on the receiver to cycle through
groups 1–4, and then use the
Up/Down buttons to select a channel,
from 1–16.
c. Place the wireless microphone IR
sensor near the receiver’s IR LED and
press the Pair button on the receiver.
Wait for about 3 seconds until the IR
LED stops flashing. When it finds an
interference-free channel, the RF LED
will illuminate on the receiver showing
the mic is matched to that channel.
5. As you speak, adjust the channel Volume
knob on Convoy for more or less output
signal.
6. Repeat steps 1-5 to pair to another wireless
mic.
Note: Convoy has 2 UHF modules which can each cycle through groups 1-4. The left side
UHF module is set to Group 1 by default and the right side UHF module is set to Group 2 by
default.
Note: When using two wireless microphones (or other transmitters) with Convoy, the two IR
receivers must be set to separate UHF groups. Pairing two transmitters on the same group
may result in feedback.
To change the wireless channel, use the Up/Down buttons on the receiver. The wireless
microphone may show a different channel or group on its display, but the wireless connection
will remain active. However, if the wireless channel or group is changed from the transmitter,
you will need to resync with the receiver by following the steps above.
If the signal is interrupted or the receiver becomes disconnected from the wireless
microphone, the RF LED will no longer be lit. Follow the directions above to resync the
receiver and transmitter.
PAIR
UP
DOWN
IR LED
RF LED
IR sensor