OPERATION GUIDE EDR10512 r1 5/05 Document Part No.
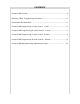
CONTENTS S-cape II MR Function ......................................................................................... 4 Optional “J Box” Programming Procedure ........................................................ 5 Powerdown Box Operation . ..............................................................................5 S-cape II MR Programming (1 hand control - 1 bed) ........................................ 6 S-cape II MR Programming (2 hand controls - 1 bed).......................................
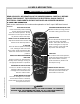
S-CAPE II MR FUNCTION IMPORTANT INFORMATION READ ADVISORY INFORMATION IN THE OWNERS MANUAL CAREFULLY BEFORE USING THIS PRODUCT. THE POTENTIAL FOR ELECTRICAL SHOCK EXISTS IF ELECTRICAL COMPONENTS ARE NOT INSTALLED OR OPERATED PROPERLY. S-CAPE II MR OPERATION Refer to the matrix below for location and explanation of the S-cape II MR hand control buttons: POSITION BUTTONS Press and release position button and the bed will automatically move to selected position.
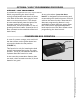
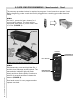
OPTIONAL “J BOX” PROGRAMMING PROCEDURE ALTERNATE “J BOX” PROGRAMMING For adjustable beds equipped with “J box” only—no power down box. When programming the hand control, unplug the adjustable bed electrical power cord. Wait 30 seconds, then plug the cord back in to the power source. This simple process automatically sets the bed to the program mode for 90 seconds.
S-CAPE II MR PROGRAMMING 1 hand control - 1 bed The two step procedure below is required to program 1 hand control to operate 1 bed. Before beginning, make certain the bed is plugged into a working grounded electrical outlet. STEP 1 On bed 1, press the learn button for 1 second and release. The bed will be equipped with either a power down box or J box (FIGURE 1). POWER DOWN BOX LEARN BUTTON LEARN BUTTON NOTE: POWER DOWN BOX IS NOT MOUNTED TO BED FRAME.
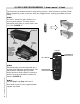
S-CAPE II MR PROGRAMMING 2 hand controls - 1 bed The three step procedure below is required to program 2 hand controls to operate 1 bed. Before beginning, make certain the bed is plugged into a working grounded electrical outlet. STEP 1 On bed 1, press the learn button for 1 second and release. The bed will be equipped with either a power down box or J box (FIGURE 1). POWER DOWN BOX LEARN BUTTON LEARN BUTTON NOTE: POWER DOWN BOX IS NOT MOUNTED TO BED FRAME.
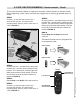
S-CAPE II MR PROGRAMMING 1 hand control - 2 beds The three step procedure below is required to program 1 hand control to operate 2 beds. Before beginning, make certain the beds are plugged into a working grounded electrical outlet. STEP 1 On bed 1, press the learn button for 1 second and release. The bed will be equipped with either a power down box or J box (FIGURE 1). POWER DOWN BOX LEARN BUTTON LEARN BUTTON NOTE: POWER DOWN BOX IS NOT MOUNTED TO BED FRAME.
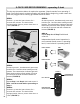
S-CAPE II MR PROGRAMMING 2 hand controls - 2 beds The six step procedure below is required to program 2 hand controls to operate 2 beds. Before beginning, make certain the beds are plugged into a working grounded electrical outlet. STEP 1 On bed 1, press the learn button for 1 second and release. The bed will be equipped with either a power down box or J box (FIGURE 1). POWER DOWN BOX STEP 5 On hand control 1, simultaneously press and hold the Pos 1 and the head massage on/off buttons.
S-CAPE II MR REPROGRAMMING separating 2 beds The six step procedure below is required to separate 2 hand controls from operating 2 beds. One hand control per bed operation will result. Before beginning, make certain the beds are plugged into a working grounded electrical outlet. STEP 1 On bed 1, press the learn button for 1 second and release. The bed will be equipped with either a power down box or J box (FIGURE 1).