
Installation Instructions


12
S
I
U
A
B
C
A
B
C
C
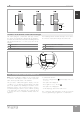
PARETE LATO
INTERNO
INSIDE WALL
PARETE LATO
ESTERNO
OUTSIDE WALL
2.7
INSTALLATION
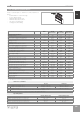
Junction line
Hook
Flap in vertical position
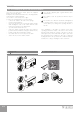
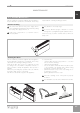
Assembling air ducts and external shutters
Once the holes have been made, place the supplied
plastic sheets inside them.
Roll up the sheet and insert it in the hole, checking that the
A junction line is aiming upwards.
Use a cutter to remove any excess pipe.
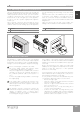
To place the external grids, proceed as follows:
- connect the chains to the ends of the springs;
- fold the external shutters;
- insert your arm in the hole to push the shutter outside
while holding the ends of the chains with the other
hand to prevent them from falling down;
- open the shutter inside the hole;
- rotate the shutter to bring the flap in the vertical C
position and check that the closing mechanism works;
- pull the chains by tensioning the springs;
- use a bolt cutter to remove any excess chain.
- anchor the hook of the chain to wall B.
Use only the supplied grids or grids with the same
characteristics.
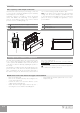
The shutters must be positioned with the flap in
vertical.
The shutters are different. Should be distinguished
from that position on the recovery from the one place
on the delivery, according to the opening direction of
the fins.
Once installation of the grilles is complete check their
opening (towards the inside of the duct for the air inlet
grid "IN" and towards the outside of the duct for the air
outlet grid "OUT"). Remember that the grilles open when
the external air flow is activated, to allow the cooling and
heating functions to be operated. The conditioner must be
activated for cooling or heating in order to test them.