OT-2 OBD-II USB/WiFi Interface for PCs & Smartphones User Manual
TABLE OF CONTENTS 1 2 3 4 5 6 7 8 9 OT-2 ........................................................................................................................................ 3 Initial Installation ..................................................................................................................... 4 2.1 Locating and connecting the OT-2 to the OBD-II port.................................................... 4 2.2 Automatic Sleep Mode ....................................................
1 OT-2 The OT-2 is an OBD-II USB/WiFi Interface for PCs & Smartphones. The unit is capable of reading up to 16 channels of “OBD-II” (“On Board Diagnostic) information directly from your vehicle’s ECU and integrate it into an Innovate MTS (“Modular Tuning System”) “Log Chain”. The data from the OT-2 can be logged and analyzed on a personal computer using Innovate’s award winning LogWorks software or on your iPhone or iPod touch with the LogWorks Mobile app available in the Apple App store.
2 Initial Installation The OT-2 can be connected to either a Windows PC with USB or Wifi capabilities or with your iPhone or iPod touch. 2.1 Locating and connecting the OT-2 to the OBD-II port The OBD-II connector is required to be within 3’ of the driver’s seat in the vehicle and accessible without tools. Generally it is somewhere just behind the bottom edge of the dashboard, immediately in front of the driver, but it may be in a relatively obscure place, like hidden behind an ashtray.
peak operation, the unit draws about 300 mA (.3 amps), and power down mode is about half that, generally 150-200 mA. The key benefit is that the ECU (and all it’s affiliated sensing circuitry), is not inadvertently being kept awake. If your vehicle is not operated regularly, or the electrical system does not have much excess capacity you can either unplug your OT-2 when not in use, or use an automotive relay to supply power to the unit only when the ignition is on.
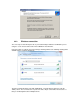
2.4.2 Wireless connection The exact steps for this will vary based on your network adapter and flavor of Windows you are using, the screen shots below are taken from a Windows Vista machine. Launch the wireless network connection manager. A dialog similar to the following showing all the available wireless networks will appear: The OT-2 network will always start with “INNOVATE_” and end with four characters (like the “C8F6”) above.
To connect, select the network by clicking on it so it is highlighted (as shown above), and then pressing the “Connect” button in the bottom right corner of the screen. Since the Ad Hoc network that the OT-2 creates is unsecured, you may get a warning like this: Select “Connect Anyway”. After Windows reports that you have joined the network, there is a brief period of 1-5 seconds while the computer is still obtaining some additional information from the OT-2 (just like joining any other network).
3 LogWorks Mobile (iPhone and iPod touch) The LogWorks Mobile application can be installed from the Apple App Store. A search for “LogWorks” will yield results for the application. Once installed you should see the LogWorks icon on your iPhone or iPod Touch. The LogWorks Mobile application has 5 different “Tabs” which can be selected on the bottom of the application pane: Dyno, Economy, LogWorks, DTC, and OT-2. Many of the tabs offer multiple screens. These can be accessed by 'swiping' left and right.
3.1.1 Types of Dyno runs The Dyno supports 2 types of runs, distance and fixed gear. A Distance Run is speed, time, and power measured over a quarter-mile. These can be useful for gauging general vehicle performance. Fixed Gear runs are generally made in one gear over a user specified RPM range (OT-2 hardware required). This is generally more useful for performance tuning, particular with the addition of wideband (lambda/AFR) measurements from an MTS compatible device (like the Innovate Motorsports LC-1).
3.2.2 Entering Fill-Up Information Swipe left until the fill-up summary screen is in view. Press the “Fill-up” button. The fill-up summary utility tries to detect missed entries (fill-ups not entered) so that averaging over time will not be distorted. The distance threshold for ‘missed’ can be set by pressing the ‘i’ button. It is generally cheaper and better for the environment to fill up completely each gas stop, however, do not hesitate to log partial fill-ups.
Channel Functions: The channels that are listed are the channels that the ECU reports as available. You will notice that you have the option of selecting whether you want the channel to be Normal or Low priority. This feature will allow you to scan non essential channels less often to gain greater speed for more important channels. See chapter 6 on OBD-II Channel speed for more information, 4. Press Done on the upper right hand corner when done configuring. 3.3.
3.4 DTCs Tab This tab is for viewing and clearing ‘Diagnostic Trouble Codes’ on your vehicle. It requires OT-2 hardware to operate. Within this tab you can scan for DTCs, clear DTCs, and view the status of emission tests 3.4.1 Scan for DTCs If hardware is present and connected a scan will happen automatically when you select this tab. To scan again, press the ‘Re-Check’ button. Note: If there are more codes than can fit on the screen you can scroll the text by swiping up and down. If you are running OS 3.
OBD-II Protocol: Select which OBD-II protocol to connect with. We suggest leaving this setting set at Automatic. Channel Functions: The channels that are listed are the channels that the ECU reports as available. You will notice that you have the option of selecting whether you want the channel to be Normal or Low priority. This feature will allow you to scan non essential channels less often to gain greater speed for more important channels. See chapter 6 on OBD-II Channel speed for more information, 3.
3. Select “Connect”, either the leftmost icon on the toolbar (it is supposed to be a male and female socket with arrows in both directions below) or select “Connect” from the “File” menu. A box like this should appear: The ‘combo box’ will also show any COM ports that you have attached to your computer. If you are connected via Wi-Fi, select “Innovate Network Device” (like above). If you are connected via USB, select “Innovate USB Device”. In both cases, finish by pressing the “Connect” button.
4.2 Select OBD-II Protocol and number of MTS Channels 1. Connect the OT-2 to the USB port on your computer or establish a WiFi connection. 2. Run LM Programmer (version 3.27 or newer). LM Programmer can be found under “All Programs”, “LogWorks3”. 3.
4.3 Assign MTS Channels to OBD-II Inputs The Inputs Tab allows you to assign the generated MTS channels to a particular OBD-II value: In order to do this, the OT-2 must be connected to the ECU in the vehicle (vehicle light on and blinking). If it is not, you will be warned and the current input assignments will be displayed but you will not be able to edit them. If this happens, you can turn on the vehicle, wait for the vehicle light, leave the Inputs tab, and return to it.
Standard Trouble Codes are listed both with a number and a description. Manufacturer specific codes will generally just appear as a number, though sometimes, like the case above, the general category can be identified. You can request that the ECU clear the pending codes using the Clear and Refresh button at the bottom right corner of the page. Note: On some vehicles, the ignition must be on, but the vehicle not started, for the Clear DTC request to be accepted.
5 Installing an OT-2 with an LC-1 or other MTS compatible device 1. With ALL MTS DEVICES OFF (no power) and the OT-2 DISCONNECTED FROM OBD-II, connect the Serial OUT port from your last MTS device to the Serial IN port on your OT-2 with a suitable patch cable 2. Find the OBD-II connector in your passenger vehicle 3. Plug the OT-2 into the OBD-II port and observe the MTS light.
Notice that the data appears ‘steppy’ and, based on the timeline, appears to be updating about 6 times per second. Next we have a log trace of 16 channels (RPM, MAF, MAP, TP, you name it) from a 2006 Saturn: Even if we zoom in to a closer time scale, the data is quite smooth. Performance is controlled by two things: • • The Connection Speed ECU Responsiveness The Lexus in the first example is using ISO 9141 and 10.4K bits per second. The Saturn is using ISO 15765 (CAN) at 500K bits per second.
Like the Saturn, it is connected using 500K bit CAN, but we can begin to see some ‘steppiness’ in the RPM channel with only 8 channels being collected. In addition, some values, like the Calculated Load are courser still. Presumably because the ECU itself is only calculating them a few times per second. With this in mind, it is probably best to assign channels only a few at a time and then select “Program”.
can be read more often. To understand how this works let’s take a look at how the OT-2normally reads values: As we can see from the diagram on the right, values are read from the ECU one after another, in a loop. Since takes the ECU has certain amount of time to respond to each query, the longer the list of channels, the longer it takes to complete the loop. Obviously, the longer to takes to complete the loop, the larger the time gap between each read of an individual value.
But what would happen if we also added ECT, IAT, MAF, and MAP? If we left all our channels at normal priority, some critical channels may not be fast enough for our purposes: But not all channels change quickly and we are more concerned with some channels than others. For example, let’s say we are primarily concerned with RPM, SPARKADV, and FUEL1_OL.
like VSS, IAT, ECT, MAF, and MAP but we do not care if they update slowly.
This extra resolution comes at the expense of our Low Priority inputs. These channels all share the ECU ‘bandwidth’ once used by VSS alone. But, this lets us have high resolution critical data combined with lower priority, lower resolution data in the same log. 7 Tip, Tricks, and Troubleshooting 1. Can I use the Wi-Fi network advertised by the OT-2 for other things? Absolutely! In development we use the same network to move files between laptops and the iPhone in the vehicle.
A. The problem is that there is no standardized way to obtain MPG from the OBD-II port. Also, the available information varies between makes and models. Other concerns are the precision and the update rate of the data. Take the example of many older Honda vehicles. Information available includes MAP, IAT, RPM, and VSS. So, in theory, fuel consumption is somewhat knowable.
9 Revision History 1.