
User's Manual


FOR OFFICIAL USE ONLY 4
2. Unpacking and Battery Installation
2.1. Unpacking Coyote UGS Node and Accessories
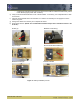
Open the shipping box and unpack its contents: Coyote UGS Node, Antenna, Umbilical Cord, and Batteries (if
purchased). See Figure 2.
CoyoteUGS Node: FAP4100-001
Umbilical Cable: RCL4200-010
Antenna: RAT1000-006
Battery: FAA9000-539
Figure 2 – Coyote UGS components
2.2. Installing Batteries
Note: Be sure to review the battery use instructions and warning labels on the battery and inside the enclosure
prior to installing batteries
a) To install batteries, remove all screws from around the edge of the Coyote UGS node and open the lid,
taking care not to damage any of the wires between the lid and the electronics compartment.
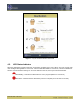
b) Insert the battery packs (1 or 2 batteries may be installed), as shown in Figure 3.
c) Connect one battery cable to the top of each battery.
d) Check the power on blinking sequence of the LED indicator. Upon power up the LED should cycle
through all three colors (red, green, yellow) and then blink red while the unit performs a self-test.
o If the unit fails self test the LED will change to solid red.
o If the unit passes self-test, that the LED will turn either solid yellow or solid green depending on
the radio activation status.
o A solid yellow indicates that the device is active but radio disabled until the next activation
procedure.