
Installation


Step 4. Installation of the Lock (Cont.)
4.4) Ensure spindle hub is at center of trim bore. Use spindle or screw driver to
test bolt retraction; if not smooth, trouble-shoot as follows:
- Check 1-3/4" trim bore dimensions
- Ensure hole is free of debris
- Make sure lock bore is perpendicular to trim bore
- Check lock by removing it from bore and throwing the bolt.
Adjust wall prep as needed.
4.5) Fasten the 2 wood screws inside the trim bore hole
through lock body and into wood stud.
5.1) Cut spindle and and screw to accommodate wall side back set.
5.2) Insert trim into spindle
hole. Use thumbturn to test
lock bolt movement.
5.3) Fasten trim screws until trim is tight
to jamb surface. NOTE: Do not over
tighten.
6.2) Using the strike center position as
a guide, drill a pilot hole through the
door with a 1/8" bit from strike side.
With the pilot hole as guide, use a 1"
diameter hole saw to drill a 1-1/4"
deep hole.
DO NOT drill through the door.
Step 5. Installation of Face Fixing Trim
Step 6. Prep and Install Dust Proof Strike with Emergency Release On Barn Door
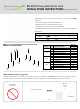
Edge to Lock Center B
1”
1-1/4”
1-1/2”
1-3/4”
2”
2-1/4”
2-1/2”
Spindle Length (mm) L
1-1/4”
1-1/2”
1-3/4”
2”
2-1/4”
2-1/2”
2-3/4”
Screw Length (mm) H
13/16”
1-1/16”
1-5/16”
1-9/16”
1-13/16”
2-1/16”
2-5/16”
6.1) Move the Barn Door to the
Closed position; throw the lock bolt
to mark the exact strike center
position. Make sure this location is
min. 1” to the edge of the door.
6.4) Install the 1" dust-proof strike with the 1/4"
release screws on the outside.
6.5) Cut break-away
screw to
appropriate
door thickness.
DO NOT OVER
TIGHTEN
6.6) Install break away screw and
tighten with allen wrench.
DO NOT OVER TIGHTEN.
Hand screw on decorative cap
6.7) Use release key (provided with lock set)
to push through center hole on release to
push lock bolt back and unlock door.
Note: Standard Barn Door to wall
clearance is approximately 3/8" to 1/2".
Install additional spacer as needed behind
the strike faceplate if the door to wall
clearance is over 1/2". Additional spacers
can support maximum clearance of 3/4"
between door and wall.
6.3) Using your pilot hole as a guide, use a 1/4" bit to drill a
hole from outside through to connect with the strike bore.
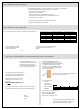
Door
Outside
Face
Door Thickness
1-3/8”
1-3/4”
Length without Spacer
11/16”
1-3/32”
Length with Spacer
15/16”
1-5/16”