
Installation Guide


instructions
Make sure your wall is clean
S’assurer que le mur est propre
TIP: After installing the large stainless
panel, (Step 8) align 2 nails at the bottom
and hammer them in halfway as a support
while the adhesive dries
Truc d’installation : Après l’installation du
panneau en acier inoxydable (étape 8),
aligner 2 clous en-dessous de ce dernier
et les enfoncer à demi dans le mur afin de
le supporter pendant que le silicone sèche
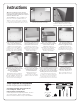
1
Remove the protective film from
all stainless steel components
Retirer le film protecteur recouvrant
tous les morceaux en acier inoxydable
2
Safety Glasses & Dust Mask
|
Drill w/ 1/8” & 1/16” Bits
Level
|
Caulking Gun
|
Hammer
|
Pencil
Philips Screwdriver
|
Silicone Adhesive
Lunettes de protection et masque anti-poussière
|
Perceuse
avec mèche 1/8'' et 1/16''
|
Niveau
|
Pistolet à calfeutrer
Marteau
|
Tournevis Cruciforme
|
Crayon
|
Silicone Adhésif
tools required for installation
outils requis pour installation
3
7
4
8
5
9
6
10
Dry fit the stainless shelf panel
& the styrofoam. Align & center
both. Use a nail to mark the
position of holes on the wall.
Adapter à sec le panneau à
étagère en acier inoxydable et
la styromousse. Les aligner et
centrer. Avec un clou, marquer
la position des trous sur le mur.
Apply silicone adhesive to the
back of the large stainless panel
as shown. Make sure the
little shelf is hidden under
the shelf panel.
Appliquer du silicone adhésif
à l’endos du gros panneau en
acier tel qu’illustré. S’assurer que
la petite étagère est cachée en
dessous du volet de l’étagère.
Attach the stainless rod to
the stainless shelf panel. Drill
out the marked holes on the
wall and insert the anchors.
Fixer la tige en acier au
panneau mentionné à l’étape
précédente. Percer les trous
marqués sur le mur et y
insérer les ancrages.
Press the panel firmly
onto the styrofoam backer
making sure the panel
is centered and level.
Appuyer fermement
le panneau sur la
styromousse et s’assurer
qu’il est centré et à niveau.
Apply silicone adhesive to the
back of the stainless shelf
panel as shown. Press it firmly
onto the wall to install.
Appliquer du silicone
adhésif à l’endos du panneau
à étagère tel qu’illustré.
Appuyer fermement sur
le mur pour l’installer.
Place the moulding in position & level
w/ the countertops. Mark the position
of the screws on the counter edge.
Pre-drill holes w/ 1/16" bit & attach the
moulding with the screws provided.
Placer la moulure de niveau avec
le comptoir et y marquer la position
des vis. Pré-percer les trous dans le
comptoir avec la mèche de 1/16’’ et
y fixer la moulure avec les vis incluses.
Apply silicone adhesive to
the styrofoam backer &
press it firmly into place &
attach it w/ gypsum screws.
Appliquer du silicone
adhésif sur la styromousse
puis appuyer fermement et
la fixer avec des vis à gypse.
Slide the range back
into position. Allow the
adhesive to dry for 24 hrs.
Glisser la cuisinière à sa
place. Attendre 24 h, pen
-
dant que le silicone sèche.