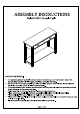
ASSEMBLY INSTRUCTIONS Style # C1276 Console Table 7~ 77 NOTE TO CUSTOMERS: For ease and speed of assembly we recommend that before you commence each step of the assembly that you identify all the parts required to complete that step. We recommend that where possible you allow sufficient space to assemble the item as close as possible to the place where it will be once assembled.
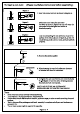
To insert a cam lock: (Please read below instructions before assembling) ft Ti 1. Insert cam screw into hole as shown in diagram A . Make sure not to insert the cam screw: Too deep as shown in figure B as this will cause the cam screw to be misaligned and unable to interlock properly. Also avoid inserting the cam screw too close to the surface of the hole as shown in figure C, as this will cause the cam lock to be too loose, and not interlock properly. 2. Connect the panels together. ARROW SIGN o-® 3.
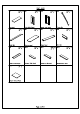
Part List Al Quantity [A2 Quantity | A3 Quantity | Ad Quantity Top Panel Loft Side Panel Right Side Panel Cross Bar A5 Quantity | zg Quantity | A7 Quantity | Ag Quantity Cross Bar Bottom panel Back Panel Divider A9 Quantity | p10 Quantity | A711 Quantity | Al2 Quantity Drawer Front Panel Drawer Side Panel ~~ Drawer Side Panel Drawer Back Panel Al3 Quantity of 2 Drawer Bottom Panel Page 3 of 9
Hardware List Bl Quantity |B2 Quantity |B3 Quantity |B4 Quantity Drawer Handle Bolt Wood Dowel Bolt B5 Quantity |B6 Quantity |B7 Quantity |B8 Quantity Bolt Large Cam-Lock Flat Washer Cam-Bolt B9 Quantity |B10 Quantity |Bll Quantity |B12 Quantity Large Screw © Spring Washer “Ig “a Small Cam-Lock Small Screw B13 Quantity |Bl4 of 4 “% Wood Dowel Bolt Quantity | B15 Quantity | B16 Quantity Anchor with screw Anti-tip kit 1. WARNING: Serious or fatal crushing injuries can occur from furniture tip-over.
STEP 1: 1). Assemble Divider (A8) to Back Panel (A7) using Wood Dowel (B3), Cam-bolt (B8) and Large Cam-lock (B6). 2). Assemble Cross Bar (A4) to Divider (A8) using Bolt (B4). 3). Assemble Cross Bar (A5) to Divider (A8) using Bolt (B4) and Wood Dowel (B3).
STEP 3: 1). Assemble Cross Bars (A4&A5) to Left Side Paneling) using Wood Dowels( Bandanna Cam-bolt (B8) & Large Cam-lock (B6). 2). Assemble Back Panel (A7) to Left Side Panel (A2) using Bolts Washers (B10) ang Flat Washers (B7). 3). Assemble Bottom Panel (A6) to Left Side Panel (A2) using Bolts Washers (B10) ang Flat Washers (B7). 4). Repeat above step to assemble the other Side Panel (A3). PCs PCs PCs PCs B14 em PCs STEP 4: Insert Wood Dowels (B3) and Cam-bolts (B8) into the holes of Top Panel (A1).
STEP 5: 1). Attach Top Panel (A1) to Side Panels (A2&A3), Back Panel (A7) and Divider (A8). 2). Insert Large Cam-locks (B86) into the holes of Side Panels (A2&A3), Back Panel (A7) and Divider (A8) to catch Cam-bolts (B8), then tighten Large Cam-locks (B6). 3). Tighten Top Panel (A1) fo Cross Bar (A4) using Large Screws (BS). B6 @& PCs B9 «=p PCs STEP 6: 1). Insert Drawer Bottom Panel (A13) into the grooves of Drawer Front Panel (A9). 2).
STEP 7: Attach Drawer Handle (B1) onto Drawer Front Panel (A9) using Bolts (B2) PCs %y apes X2 STEP 8: the drawers into the unit. your safety,please attach the unit to the wall by Anchor with screw B15 and Anti-tip kit B16.
APPENDIX: Dimension of Hardware in this Bolt Wood Dowel Bolt Bolt Cam-Lock Flat Washer B8 BS B10 g Cam-Bolt Screw Spring Washer Bll B12 B13 Can-Lock Screw Wood Dowel B14 B15 “© A Big A BY o Bolt Screw Screw Page 9 of 9