JK2001 2007 to 2017 Jeep Wrangler Installation Tips V1.
Table of Contents I. Introduction II. Safety precautions III. Opening the dash IV. Removing the stock radio V. Installing Your JK2001 VI. Attachments VII.Finishing up VIII.Tips & Tricks A.
I. Introduction Congratulations! If you are reading this, then you are most likely about to install the JK2001 in your 2007 to 2015 Jeep Wrangler. Don’t worry , installation should be a breeze and this document is intended to give you a few helpful hints and tips. This should go without saying, but PLEASE USE YOUR NEW JK2001 RESPONSIBLY. Never attempt to operate the unit or view videos while driving. When in doubt, pull over first then do what you need to do.
II. Safety Precautions •Disconnect the negative battery terminal before beginning this installation! •Don’t run with scissors •If at any time during the installation you encounter a wild bear, you should avoid poking it with a stick. They don’t like that.
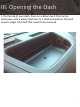
III. Opening the Dash 1. On the top of your dash, there is a rubber insert that can be pried open with a plastic dash tool or a small screwdriver. That will reveal a single 7mm bolt that needs to be removed.
III. Opening the Dash 2. Next, pry open the center switch panel. Be careful not to scratch the plastic! 3. Remove the single 7mm bolt behind the switch panel.
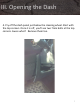
III. Opening the Dash 4. Pry off the dash panel just below the steering wheel. Start with the top corners. Once it is off, you’ll see two 7mm bolts at the top corners. Guess what? Remove them too.
III. Opening the Dash 5. Now you can pop the entire upper dash panel off. It’s held in place with pressure clips.
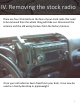
IV. Removing the stock radio There are four 7mm bolts on the face of your stock radio that need to be removed then the whole thing will slide out. Disconnect the antenna and the old wiring harness from the factory harness. Once your old radio has been freed from your dash, it can now be used as a handy doorstop or paperweight.
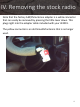
IV. Removing the stock radio Note that the factory AM/FM antenna adapter is a white connector that can easily be removed by pressing the little lever down. This plugs right into the adapter cable included with your JK2001. The yellow connector is an old SiriusXM antenna that is no longer used.
IV. Removing the stock radio SPECIAL NOTE FOR VEHICLES THAT PREVIOUSLY HAD OEM uCONNECT MODULES Insane Audio has recently become aware of a Jeep factory defect where certain uConnect modules will still remain active even after your OEM radio has been removed. This may result in your old uConnect module placing an un-necessary drain on your vehicle’s battery even after your Jeep is powered off.
V. Installing the JK2001 Before proceeding with the installation, vehicles with the OEM Alpine Premium Sound System will need to make a minor change on your new Insane Audio wiring harness. 6061E F2 R2 F1 R1 If your vehicle is not equipped with the OEM Alpine Premium Sound System or if you are using your own aftermarket amps and speakers you do not have to make any changes. F2 should be connected to F1 and R2 should be connected to R1 as shown above.
V. Installing the JK2001 •Connect the wiring harness, the GPS antenna, the AM/FM radio adapter, the iPod cable and USB cable to the rear of your JK2001 and simply slide it into the dash. •You’ll most likely want to route the iPod cable and USB cable to the glove box. •The GPS antenna has a magnetic mount and is best placed on the top of the JK2001. •If you’re installing a rearview camera, aux input or connecting an aftermarket stereo system just use the included accessory harness.
VI. Attachments Your JK2001 comes with a built-in Bluetooth microphone, but we also include a complementary high quality external mic that will provide superior audio quality . This external mic will work at just about any location, but we do have some recommendations as to placement. Try to keep this mic away from any windows, air vents, or speakers to avoid background sounds or feedback. The external mic will plug into the back of the JK2001 via a 3.
VI. Attachments Above is a picture of the back of your JK2001. Your JK2001 is equipped with a Wi-Fi antenna, and you will have this gold plated plug just above the microphone plug in. Your Wi-Fi antenna will screw on as shown above. Along with that, your GPS plug in is now on the far right hand side of the JK2001.
VI. Attachments Your JK2001 is designed to automatically display a backup camera anytime your vehicle is in reverse. If you don’t yet have a backup camera, then you may want to disengage the reverse wire in your JK2001’s wiring harness. Disengaging this wire will disable the “no signal” warning every time you put your Jeep into reverse when no camera is attached. You can always re-connect this wire when you are ready to install a backup camera. Please refer to Appendix A on how to install cameras.
VII. Finishing up •There is plenty of room underneath the JK2001 to neaten any cables. •Secure your JK2001 with the four 7mm bolts you removed from the front of your factory unit.
VIII. Tips & Tricks •Your new JK2001 is packed with features… so much so that the best way to fully get familiar with it is to just go ahead and start using it! •Be sure to check out our online user forum. It’s a great place to share technical information and creative uses of your JK2001. It’s entirely free and here as a resource for our customers! http://insaneaudio.com/forum •Just about everything is customizable on your JK2001. You can change the icons, add widgets, change the background, etc.
VIII. Tips & Tricks •Insane NavEngine can be accessed both via the icon or by pressing the NAVI button on the face of your JK2001. This will get you where you’re going both on and off the road. •Your JK2001 comes with a microSD card slot on the bottom right hand side of the unit. Load up a data card with movies or music and access the content via the VIDEO or MUSIC icons on your JK2001 •Your JK2001 came with an OBD Bluetooth adapter and the Torque application already installed.
Thank you! If you haven’t gotten a chance yet, we recommend you check out our Quick Start Guide -http://insaneaudio.com/IA_2000Series_QSG_current.pdf You can always find out more information or view user manuals online at -- http://insaneaudio.com/ In addition, feel free to “like” us here – www.facebook.
Appendix A: Installing cameras Insane Audio’s JK2001 is designed to support a backup camera as well as a front facing camera. You can use any camera that provides an RCA video signal. Insane Audio has a few camera offerings that we highly recommend, as they have been designed and tested to work specifically with our head units. Like all Insane Audio products, our cameras are built tough and ready for the trail.
Appendix A: Installing cameras The A/V pigtail offers two wires labeled “RockCam Power” and “RockCam GND” that automatically provide +12V whenever you reverse the vehicle or open the RockCam app. We recommend you use these wires to power your front camera, your backup camera or both if you’ve got ‘em! Before making any connections, unplug the A/V pigtail from the head unit and make sure that everything is powered off.
Appendix A: Installing cameras BACKUP CAMERA INSTALLATION For a backup camera, you will need to run the RockCam wires from the front of your Jeep all the way to your backup camera. Insane Audio’s IACAM1/IACAM2 includes a DC power cable that you will wire directly to the red and black RockCam terminals. You will have to strip some insulation from the RockCam wires. Protect the head unit by ensuring that the electrical connection is safely insulated.
VI. Installing cameras The backup camera feed will connect to the “CAM IN” video input female RCA terminal. Insane Audio’s cameras include an RCA extension cable that you can run from the head unit to the rear of the vehicle.
Appendix A: Installing cameras Next, you must connect the backup trigger wire, labelled “REVERSE” on the main wiring harness. This triggers the JK2001 to immediately display the feed from the camera, when the vehicle is backing up. When this wire is connected, your JK2001 will automatically display the backup camera anytime the vehicle is in reverse.
Appendix A: Installing cameras FRONT CAMERA INSTALLATION Installation of a front facing camera with Insane Audio’s JK2001 is fairly simple. Connect the camera’s power lines to the red and black RockCam terminals. Remember that these power terminals can support a front camera, a backup camera, or both cameras simultaneously. Finally feed the IACAM2 video signal into the “RockCam Video In” RCA port. At this point, you may plug the A/V pigtail back into the head unit and power everything back on.
Appendix A: Installing cameras Check the installation by opening the RockCam app. If you see a “No signal” warning, ensure that the front video feed is connected to “RockCam Video In” RCA port and the power wires are properly connected. Note that with the RockCam app, you can even view any installed backup camera, too. Tap on the upper left camera icon to switch between front and rear views whenever you’re parked or moving forward.