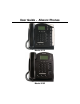
User Guide - Allworx Phones Model 9112 Model 9102
Warranties and Specifications This equipment has been tested and found to comply with the limits for a Class B digital device, pursuant to Part 15 of the FCC rules. These limits are designed to provide reasonable protection against harmful interference in a residential installation. This equipment generates, uses, and can radiate radio frequency energy and, if not installed and used in accordance with the instructions, may cause harmful interference to radio communications.
Table of Contents Getting Started ........................................................................................................................... 1 What is in the box?.................................................................................................................... 1 Connecting the Phone ............................................................................................................... 1 Introduction to your Allworx Phone.............................................
Redial a number...................................................................................................................... 16 Missed Calls ........................................................................................................................... 16 Ignore and Silence Softkeys..................................................................................................... 16 Adjusting Your Phone ..................................................................................
Congratulations! You’re the new owner of an Allworx 9102 or 9112 VoIP phone. This phone will make it easy for you to place and receive calls when using the Allworx 10x system. Getting Started What is in the box? Check out the contents of the box your phone came in.
Introduction to your Allworx Phone Your new Allworx phone supports two modes of operation: PBX Mode and Key System Mode. Your system administrator has pre-configured the phone for one of these two modes. The programmable buttons on the phone function differently depending on the mode of the phone. This guide contains two sections, “PBX Mode” and “Key System Mode”. Please refer to the section that describes your phone.
635 Crosskeys Office Park • Fairport, NY 14450 • Toll Free 1-866-ALLWORX • 585-421-3850 • www.allworx.com © 2004 InSciTek Microsystems, Inc. All rights reserved. Allworx is a registered trademark of InSciTek Microsystems. All other names may be trademarks or registered trademarks of their respective owners.
Definitions: Key System Mode – Key System mode is directly associated with outside lines. Any conversation is always between a local person (connected to an external CO line) and a remote person at the other end of the telephone company’s phone line. In a true key system there are no extensions or call routes. PBX Mode (Private Exchange Branch) – A PBX type phone system is generally thought of as a private phone company. There are extension telephone numbers assigned to every telephone in the system.
Speed Dial – When defined as a Speed Dial button, you will have the ability to ring another users extension without having to dial the extension number. Call Appearance – When defined as a Call Appearance button, you will have the ability to receive calls targeted for your extension. You may have multiple buttons configured for Call Appearance, which you can manage individually. For example, each call can be put on hold or transferred to another extension. Call Appearance has a Ring Type associated with it.
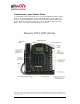
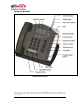
Using the Buttons Allworx Phone 9112 635 Crosskeys Office Park • Fairport, NY 14450 • Toll Free 1-866-ALLWORX • 585-421-3850 • www.allworx.com © 2004 InSciTek Microsystems, Inc. All rights reserved. Allworx is a registered trademark of InSciTek Microsystems. All other names may be trademarks or registered trademarks of their respective owners.
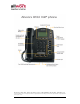
Allworx Phone 9102 635 Crosskeys Office Park • Fairport, NY 14450 • Toll Free 1-866-ALLWORX • 585-421-3850 • www.allworx.com © 2004 InSciTek Microsystems, Inc. All rights reserved. Allworx is a registered trademark of InSciTek Microsystems. All other names may be trademarks or registered trademarks of their respective owners.
Button Light Purpose More Info Keypad None Use the keypad to dial numbers. Place a call Messages Solid red if new messages are present. Access your voice mail. Voice Mail Transfer Solid red until the call is transferred. Transfer a call to another extension. Transfer a call Conference Blinking green while making connections Talk to more than one extension at a time. Place a conference call Solid red when in use. Intercom Solid green when in use. Use the phone as an intercom.
The Release button This button is used to hang-up an existing call or to abort a new call leg setup such as the middle of a transfer operation. The Info Button The Info button is only available on the Allworx 9112 phone. You can use it to get information about the other buttons on your phone. For example, you can use the Info button to determine the numbers that have been programmed for each speed-dial button. To use the feature, press the Info button once and then any of the other buttons on the phone.
Place a call on Hold If you’re on a call and want to put it on hold, press Hold and put the handset on the hook. The button for the call will blink red briefly. When you’re ready to talk again, pick up the handset and you’ll automatically pick up the call on hold. You can put more than one caller on hold. If the calls will be displayed on the screen when the handset you will automatically pick up the on hold, press the flashing button for the call the call on the screen, then press Select.
3. With DND enabled, your phone will not ring and all calls targeted for you will follow the next step in your active call route. 4. Press Mute/DND second time to receive. The light will turn off. Placing and splitting a conference call After connecting to the first person you want on the conference call. 1. Press Hold. 2. Select another Call Appearance and call the second person you want on the conference call. 3. Press Conference. 4.
If you’re already using the handset, you can: • Place the handset on the hook. When you are finished with the call, press Speaker to hang up. • Place the handset on the desk. To switch back to using the handset, just press Speaker. NOTE: If you’re using a headset, you will use Speaker to activate it. You will not be able to use the speakerphone while using a headset. Refer to How Do I Use a Headset. Intercom 1.
PBX Mode Operation PBX mode fits best when calls are coming from repeat customers who wish to reach a specific person at an extension number. PBX mode works well for professional offices such as legal, medical, financial, engineering etc. • Each person in the company has an extension and the calling party reaches them by dialing their extension number, which in turn arrives at their phone as a Call Appearance.
Answering a call when you are on the phone A second or third call directed to your phone (Call Appearance) can be answered by: • Placing the first call on hold, then pressing the call appearance for the second caller. • Placing the second call on hold and pressing the call appearance for the first caller can retrieve the first caller. Ending a call • If you’re using the handset, place it back on the hook. • If you’re using the speakerphone, press Speaker. Make sure the handset is on the hook.
Key System Mode Operation Key mode will fit the best in a sales or retail environment where any available person will answer calls live. Examples are counter sales, car dealerships, travel agencies etc. • All the phones in the system will be able to monitor and directly answer outside lines (line appearances) – calls that are coming into your company.
End a call • If you’re using the handset, place it back on the hook. • If you’re using the speakerphone, press Speaker. Make sure the handset is on the hook. • If you’re using a headset, press Release . • You can also press a button for another line to end your current call and prepare for a new call. Redial a number • From the phone’s screen, you can automatically dial the last number you called by selecting the softkey for REDIAL.
Adjusting Your Phone Volume You can adjust the volume of the incoming ring, handset speaker, the speakerphone, and the headset. The volume will be adjusted for the device that are currently using. To adjust the volume: 1. You can adjust the incoming ring when a call comes in. To adjust other volumes, pick up the handset, turn on the speakerphone, or headset. 2. The screen shows the device for which you are adjusting the volume. 3. Press Volume Bar on the right to increase the volume. 4.
Advanced Topics Depending on the configuration of your Allworx system, you may be able to see information about the configuration of your phone. In some instances, you can make changes. Please check with your System Administrator before making any changes.
Reboot the phone WARNING: Do not reboot your phone unless instructed by your System Administrator. 1. Select the softkey that corresponds to CONFIG on the screen. 2. Highlight Reboot Phone. 3. Press Select. 4. If you have any unsaved changes, you’ll be asked if you want to save them before rebooting. Select the Softkey that corresponds to YES to save the changes OR select NO to lose the changes. Clear Call History The Allworx phone retains the history of your calls up to 99 calls.
Check the current status 1. Select the softkey that corresponds to CONFIG on the screen. 2. Highlight Current Status/Info. 3. Press Select. 4. You can see the following information: • DHCP Lease Time (if DHCP is enabled) • Boot Server IP • Phone IP • Subnet IP • Gateway IP • Boot Configuration success or failure • MAC Address • Model Name • Software Version • LAN Connection Info • PC Connection status Use the up and down arrow buttons to move through the list.
• Refused Busy Use the up and down arrow buttons to move through the list. When finished, select the softkey that corresponds to EXIT. Save changes to your settings Normally, the user is prompted to save the changes they have made. However, they may manually want to save the changes. 1. Select the softkey that corresponds to CONFIG on the screen. 2. Highlight Save Settings. 3. Press Select. 4. Select the Softkey that corresponds to YES to save any changes OR select NO to cancel saving the changes.
Wall mounting your phone (Optional) Your phone is wall mountable and requires a wall mounting plate. The mounting plates are available from your local telephone company or your local retailer. If using a standard telephone wall mounting plate, DO NOT make any connection to the RJ 11 jack. This connection is intended for an analog phone and may cause damage to the Allworx phone, voiding your warranty.