User Guide Skyus 500 Inseego 9605 Scranton Road Suite 300 San Diego, CA 92121 (858) 812-3400 inseego.
User Guide Skyus 500 (Ninkasi) Table of Contents 1. Product Overview ........................................................................................................................... 3 2. UI Reference.................................................................................................................................... 6 3. Using, Testing, Troubleshooting ................................................................................................... 48 4.
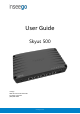
User Guide Skyus 500 (Ninkasi) 1. Product Overview Marketing Name: Skyus 500V Model Name: SKR5MD8800 Base SKU: SK500V Front View Back View Page 3 of 78 Rev 1 inseego.
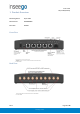
User Guide Skyus 500 (Ninkasi) Right Side View Page 4 of 78 Rev 1 inseego.
User Guide Skyus 500 (Ninkasi) Indicator LEDs The Skyus 500 has six indicator LEDs. These indicators change colors and either blink or glow solid to communicate current states for the device.
User Guide Skyus 500 (Ninkasi) 2. UI Reference Navigating the Web UI Home Page The Skyus 500 Home page is the local gateway to configuring and managing your router. It displays current router status, lists currently connected devices, and offers links to other pages with option settings and help. Click > in the bottom-right corner of a panel to access subscreens with further information and options.
User Guide Skyus 500 (Ninkasi) 1. On the device you want to connect to the Internet, open the Wi-Fi application or controls and in the displayed list of available networks, find the network name for your Skyus 500. 2. Click Connect or otherwise select the network name. 3. When prompted, enter the password. NOTE: The Wi-Fi name and password are displayed in the Wi-Fi panel of the Home screen.
User Guide Skyus 500 (Ninkasi) Support A User Guide for your Skyus 500 is available online. To download the complete User Guide, go to www.inseego.com/support-documentation. For additional information and technical support, email Technical Support at technicalsupportus@inseego.com or call Customer Support (Toll Free) at 1-877-698-6481. Page 8 of 78 Rev 1 inseego.
User Guide Skyus 500 (Ninkasi) Admin Password The Admin password is what you use to sign into the Skyus 500 Web Interface. Initially, it is the same as the default password for your router’s Primary network and is printed on the bottom of the router. NOTE: You can set up separate Wi-Fi passwords both Primary and Guest networks in Wi-Fi, but these are different from the Admin password, which is for this Web Interface.
User Guide Skyus 500 (Ninkasi) Wi-Fi - Settings You can use the default values as they appear on this tab, or can adjust them for your environment. Wi-Fi Use the Allow Wi-Fi devices to connect to this Router ON/OFF slider to turn Wi-Fi on or off. This selection affects Primary and Guest networks. When Wi-Fi is turned off, the only way to connect to the router (and to the Admin website) is with Ethernet cable. Band Selection Each network can be accessed over two bands: 2.4 GHz and 5 GHz: • The 2.
User Guide Skyus 500 (Ninkasi) Wi-Fi – Primary Network Use these settings to connect initially to the Primary Wi-Fi network or change Primary network information. Connected devices must use the Wi-Fi settings shown on this screen. NOTE: If you change these settings, existing connected devices may lose their connection. Settings Primary network name (SSID): Enter a Primary network name (SSID) to set up or change the Primary network name. The name can be up to 28 characters long.
User Guide Skyus 500 (Ninkasi) Wi-Fi – Guest Network The Wi-Fi Guest network allows you to segregate traffic to a separate network rather than share access to your Wi-Fi Primary network. Use settings on this tab to set up or change Wi-Fi Guest network information. Connected devices must use the Wi-Fi settings shown on this screen to connect to the Guest Wi-Fi network.
User Guide Skyus 500 (Ninkasi) Wi-Fi – Wi-Fi as WAN Use settings on this tab to set options for using an external Wi-Fi network to access the Internet. NOTE: To enable Wi-Fi as WAN, you must go to the Wi-Fi Settings tab and in Band Selection, select a band for Wi-Fi as WAN. Then select Save Changes. Important: Only one station/network from either the 2.4GHz or 5GHz band can be enabled at a time.
• Delete: Delete an access point from the list. User Guide Skyus 500 (Ninkasi) Page 14 of 78 Rev 1 inseego.
User Guide Skyus 500 (Ninkasi) Connected Devices This page provides details about each device connected to the Skyus 500 and allows you to edit how device names appear in the Web UI. You can also block or unblock a device from Internet access. NOTE: You can also see list of all devices currently connected to the router and the network they are using in the Connected Devices panel on the Web UI Home page.
User Guide Skyus 500 (Ninkasi) Page 16 of 78 Rev 1 inseego.
User Guide Skyus 500 (Ninkasi) Access Control - Devices Access controls in the Skyus 500 Web UI allow you to control Internet access to specific devices. You can set up multiple schedules for Internet access on the Schedules tab and apply them to individual connected devices on the Devices tab. NOTE: You must first create schedules on the Schedules tab for device and schedule information to display on the Devices tab. This tab lists all currently connected devices and any applied schedules.
User Guide Skyus 500 (Ninkasi) Access Control - Schedules Access controls in the Skyus 500 Web UI allow you to control Internet access to specific devices. You can set up multiple schedules for Internet access on the Schedules tab and apply them to individual connected devices on the Devices tab. Use this tab to manage schedules for when devices can access the Internet through the Skyus 500. Create New Schedule: Select this button to create a new schedule. The Create New Schedule dialog box appears.
User Guide Skyus 500 (Ninkasi) Settings - Preferences This tab allows you to change how dates, time, and numbers are displayed in the Skyus 500 Web UI. NOTE: These preferences affect packets sent to remote servers. For example, if you select a 24 hour time format, the Web UI, and any packets reporting time somewhere else, will display time in 24 hour format. Date: Select the date format to be used throughout the Web UI and remote servers (mm/dd/yyyy or dd/mm/yyyy).
User Guide Skyus 500 (Ninkasi) Settings – Software Update Software updates are delivered to the Skyus 500 automatically over the mobile network. This tab displays your current software version, last system update information, and allows you to check for new software updates. NOTE: You can also view the date and time of the last system update in the Settings panel on the Web UI Home page. Current Software Software Version: The version of the software currently installed on your Skyus 500.
Settings – Backup and Restore User Guide Skyus 500 (Ninkasi) Use this tab to back up current Skyus 500 settings to a file on your computer, restore (upload) a previously-saved configuration file, reset the router to factory defaults, or restart the router. Backup To back up current Skyus 500 settings to a file on your computer, enter your Admin password in the Admin password field. The default Admin password is printed on the bottom of the router.
User Guide Skyus 500 (Ninkasi) Restart Router Restart: This button turns your router off and on again. Page 22 of 78 Rev 1 inseego.
User Guide Skyus 500 (Ninkasi) Advanced Features – Lan This tab provides settings and information about the Skyus 500's local area network (LAN). For this device, the LAN consists of this device and all Wi-Fi and Ethernet connected devices. IPv4 IP Address: The IP address for this device, as seen from the local network. Normally, you can use the default value. Subnet Mask: The subnet mask network setting for the Skyus 500. The default value 255.255.255.0 is standard for small (class "C") networks.
Advanced Features – Network User Guide Skyus 500 (Ninkasi) In most configurations, the Skyus 500 is used with a dynamic IP and SIM and the Access Point Name (APN) is available from the network, for example: vzwinternet. However, if you are on a private network, you may need to set the APN on this tab for the network to communicate with the Skyus 500, for example: we01.vzwstatic. APN Internal Modem: Enter the APN for your private network.
Advanced Features – Manual DNS User Guide Skyus 500 (Ninkasi) The Skyus 500 automatically selects a Domain Name Server (DNS). This tab allows you to manually assign up to two DNS IP addresses. Turn on manual DNS: Check this box to manually select a DNS. DNS 1 IP address: Enter the IP address for the primary DNS. This address is required to use the Manual DNS feature. DNS 2 IP address: Enter the IP address for the secondary (backup) DNS. This address is optional and may be left blank if desired.
Advanced Features – Firewall User Guide Skyus 500 (Ninkasi) The Skyus 500 firewall determines which Internet traffic is allowed to pass between the router and connected devices and protects your connected devices from malicious incoming traffic from the Internet. The firewall cannot be turned off. Use the Firewall tab to adjust the general security level of the firewall, designate a specific device to receive all traffic, and set up specific firewall rules.
Advanced Features – MAC Filter User Guide Skyus 500 (Ninkasi) The MAC filter allows only selected devices to access the Skyus 500’s Primary Wi-Fi network. By default, MAC filter is turned OFF. Use this tab to turn the MAC Filter ON and specify device access. NOTE: The MAC filter has no effect on devices connected to the Guest Wi-Fi network or connected via Ethernet.
• User Guide Skyus 500 (Ninkasi) If the MAC Filter is ON, and a device is blocked with Connected Devices > Block, and is not enabled for the MAC Filter, then it will not be able to connect. Both the MAC Filter and the Block prevent connection. • If the MAC Filter is ON, and a device is enabled for the MAC Filter, then the device will be able to connect. However, it can still be blocked using Connected Devices > Block or by disabling the MAC Filter. Rev 1 Page 28 of 78 inseego.
Advanced Features – Port Filtering User Guide Skyus 500 (Ninkasi) Port Filtering allows you to block outgoing Internet connections and permit only selected applications to access the Internet. Traffic is identified by port numbers. Some applications are pre-defined. You can define additional applications if you know the details of the traffic used and generated by the applications. NOTE: You can view the current Port Filtering setting (ON/OFF) in the Settings panel on the Web UI Home page.
Advanced Features – Port Forwarding User Guide Skyus 500 (Ninkasi) Port Forwarding allows incoming traffic from the Internet to be forwarded to a particular computer or device on your Wi-Fi network. Normally, the built-in firewall blocks incoming traffic from the Internet. Port forwarding allows Internet users to access any server you are running on your computer, such as a Web, FTP, or Email server. For some online games, port forwarding must be used in order for the games to function correctly.
• User Guide Skyus 500 (Ninkasi) Port Numbers: Use the From and To fields to specify the range of port numbers used by outgoing traffic for the custom application. NOTE: If the application uses a single port instead of a range, type the same value in both the From and To fields. For translate ports, use the Ext. and Int. to specify ports. • Protocol: Select the protocol used by the port range from the drop-down list (TCP, UDP, or both). • Delete: Check this box to delete a custom application.
Advanced Features – WAN Configuration User Guide Skyus 500 (Ninkasi) Use this tab to configure and set the priority of each available WAN interface. Active WAN Interface This section displays current active WAN interfaces. Priority Listing of the Available WAN Interfaces Use the drop-downs to reset the priorities you wish for WAN interfaces. WAN Settings Use the tabs to set the following for each WAN interface.
User Guide Skyus 500 (Ninkasi) GPS - Status The Skyus 500 incorporates a GPS receiver. The GPS receiver can determine your current location, often even indoors. Current location information can be shared with connected devices by using the Local Streaming feature on the Local tab. Use settings on this tab to enable or disable GPS and to view the current status of your GPS connection. Enable GPS Receiver This setting enables or disables the GPS radio on your device.
User Guide Skyus 500 (Ninkasi) GPS - Local GPS data is provided by the Skyus 500 in the form of a National Marine Electronics Association (NMEA) text stream. Using a NMEA (GPS) port is a standard method for applications to access a GPS data stream in Windows and other computing platforms. To create this port, you must download and install the GPS over Wi-Fi driver for your platform.
http://192.168.0.1/cgi-bin/luci/vzw/gps/gps_remote (rewrite – Replace all text) User Guide Skyus 500 (Ninkasi) GPS - Remote Use this tab to configure the system to stream GPS data to remote servers. NOTE: These servers are not IoT Connect. Use the Remote Management page to configure IoT Connect remote servers. Global device ID: The 4-digit unique ID specific to your Skyus 500 that is inserted into your GPS packet for routing to remote servers.
User Guide Skyus 500 (Ninkasi) Select NMEA or TAIP. The available options for your selection are displayed. Select or de-select any option. All options that are checked will be part of the packet routed to the remote server. Reporting Triggers • Time Interval — You can set a time interval to trigger when packets will be routed to the remote server. For example, if you select 15 minutes, a GPS packet will be sent to the remote server 15 every minutes.
User Guide Skyus 500 (Ninkasi) http://192.168.0.1/cgi-bin/luci/vzw/gpio (new content – Replace all text) GPIO The Skyus 500 includes General Purpose Input Output (GPIO) ignition sense. This feature detects when the ignition is on and automatically turns on the router. When the ignition is turned off, the router turns off with a specified time delay. Use settings on this tab to enable or disable ignition sense, define a time delay, and configure or view pin settings.
User Guide Skyus 500 (Ninkasi) Pulse Count: The number of times the Value field has moved from Low to High or High to Low. NOTE: To reset the pulse count to zero, reset the device to the factory default settings. Dedicated Output Pin Value: The state specified by the pin: Low or High. Set Output: The output specified by the pin: Active Low or OFF. Page 38 of 78 Rev 1 inseego.
User Guide Skyus 500 (Ninkasi) VPN The Skyus 500 allows you to create IPSEC VPNs to establish secure connections to remote networks over a public network. VPN Service This setting enables or disables IPSEC VPN service on your device. When the ON/OFF slider is ON, VPN is enabled. When OFF, VPN service is not available. VPN Tunnel Configurations Once such a tunnel is added, the page would display the list of tunnel configurations.
• • User Guide Skyus 500 (Ninkasi) Local IP — Enter the WAN IP address of local device. NOTE: This should be a static IP that you are able to reach from remote device (no NAT). Local Subnet Mask — Enter the subnet mask of the local device, for example: If your local IP is 192.168.0.100 and your subnet mask is 255.255.255.0 this should be 192.168.0.0/24. NOTE: This should mirror what the subnet displays in the local device, for example: 192.168.0.0 / 255.255.255.0.
User Guide Skyus 500 (Ninkasi) Add New VPN Tunnel: Step 5 out of 5 Dead Peer Detection (DPD) is a keep-alive method that ensures the tunnel is up and will take action if it is not able to reach the remote side of the tunnel, depending on what DPD action you select. You can use the default values, if desired. Dead Peer Detection Enable: Check this box to enable DPD. DPD Action: Use the drop-down to select a DPD action. DPD Delay: The number of seconds between DPD packets.
User Guide Skyus 500 (Ninkasi) Remote Management Use this tab to enable server reporting with IoT ConnectTM. IoT Connect is a cloud platform product that provides 360 degree visibility and secure accessibility into your deployment from a single platform. You must have this product installed to use the Remote Management feature. Enable IoT Connect Server Reporting: This setting enables or disables server reporting with IoT Connect on your device.
User Guide Skyus 500 (Ninkasi) About – General Status Use the General Status tab to view general Internet connection and system information. NOTE: You can also view the Internet status, network, and time connected in the About panel on the Web UI Home page. General • Connection Status: Indicates whether your router is connected to WAN. • Session Connection Time: The amount of time that has elapsed since the connection for the current Internet session was established.
User Guide Skyus 500 (Ninkasi) About – Primary WAN Use this tab to view details about your Primary WAN connection. General • Radio Access Technology: Indicates whether your router is connected to 4G or 4G LTE or any network. • IMEI: The International Mobile Equipment Identity (IMEI) for this device. This is a 15 or 17 digit code used to uniquely identify an individual mobile station on a LTE network. The IMEI does not change when the SIM is changed. • SIM Status: The status of the SIM card.
User Guide Skyus 500 (Ninkasi) About - Ethernet WAN Use this tab to view details about your Ethernet WAN connection. IP4 • IPv4 Address: The Internet IP address assigned to the Skyus 500. • IPv4 Subnet Mask: The network mask associated with the IPv4 address. • IPv4 Gateway: The gateway IP address associated with the IPv4 address. • IPv4 DNS: The Domain Name Server currently used by this device. IP6 • IPv6 Address: The global IPv6 address for the Skyus 500.
User Guide Skyus 500 (Ninkasi) About – Wi-Fi as WAN Use this tab to view details about your Wi-Fi as WAN connection. General • SSID: The network name of Wi-Fi network. • BSSID: The MAC address of Wi-Fi network. • Security: The security level of the Wi-Fi network. IP Address and Signal • Signal Strength: The received signal strength indicator (RSSI) value. • Mode: The mode setting of the Wi-Fi network connection. • Channel: The channel setting of the Wi-Fi network connection.
User Guide Skyus 500 (Ninkasi) About – System Status Use this tab to view details about your system status. General • Ethernet Clients: The number of clients connected by Ethernet. • GHz Clients: The number of clients connected at 2.4 GHz band. • 5 GHz Clients: The number of clients connected at 5 GHz band. Page 47 of 78 Rev 1 inseego.
3. Using, Testing, Troubleshooting User Guide Skyus 500 (Ninkasi) Using, Testing, and Troubleshooting the Device Flashing Device Release Builds are posted below \\nvtlsdsfile02\engineering\software\EngReleases\firmware\IPQ4019 1. Select ***.secure file from appropriate Release folder Eg: IPQ4019_Linux_1.26_to_1.27_Real.secure 2. Access Sideload page from WebUI http://192.168.0.1/cgi-bin/luci/vzw/sideload 3. Select *.secure file to upload Page 48 of 78 Rev 1 inseego.
User Guide Skyus 500 (Ninkasi) 4. Update Progress Screen should be displayed once installation process starts 5. After successful installation and reboot, following screen should be presented Page 49 of 78 Rev 1 inseego.
User Guide Skyus 500 (Ninkasi) Enabling SSH Install debug_mode_enable_sideload_package.secure from WebUI: http://192.168.1.1/cgi-bin/luci/vzw/sideload Debug_mode_enable_sideload_package.secure file available here Root Password Telnet to 192.168.0.1 Issue Command “fw_printenv” – This should allows the option to change root password If not, enter passwd and change root password Once root password is changed, device can be connected over SSH to access Linux File System Sideload Load .
User Guide Skyus 500 (Ninkasi) Logs After SSH is enabled, use WinSCP to grab logs Collect logread from console and Debuglogs from WebUI for all issues. FOTA Debuglogs from Web UI. Before capturing the logs from Web UI, enable debug logs from NOTICE to DEBUG using command /bin/insg/mifi_debug_cli NUA debug.
User Guide Skyus 500 (Ninkasi) Running CLI commands 1. SSH to device 2. /bin/insg/cumclient_cli --> This will generate list of cumclient commands that can be run WiFi Station Document on how it works posted here VPN IpSec document posted here Page 52 of 78 Rev 1 inseego.
User Guide Skyus 500 (Ninkasi) Configuration Snapshot Skyus500 has the ability to retrieve device’s configuration(settings) files and also apply configuration files to device from IOTC. Each subsystem maintains its own configuration files in /etc/config For eg: WiFi maintains its own settings at wireless Possible use case: If a device on field has issues, we can retrieve problematic device’s configuration file, apply to our device for easy debugging. Page 53 of 78 Rev 1 inseego.
How to Retrieve Device’s Configuration Snapshot User Guide Skyus 500 (Ninkasi) 1. Login to IOTC (inseego.cumulocity.com) 2. From Device Management’s All devices, pick your device Eg: ID-990000123456789 3. Select Configuration 4. Navigate down the screen and to find “Get new snapshot from device” 5. Popup should appear once retrieval from device begins 6. AWS Link with downloaded Configuration snapshot tar file should be available. Accessing AWS link on Browser will let user download the tar file.
User Guide Skyus 500 (Ninkasi) 7. IOTC’s Shell should also post Successful Status Page 55 of 78 Rev 1 inseego.
How to upload Configuration Snapshot User Guide Skyus 500 (Ninkasi) 1. Login to IOTC (inseego.cumulocity.com) 2. From Device Management Tab, click on “Configuration repository” 3. Click on “Add configuration snapshot” Page 56 of 78 Rev 1 inseego.
User Guide Skyus 500 (Ninkasi) 4. Enter easily identifiable Name, select downloaded Configuration Snapshot and click “Add configuration snapshot” 5. Successful upload popup should be displayed 6. Uploaded Configuration Snapshot file will be displayed Configuration repository list Page 57 of 78 Rev 1 inseego.
How to apply Configuration snapshot to device User Guide Skyus 500 (Ninkasi) 1. Login to IOTC (inseego.cumulocity.com) 2. From Device Management’s All devices, pick your device Eg: ID-990000123456789 3. Select Configuration 4. Select appropriate Configuration snapshot file from drop down list 5. Once IOTC starts applying configuration snapshot to device, a popup to let user know will be displayed Page 58 of 78 Rev 1 inseego.
User Guide Skyus 500 (Ninkasi) 6. Popup after successful application of Configuration should follow sequentially 7. IOTC’s Shell will also display successful Message 8. Device will reboot, after which device will have appropriate Configuration snapshot NetMotion Diagnostics Client Info and FAQs on NetMotion’s Diagnostic Client can be found here Installing NetMotion’s Diagnostics Client 1. Download Client for WINDOWS from https://netmotionsoftware.sharefile.com/d-se16dddf8e2a4ee0a 2.
User Guide Skyus 500 (Ninkasi) Page 60 of 78 Rev 1 inseego.
User Guide Skyus 500 (Ninkasi) Page 61 of 78 Rev 1 inseego.
User Guide Skyus 500 (Ninkasi) 3. Ensure “Require trusted server certificate” is UNCHECKED Page 62 of 78 Rev 1 inseego.
User Guide Skyus 500 (Ninkasi) Page 63 of 78 Rev 1 inseego.
User Guide Skyus 500 (Ninkasi) 4. Ensure Laptop is connected to Ninkasi device and NetMotion Diagnostics Client should populating info GPS Enablement: The screenshot in this location \\nvtlsdsfile01\temp\GPS_ninkasi\GPS.zip 1. First you need to check if GPS engine is up • telnet to the device, then enter “i2cget -y 0 0x42 0x00” if return 0xff then GPS is up (see screenshot i2cget.PNG) then go to step 2, if not then do the following 1. telnet to the device and you need to set the root password a.
User Guide Skyus 500 (Ninkasi) ii. you should see this echo 0 > /sys/class/gpio/gpio40/value iii. if it is 0 then change it to 1 echo 1 > /sys/class/gpio/gpio40/value (see screenshot rclocal.PNG) iv. save the file then open it again to make sure the changes took effect v. then reboot the device vi. now telnet to the device, then enter “i2cget -y 0 0x42 0x00” vii. if return 0xff then GPS is up 2.
User Guide Skyus 500 (Ninkasi) o Property manager who adds, removes and manages subtenants * firmwaretest.cumulocity.com o Renter who is a sub-tenant of inseego So, Inseego is the primary tenant at inseego.cumulocity.com, from there we can add, remove and track our sub-tenants. firmwaretest.cumulocity.com is a sub-tenant for testing what our customers will see. Page 66 of 78 Rev 1 inseego.
Device Registration Device Removal in IOT Connect User Guide Skyus 500 (Ninkasi) Refer to document below. This instruction is used by Exodus (our fulfillment center) for creating subtenants (customers), adding their users and their devices. Not all of it is relevant, focus on Registration and Device Removal. https://teams.microsoft.com/_?lm=deeplink&lmsrc=TeamsPOCSignIn#/docx/viewer/teams/https:~2 F~2Finseego.sharepoint.
User Guide Skyus 500 (Ninkasi) Remote Service Agent Supports 3 Data Traffic Modes: (*) Enable = All traffic is routed at the check-in interval Test Case: if all data points report to right network, track packet size (*) Low Data Enable = A limited amount of information is routed at the check-in interval; operations are enabled Test Case: track packet size so we can estimate the data usage range for packet size (*) Disable = No traffic is routed out or received from the remote server Test Case: Send a requ
User Guide Skyus 500 (Ninkasi) Package Size – What is sent? When device powers up, all data points are sent in check-in data. After which, only those that vary like RSSI is sent and static ones are not sent like ICCID, MDN, IMEI etc.
User Guide Skyus 500 (Ninkasi) Registering Device Device can be registered at IOTC using 2 modes: 1. General Registration 2. Bulk Registration General Registration 1. Login to IOTC (firmwaretest.cumulocity.com) 2. Select “Registration” from left Pane 3. Click on “Register device” 4. Select “General Registration” 5. Enter IMEI info on Device ID field and select “Next” Page 70 of 78 Rev 1 inseego.
User Guide Skyus 500 (Ninkasi) 6. Success Registration message should show up 7. Registered Device must now show up in Registration page Page 71 of 78 Rev 1 inseego.
User Guide Skyus 500 (Ninkasi) 8. From WebUI, access Remote Management page and ENABLE IoT Connect server reporting 9. Select ACCEPT Button beside Device IMEI registered on Device Registration page on IOTC 10. Now Device should be registered and start reporting 11. WebUI should be populated with info from server Page 72 of 78 Rev 1 inseego.
User Guide Skyus 500 (Ninkasi) 12. rsacredential file should be created NOTE: If device was previously registered: 1. Remove device from All Devices list and remove credentials from Device Credentials page on IOTC 2. Register device again using General Registration 3. From WebUI, select Reset credentials 4. Disable and Enable IoT Connect server reporting General Registration 1. Login to IOTC (firmwaretest.cumulocity.com) 2. Select “Registration” from left Pane 3.
User Guide Skyus 500 (Ninkasi) 4. Select Bulk Registration 5. Click on “Select file to upload” and select updates test_bulkimport excel sheet test_bulkimport.xls needs to be edited with IMEI and password (Eg: test1234567) 6. Device should be successfully registered Page 74 of 78 Rev 1 inseego.
User Guide Skyus 500 (Ninkasi) 7. From WebUI, access Remote Management Page, ENABLE Iot Server reporting 8. Select “Change configuration” 9. Enter server info (Eg: firmwaretest.cumulocity.com) and password (Eg: test1234567) Password that was entered in test_bulkimport.xls Page 75 of 78 Rev 1 inseego.
User Guide Skyus 500 (Ninkasi) 10. Device should connect to IOTC and start reporting after successful connection 11. rsacredential file should be created after successful connection Page 76 of 78 Rev 1 inseego.
User Guide Skyus 500 (Ninkasi) Remote Services Agent Remote Services Agentsolution powered by Cumulocity IoT: 1. Translates device-specific interface protocols into one reference protocol 2. Translates specific domain models into one reference domain model 3. Enables secure remote communication across virtually any network Cumulocity IoT uses a simple and secure reference protocol based on REST and JSON™.
User Guide Skyus 500 (Ninkasi) 4. Regulatory Information Product: Skyus 500V Model: SKR5MD8800 Caution: Any changes or modifications not expressly approved by the party responsible for compliance could void the user’s authority to operate this equipment. NOTE: This equipment has been tested and found to comply with the limits for a Class B digital device, pursuant to part 15 of the FCC Rules.