
User's Guide


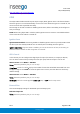
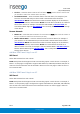
Table Of Contents
- 1. Product Overview
- 2. UI Reference
- Support
- Admin Password
- Wi-Fi - Settings
- Wi-Fi – Primary Network
- Wi-Fi – Guest Network
- Wi-Fi – Wi-Fi as WAN
- Connected Devices
- Access Control - Devices
- Access Control - Schedules
- Settings - Preferences
- Settings – Software Update
- Settings – Backup and Restore
- Advanced Features – Lan
- Advanced Features – Network
- Advanced Features – Manual DNS
- Advanced Features – Firewall
- Advanced Features – MAC Filter
- Advanced Features – Port Filtering
- Advanced Features – Port Forwarding
- Advanced Features – WAN Configuration
- GPS - Status
- GPS - Local
- GPS - Remote
- GPIO
- VPN
- Remote Management
- About – General Status
- About – Primary WAN
- About - Ethernet WAN
- About – Wi-Fi as WAN
- About – System Status
- 3. Using, Testing, Troubleshooting
- 4. Regulatory Information

User Guide
Skyus 500 (Ninkasi)
Rev 1 Page 40 of 78
inseego.com
• Local IP — Enter the WAN IP address of local device. NOTE: This should be a static IP that
you are able to reach from remote device (no NAT).
• Local Subnet Mask — Enter the subnet mask of the local device, for example: If your
local IP is 192.168.0.100 and your subnet mask is 255.255.255.0 this should be
192.168.0.0/24
. NOTE: This should mirror what the subnet displays in the local device,
for example: 192.168.0.0 / 255.255.255.0. NOTE: The local device should be on a different
subnet from remote, for example: If the Remote Subnet Mask is
192.168.1.0/24, the
Local Subnet Mask might be 192.168.0.0/24. This is usually based off the DHCP settings
of the devices.
Remote Network
• Remote IP — Enter the WAN IP address of remote device. NOTE: This should be a static IP
that you are able to reach from local device (no NAT).
• Remote Subnet Mask — Enter the subnet mask of the remote device, for example: If
your remote IP is 192.168.0.100 and your subnet mask is 255.255.255.0 this should be
192.168.0.0/24
. NOTE: This should mirror what the subnet displays in the local device,
for example: 192.168.0.0 / 255.255.255.0. NOTE: The remote device should be on a
different subnet from local, for example: If the Local Subnet Mask is
192.168.1.0/24, the
Remote Subnet Mask might be 192.168.0.0/24. This is usually based off the DHCP
settings of the devices.
Add New VPN Tunnel: Step 3 out of 5
IKE Phase 1
Select desired items from each column.
NOTE: Each phase should support at least one matching option in each column. For example, if
Phase 1 on this page is configured to support Hash SHA2 512, SHA2 384, and SHA2 256, then at
least one of those selections must be selected in Phase 2 on the next page in order for there to
be a common Hash.
Add New VPN Tunnel: Step 4 out of 5
IKE Phase 2
Select desired items from each column.
NOTE: Each phase should support at least one matching option in each column. For example, if
Phase 1 on the previous page is configured to support Hash SHA2 512, SHA2 384, and SHA2 256,
then at least one of those selections must be selected in Phase 2 on the this page in order for
there to be a common Hash.