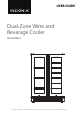
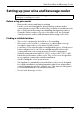
USER GUIDE Dual-Zone Wine and Beverage Cooler NS-BC2ZSS1 Before using your new product, please read these instructions to prevent any damage.
Contents IMPORTANT SAFETY INSTRUCTIONS . . . . . . . . . . . . . . . . . . . . . . . . . . . . . . 3 Features . . . . . . . . . . . . . . . . . . . . . . . . . . . . . . . . . . . . . . . . . . . . . . . . . . . . . . . . . 5 Package contents . . . . . . . . . . . . . . . . . . . . . . . . . . . . . . . . . . . . . . . . . . . 6 Components. . . . . . . . . . . . . . . . . . . . . . . . . . . . . . . . . . . . . . . . . . . . . . . . 6 Dimensions. . . . . . . . . . . . . . . . . . . . . . . . . . . . . . . .
Dual-Zone Wine and Beverage Cooler IMPORTANT SAFETY INSTRUCTIONS CAUTION RISK OF ELECTRIC SHOCK DO NOT OPEN This symbol indicates that dangerous voltage constituting a risk of electric shock is present within your cooler. This symbol indicates that there are important operating and maintenance instructions in the literature accompanying your cooler.
WARNING Electric Shock Hazard Failure to follow these instructions can result in electric shock, fire, or death. 1 WARNING–Keep ventilation openings in the appliance enclosure or in the built-in structure clear of obstruction. 2 WARNING–Do not touch the interior of the chiller compartment with wet hands. This could result in frost bite. 3 WARNING–Do not use mechanical devices or other means to accelerate the defrosting process, other than those recommended by the manufacturer.
Dual-Zone Wine and Beverage Cooler 11 This cooler is intended to be used in household and similar environments, such as: • Staff kitchen areas in shops, offices, and other working environments • Farm houses and by clients in hotels, motels, and other residential environments • Bed and breakfasts • Catering and similar non-retail applications 12 Do not store or use gasoline or any flammable liquids inside or in the vicinity of this cooler. Grounding Instructions This appliance must be grounded.
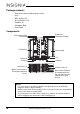
Package contents • • • • • • • Dual-zone wine and beverage center Keys Wire shelves (3) Wood shelves (12) Handles (2) Hardware Bag User Guide Components Circulation fan Control panel and display Control panel and display Circulation fan Glass door (left) Glass door (right) Lock Bottom vent Leveling leg Leveling leg Wood shelves (12) Flat chrome shelves (3) Option1: Six wood shelves for left and right compartments for wine. Option 2: Six wood shelves in one compartment for wine.
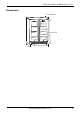
Dual-Zone Wine and Beverage Cooler Dimensions 23.7 in. (60.2 cm) 34 in. (86.5 cm) 23.8 in. (60.5 cm) www.insigniaproducts.
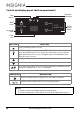
Control and display panels (both compartments) Power Power button Light button indicator On/Off button Display Temperature scale indicator Up and down buttons °C/°F Hold 3 Sec Hold 3 Sec Interior light button Increase/ decrease buttons Display screen BUTTON FUNCTION Press to turn the power on or off. Press to turn the interior light on or off. The default is on when the door is open and off when the door is closed. Press the button once to turn the light off when the door is open.
Dual-Zone Wine and Beverage Cooler Setting up your wine and beverage cooler CAUTION: This appliance is heavy. We suggest that two people be used when setting up or moving your cooler. Before using your cooler • • • Remove the exterior and interior packing. Let the cooler stand upright for approximately six hours before connecting it to power. This reduces the possibility of a malfunction in the cooling system from improper handling during transportation.
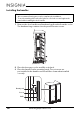
Installing the handles Notes: • We recommend having two people complete the installation. • To avoid scratching the front panel, place a soft cloth or towel against the panel while installing the door handle. 1 Remove the door handles and hardware bag from the from the cooler. The hardware bag contains a hex key and four extra screws. 2 Place the beverage cooler carefully on its back. 3 Place the handle on the mounting studs.
Dual-Zone Wine and Beverage Cooler 4 Push the door handle tightly against the door. 5 Insert the short end of the hex key into the set screw and tighten until snug (do not overtighten). The set screw is not recessed into the handle. 6 Repeat Step 5 for the other set screw, then repeat steps 3 through 5 for the other handle. 7 Keep the hex key with these installation instructions for future use. Front vent This appliance is front vented. Do not block the front air vent.
Building in your wine and beverage cooler Required tools Tape measure Safety goggles Carpenter square Gloves Electric drill with hole bit Level Flashlight Preparing the enclosure CAUTION: Gloves and safety goggles should be worn during the installation. We do not recommend that you install the appliance into a corner or directly beside a wall. The door needs to be opened more than 90° to allow full extension of the shelves.
Dual-Zone Wine and Beverage Cooler If you are installing the unit between frameless cabinets, a 0.5 inch (1.3 cm) wide filler strip or side panel may be needed on both sides of your cooler. The filler strip provides a space between the appliance case and the adjacent cabinet door swing. The width of the opening must include the filler panels. The door should extend at least 1 inch (2.6 cm) beyond the surrounding cabinets.
Connecting to power • Plug the appliance into a dedicated, properly installed grounded wall outlet. This appliance should be operated on a separate electrical circuit from other appliances. Any questions concerning power and/or grounding should be directed toward a certified electrician or an authorized service center. CAUTION: This unit is not designed to be installed in an RV or used with an inverter.
Dual-Zone Wine and Beverage Cooler After you have adjusted the left and/or right zone to the temperature you want, release the button. The temperature display blinks for approximately three seconds to confirm the selected temperature. After the display stops blinking, the temperature display indicates the set temperature of that zone.
Using the wine compartment It is necessary to position the bottles alternately on the upper six shelves. This will allow for the storage of three 750 ml bottles on each of the six shelves and three bottles on the bottom shelf, for a total storage capacity of for storage capacity of 21 wine bottles for each zone, and total storage capacity of 42 wine bottles for both zones. Shelves can be removed to accommodate larger bottles. 18 bottles Three bottles 16 www.insigniaproducts.
Dual-Zone Wine and Beverage Cooler Using the beverage compartment The top three shelves can hold 18, 355 ml cans per shelf. Ten cans can be stored in the bottom, for a total storage capacity of 64 beverage cans. 18 cans 10 cans To remove a shelf 1 Remove all bottles from the shelves. 2 Tilt one side of the shelf upward and then gently pull out the shelf. www.insigniaproducts.
To replace a shelf • To reinstall the shelf, make sure that it is resting securely on the support brackets, then push inward until it clicks into place. CAUTIONS: • Make sure that the tabs are firmly engaged in the supporting guides before storing any bottles. • The bottom shelves in both compartments are not secured in place. Do not attempt to pull on these shelves when they are stacked with bottles.
Dual-Zone Wine and Beverage Cooler • • • • • In order to maintain good air circulation in the cooler, do not let the bottles touch the back of the cooler. Do not store bottled wine by the box or case in the cooler. The cork of an opened bottle should always be moistened when returning it to the bottle. Red wine should be allowed to breath (oxygenate) before drinking.
Alarms Door ajar alarm If the door is not closed completely for five minutes, an alarm sounds. Close the door to silence the alarm. If the door is closed and the alarm continues to sound, make sure that the actuator at the bottom of the door is making contact with the switch on the appliance. If the door alarm sounds when filling the cooler, it can be silenced by pressing the power button once.
Dual-Zone Wine and Beverage Cooler If that is not possible and the appliance must be placed on its back or side during transportation, upon reaching the destination allow it to remain upright for six hours before plugging it in to avoid damage to internal components. Power failure Most power failures are corrected within a few hours and should not affect the temperature of your appliance, if you minimize the number of times the door is opened.
Troubleshooting CAUTION: Do not try to repair your cooler yourself. Doing so invalidates the warranty. Error codes If the “HI”, “LO”, or “CL” error codes appear on the display for more than five minutes, a power reset may rectify the issue (see Temperature alarms and error codes on page 20). Unplug the appliance, wait five minutes, then plug the appliance back in. If the error code persists, contact consumer care or an authorized service agent. PROBLEM SOLUTION The cooler does not operate.
Dual-Zone Wine and Beverage Cooler Specifications Dimensions (HxWxD) 34 × 23.8 × 23.7 in. (86.5 × 60.5 × 60.2 cm) Weight 125.6 lbs. (57 kg) Capacity per compartment Wine zone - 21 bottles (750 ml) Beverage zone - 64 cans (355 ml) Power requirements 115 V~60 Hz Current 1.2 A Operating temperature Wine zone - 41° F to 64° F (5° C to 18° C) Beverage zone - 34° F to 64° F (1° C to 18° C) www.insigniaproducts.
ONE-YEAR LIMITED WARRANTY Definitions: The Distributor* of Insignia branded products warrants to you, the original purchaser of this new Insignia-branded product (“Product”), that the Product shall be free of defects in the original manufacturer of the material or workmanship for a period of one (1) year from the date of your purchase of the Product (“Warranty Period”).
Dual-Zone Wine and Beverage Cooler • • • • • • • Connection to an incorrect voltage or power supply Attempted repair by any person not authorized by Insignia to service the Product Products sold “as is” or “with all faults” Consumables, including but not limited to batteries (i.e. AA, AAA, C etc.
www.insigniaproducts.com 1-877-467-4289 (U.S. and Canada) INSIGNIA is a trademark of Best Buy and its affiliated companies. Distributed by Best Buy Purchasing, LLC 7601 Penn Ave South, Richfield, MN 55423 U.S.A ©2021 Best Buy. All rights reserved.