
User Manual
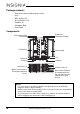
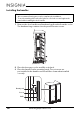
Table Of Contents
- Contents
- IMPORTANT SAFETY INSTRUCTIONS
- WARNING
- Features
- Setting up your wine and beverage cooler
- Using your wine and beverage cooler
- Maintaining your wine and beverage cooler
- Alarms
- Storing your cooler
- Moving your wine and beverage cooler
- Power failure
- Disposal
- Tips on saving energy
- Troubleshooting
- Specifications
- ONE-YEAR LIMITED WARRANTY

10
www.insigniaproducts.com
Installing the handles
1 Remove the door handles and hardware bag from the from the cooler.
The hardware bag contains a hex key and four extra screws.
2 Place the beverage cooler carefully on its back.
3 Place the handle on the mounting studs. The set screws are
pre-installed in the handles and should face down when installed
correctly.
Notes:
• We recommend having two people complete the installation.
• To avoid scratching the front panel, place a soft cloth or towel against the
panel while installing the door handle.
Mounting stud
Set screw
Handle