
User Manual


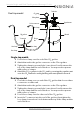
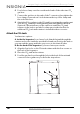
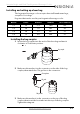

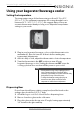
Table Of Contents
- Contents
- Introduction
- Important Safety Instructions
- WARNING
- Features
- Locating your kegerator/beverage cooler
- Assembling your kegerator/beverage cooler
- Using your kegerator/beverage cooler
- Maintaining your kegerator/beverage cooler
- Replacing kegs
- Replacing the CO2 tank
- Storing your kegerator/beverage cooler
- Moving your kegerator/beverage cooler
- Converting your beer dispenser to a beverage refrigerator
- Troubleshooting - beer quality
- Troubleshooting - cooler
- Specifications
- ONE-YEAR LIMITED WARRANTY - INSIGNIA

17
Insignia Single- and Dual-Tap Kegerator/Beverage Cooler
www.insigniaproducts.com
Installing and setting up a beer keg
This kegerator/beverage cooler accepts almost all brand name kegs,
except for Coors kegs.
Keg sizes that can be used in your kegerator/beverage cooler:
Installing the keg coupler
1 Insert the keg coupler into the neck of the beer keg and turn it
clockwise to lock it into position.
2 Make sure the washer is in the connector on the side of the keg
coupler, then attach the CO
2
gas line to the connector.
3 Make sure the washer is in the connector on the top of the keg
coupler, then insert the beer tube into the top of the keg coupler.
Tighten the wing nut.
Barrel Liters Gallons Ounces 12 oz. Glasses
1/2 59 15.5 1984 164
1/4 30 7.8 992 82
1/6 20 5.2 661 55
1/8 15 4.0 496 41
Keg coupler
Keg
CO
2
regulator
CO
2
tank
CO
2
gas line