User Guide | Guide de l’utilisateur | Guía del Usuario Clock Radio with iPod® Dock Radio-réveil avec station d’accueil pour iPodMD Radio reloj con estación de acoplamiento para iPod® NS-CL01
Insignia NS-CL01 Clock Radio with iPod® Dock Contents Welcome . . . . . . . . . . . . . . . . . . . . . . . . . . . . . . . . . . . . . . . . . . 3 Safety information . . . . . . . . . . . . . . . . . . . . . . . . . . . . . . . . . . . 3 Important safeguards . . . . . . . . . . . . . . . . . . . . . . . . . . . . . . . . 4 Features . . . . . . . . . . . . . . . . . . . . . . . . . . . . . . . . . . . . . . . . . . 6 Setting up your clock radio . . . . . . . . . . . . . . . . . . . . . . . . . . . .
Insignia NS-CL01 Clock Radio with iPod® Dock The lightning flash with arrowhead symbol within a triangle is intended to alert you to the presence of uninsulated dangerous voltage within your shelf system’s enclosure that may be of sufficient magnitude to constitute risk of electric shock to persons. The exclamation point within a triangle is intended to alert you to the presence of important operating and maintenance (servicing) instructions in the literature accompanying your shelf system.
Insignia NS-CL01 Clock Radio with iPod® Dock • • • • • • • • • built-in installation such as a bookcase or rack unless correct ventilation is provided or the manufacturer’s instructions have been adhered to. Power sources—Use only the type of power source indicated on the label. If you are not sure of the type of power supply to your home, consult Insignia Technical Support or your local power company.
Insignia NS-CL01 Clock Radio with iPod® Dock • • If your clock radio has been exposed to rain or water. If your clock radio does not operate normally by following the operating instructions. Adjust only those controls that are covered by the operating instructions, because incorrect adjustment of other controls may result in damage and often requires extensive work by a qualified technician to restore your clock radio to its normal operation. • If your clock radio has been dropped or damaged in any way.
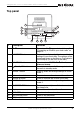
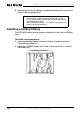
Insignia NS-CL01 Clock Radio with iPod® Dock Top panel 1 2 4 6 17 16 3 15 5 13 7 14 12 8 9 10 11 # Description Function 1 iPod® connector Connect an iPod® to your clock radio here. See “Connecting an iPod® to your clock radio” on page 15. 2 BASS/TREB button Press repeatedly to adjust the bass and trebel settings of your clock radio. The settings will be stored and shown on the Bass or Treb indicator on the display (on the front of the radio).
Insignia NS-CL01 Clock Radio with iPod® Dock # Description Function 14 TUNE DOWN/SKIP– button In radio mode, press to tune or scan the radio to a lower frequency. In iPod® mode, press to skip to the previous track. In bass/treb mode, press to decrease bass/treble level. 15 TUNE UP/SKIP+ button In radio mode, press to tune or scan the radio to a higher frequency. In iPod® mode, press to skip to the next track. In bass/treb mode, press to increase bass/treble level.
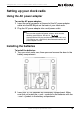
Insignia NS-CL01 Clock Radio with iPod® Dock Setting up your clock radio Using the AC power adapter To use the AC power adapter: 1 Insert the small connector at the end of the AC power adapter cable into the DC IN jack on the back of your clock radio. 2 Plug the AC power adapter into a wall power outlet. Note Only use the supplied AC power adapter, which has the following specifications: DC=6V 1A Unplug both the DC plug and the adapter when not in use.
Insignia NS-CL01 Clock Radio with iPod® Dock 3 Reinstall and close the battery compartment and return your clock radio to the upright position. Note The AC power adapter must be disconnected from the DC IN jack on the back of the radio in order for the radio to operate on battery power. appears in the display, you When the battery indicator need to replace the batteries. Installing a backup battery One CR2025 battery can be used as a backup for the clock and alarm time.
Insignia NS-CL01 Clock Radio with iPod® Dock 3 Place the backup battery cover back on the compartment, then rotate it clockwise until it locks. Caution Follow these precautions when using batteries in this device: 1. Use only the size and type of batteries specified. 2. Make sure that you follow the correct polarity as indicated in the battery compartment when installing batteries. Reversed batteries may cause damage to the radio. 3.
Insignia NS-CL01 Clock Radio with iPod® Dock Using your clock radio Playing the radio To play the radio: 1 Press (Standby/on) to turn on the clock radio. 2 Press FUNCTION repeatedly to select the radio band you want to listen to. 3 Press TUNE UP/SKIP + or TUNE DOWN/SKIP– to tune the radio up or down and select the station you want. 4 Adjust the volume to a comfortable level by pressing either the VOLUME UP or VOLUME DOWN button.
Insignia NS-CL01 Clock Radio with iPod® Dock To listen to another audio device: 1 Make sure the clock radio is turned off 2 Plug one end of the auxiliary line-in cable (not included) into the Line-in jack on the back of the radio. 3 Plug the other end of the cord into the Line-out jack on the audio device. 4 Turn on the radio. 5 Press FUNCTION one or more times until “Line-in” appears on the display. 6 Use the controls on the audio device to control playback.
Insignia NS-CL01 Clock Radio with iPod® Dock 2 Press ALARM 1 or ALARM 2 repeatedly to select iPod®, radio, or buzzer. Notes • When the alarm time is reached, the alarm volume starts at the minimum settings, then gradually increases in volume until it reaches the current volume setting. • If set to AM, FM, or buzzer, the alarm automatically turns on for 20 minutes and then shuts off. • If set to iPod®, the radio starts playback on the current track.
Insignia NS-CL01 Clock Radio with iPod® Dock To set sleep timer: 1 Make sure the radio is turned on. 2 Press SNOOZE/SLEEP once. The “SLEEP” indicator appears in the display, and “10” appears in the display for five seconds (indicating that the radio will turn off after 10 minutes). 3 Repeatedly press SNOOZE/SLEEP to increase the sleep timer in 10 minute increments up to 60 minutes. 4 After you set the sleep timer, the real time displays.
Insignia NS-CL01 Clock Radio with iPod® Dock To charge the iPod® battery: • Make sure that you have installed the correct iPod® holder in the iPod® dock on the radio, then insert the iPod®. The battery charging indicator appears on the iPod® display.
Insignia NS-CL01 Clock Radio with iPod® Dock Note The five iPod® holders provided with this radio are for use with this radio only. They are not universal docks. The universal dock number is shown on the front of each dock (see the following). 5 5 Changing the cover To remove the cover: • Press the locks on the sides of the radio and pull the cover from the back of the radio. To install the cover: • Slide the cover onto the radio from the back. The locks snap into place to hold the cover on. www.
Insignia NS-CL01 Clock Radio with iPod® Dock Troubleshooting Caution Do not try to repair the clock radio yourself. Doing so will invalidate your warranty. Problem Possible cause Solution Noise or sound FM—The antenna wire is not distorted on AM extended. or FM radio AM—The radio is not broadcasts positioned correctly. Extend the FM antenna. No sound The volume control is turned down. Increase the volume. The AC power adapter is unplugged.
Insignia NS-CL01 Clock Radio with iPod® Dock Legal notices FCC Part 15 This device complies with Part 15 of the FCC Rules. Operation of this product is subject to the following two conditions: (1) this device may not cause harmful interference, and (2) this device must accept any interference received, including interference that may cause undesired operation. This equipment has been tested and found to comply within the limits for a class B digital device, pursuant to Part 15 of the FCC Rules.
Insignia NS-CL01 Clock Radio with iPod® Dock 20 www.insignia-products.
Insignia NS-CL01 Clock Radio with iPod® Dock 90-day limited warranty Insignia Products (“Insignia”) warrants to you, the original purchaser of this new NS-CL01 (“Product”), that the Product shall be free of defects in the original manufacture of the material or workmanship for a period of 90 days from the date of your purchase of the Product (“Warranty Period”). This Product must be purchased from an authorized dealer of Insignia brand products and packaged with this warranty statement.
Insignia NS-CL01 Clock Radio with iPod® Dock • • • Commercial use Modification of any part of the Product, including the antenna Plasma display panel damaged by static (non-moving) images applied for lengthy periods (burn-in).
NS-CL01 de Insignia Radio-réveil avec station d’accueil NS-CL01 de Insignia Radio-réveil avec station d’accueil pour iPodMD Table des matières Bienvenue . . . . . . . . . . . . . . . . . . . . . . . . . . . . . . . . . . . . . . . . 23 Informations sur la sécurité. . . . . . . . . . . . . . . . . . . . . . . . . . . 23 Importantes mesures de sécurité . . . . . . . . . . . . . . . . . . . . . . 24 Fonctionnalités . . . . . . . . . . . . . . . . . . . . . . . . . . . . . . . . . . . .
NS-CL01 de Insignia Radio-réveil avec station d’accueil L'éclair fléché au centre d'un triangle prévient l'utilisateur de la présence de tensions élevées non isolées dans l’appareil, pouvant constituer un risque de choc électrique pour les personnes. Le point d’exclamation au centre d’un triangle prévient l’utilisateur de la présence d’instructions importantes dans le manuel de l’utilisateur livré avec l'appareil concernant son utilisation et son entretien.
NS-CL01 de Insignia Radio-réveil avec station d’accueil • • • • • • • pas obstruer les ouvertures. L’appareil ne doit jamais être placé à proximité ou sur un radiateur, ou une bouche de chauffage. Ne pas installer l’appareil dans un meuble encastré tel qu’une bibliothèque ou sur une étagère, sauf si une ventilation adéquate a été prévue ou si les instructions du fabricant ont été respectées.
NS-CL01 de Insignia Radio-réveil avec station d’accueil • • • • • Réparation – L’utilisateur ne doit pas essayer de réparer cet appareil lui-même; en effet son ouverture ou le démontage des couvercles peut l’exposer à des tensions dangereuses et à d'autres dangers. Toutes les réparations doivent être réalisées par un personnel qualifié.
NS-CL01 de Insignia Radio-réveil avec station d’accueil La prise principale de l'adaptateur d’alimentation CA est utilisée comme dispositif de déconnexion. Elle doit être facilement accessible et sans aucune obstruction pendant l'utilisation. Pour complètement déconnecter l’appareil de l’alimentation principale, la prise de l’adaptateur d’alimentation CA doit être débranchée complètement de la prise secteur CA.
NS-CL01 de Insignia Radio-réveil avec station d’accueil # Description Fonction 3 Touche de FONCTION Permet de sélectionner AM, FM, iPodMD, Line-in (Entrée ligne) ou Alarm on buzzer (Alarme sur sonnerie). 4 Touche Attente/Marche 5 Touche ALARM 1 (Alarme 1) Permet de sélectionner et de modifier les réglages du mode d’Alarme 1. 6 Touche de diminution du volume Permet de diminuer le volume de la radio. 7 Touche d’augmentation du volume Permet d’augmenter le volume de la radio.
NS-CL01 de Insignia Radio-réveil avec station d’accueil Panneau arrière 1 2 3 # Description Fonction 1 Antenne FM Améliore la réception des transmissions FM. 2 Prise d’entrée CC Insérer le petit connecteur de la prise d’alimentation CA ici. 3 Prise d’entrée ligne Brancher le câble d'une source audio externe sur cette prise d’entrée pour écouter le son à travers le radio-réveil.
NS-CL01 de Insignia Radio-réveil avec station d’accueil 2 Brancher l’adaptateur d'alimentation CA sur une prise secteur. Remarque N'utiliser que l'adaptateur d'alimentation CA fourni, dont les spécifications sont les suivantes : CC = 6 V 1 A Débrancher la prise CC et l'adaptateur si l'appareil n'est pas utilisé. Les piles sont automatiquement déconnectées lorsqu'un adaptateur CA est utilisé.
NS-CL01 de Insignia Radio-réveil avec station d’accueil Installation d’une pile de secours Une pile de secours CR2025 peut être utilisée pour sauvegarder l’heure de l’horloge et de l'alarme. Pour installer une pile de secours : 1 Ouvrir le compartiment de la pile de secours en le pivotant dans le sens antihoraire, puis retirer le couvercle. 2 Insérer la pile CR2025 tel qu’illustré ci-dessous, avec le signe + de la pile tourné vers le haut. Insérer la pile telle qu’illustré www.insignia-products.
NS-CL01 de Insignia Radio-réveil avec station d’accueil 3 Remettre le couvercle du compartiment de la pile en place, puis le faire pivoter dans le sens horaire jusqu’à enclenchement. Attention Observer ces précautions pour le fonctionnement de l'appareil sur piles : 1. N'utiliser que la taille et le type de piles spécifiés. 2. Prendre soin de respecter la polarité correcte indiquée dans le compartiment des piles lors de leur installation. L'inversion accidentelle des piles peut endommager le radio-réveil.
NS-CL01 de Insignia Radio-réveil avec station d’accueil Fonctionnement du radio-réveil Fonctionnement de la radio Pour utiliser la radio : 1 Appuyer sur la touche radio-réveil en marche. (Marche/Arrêt) pour mettre le 2 Appuyer plusieurs fois sur FUNCTION (Fonction) pour sélectionner la bande radio souhaitée.
NS-CL01 de Insignia Radio-réveil avec station d’accueil 5 Appuyer sur TUNE UP/SKIP + ou TUNE DOWN/SKIP– pour sélectionner le numéro préréglé souhaité de la station radio. 6 Appuyer sur PRESET/MEMORY pour confirmer le paramètre. La station est mise en mémoire. 7 Répéter les étapes 3 à 6 pour mémoriser jusqu’à 10 stations AM et 10 stations FM préréglées. 8 Pour sélectionner une station préréglée, appuyer plusieurs fois brièvement sur PRESET/MEMORY jusqu’à ce que la station souhaitée s’affiche.
NS-CL01 de Insignia Radio-réveil avec station d’accueil 2 Appuyer sur MIN (minute) pour régler les minutes de l’alarme et sur HR (heure) pour régler l’heure de l’alarme. Vérifier d’avoir réglé correctement AM ou PM. 3 Appuyer de nouveau brièvement sur ALARM 1 ou ALARM 2 pour enregistrer le réglage. L’affichage arrête de clignoter. 4 Pour annuler l’alarme, appuyer sur ALARM 1 ou ALARM 2 jusqu’à ce que le témoin d’alarme disparaisse de l’écran.
NS-CL01 de Insignia Radio-réveil avec station d’accueil 4 Si la touche SNOOZE/SLEEP est appuyée dans les cinq secondes, la durée du rappel d’alarme augmente par incréments de cinq minutes allant jusqu’à 60 minutes à chaque appui de la touche SNOOZE/SLEEP. Après avoir réglé le rappel d’alarme, l’heure actuelle s’affiche. Appuyer de nouveau sur SNOOZE/SLEEP pour voir la durée restante du rappel d’alarme pendant cinq secondes.
NS-CL01 de Insignia Radio-réveil avec station d’accueil Pour écouter l'iPodMD : 1 Vérifier que le radio-réveil est hors tension et que l’adaptateur pour iPodMDcorrespondant à l’iPodMD utilisé est installé. 2 Insérer l’iPodMD dans la station d’accueil. 3 Régler le volume sonore à un niveau confortable en appuyant sur VOLUME UP (Augmentation du volume) ou VOLUME DOWN (Diminution du volume).
NS-CL01 de Insignia Radio-réveil avec station d’accueil Pour charger la batterie de l'iPodMD : • Vérifier que l’adaptateur pour iPodMD approprié est installé dans la station d’accueil pour iPodMD du radio-réveil, puis insérer l’iPodMD. Le témoin de charge de la batterie s'affiche sur l'écran de l'iPodMD.
NS-CL01 de Insignia Radio-réveil avec station d’accueil Remarque Les cinq adaptateurs iPodMD fournis avec l’appareil sont uniquement destinés à être utilisés avec ce radio-réveil. Ce ne sont pas des stations Universal Dock. Le numéro de la station Universal Dock est indiqué sur l'avant de chaque station (voir l’illustration suivante). 5 5 Remplacement du boîtier Pour retirer le boîtier : • Appuyer sur les verrous de chaque côté du radio-réveil et retirer le boîtier de l’arrière de l’appareil.
NS-CL01 de Insignia Radio-réveil avec station d’accueil Problèmes et solutions Attention L’utilisateur ne doit pas essayer de réparer lui-même le radio-réveil. Cela annulerait la garantie. Problème Cause éventuelle Solution Bruit ou son déformé lors de l’écoute d’émissions de radio AM ou FM FM – L’antenne filaire n’est pas Déployer l'antenne FM. déployée. AM – L’appareil n’est pas positionné correctement. Faire pivoter l’appareil jusqu’à l’obtention d’une meilleure réception.
NS-CL01 de Insignia Radio-réveil avec station d’accueil Avis juridiques FCC article 15 Ce dispositif est conforme à l’article 15 du règlement de la FCC. Son utilisation est soumise aux deux conditions suivantes : (1) cet appareil ne doit pas provoquer d’interférences préjudiciables, et (2) il doit accepter toute interférence reçue, y compris celles risquant d’engendrer un fonctionnement indésirable.
NS-CL01 de Insignia Radio-réveil avec station d’accueil 42 www.insignia-products.
NS-CL01 de Insignia Radio-réveil avec station d’accueil Garantie limitée de 90 jours Insignia Products (« Insignia ») garantit au premier acheteur de ce NS-CLO1 neuf (« Produit »), qu’il est exempt de vices de fabrication et de main-d’œuvre à l’origine, pour une période de 90 jours à partir de la date d’achat du Produit (« Période de garantie »). Ce Produit doit avoir été acheté chez un revendeur agréé des produits de la marque Insignia et emballé avec cette déclaration de garantie.
NS-CL01 de Insignia Radio-réveil avec station d’accueil • • • • • • • les accidents; une utilisation inadaptée; une manipulation abusive; la négligence; une utilisation commerciale; la modification de tout ou partie du Produit, y compris l’antenne; un écran plasma endommagé par les images fixes (sans mouvement) qui restent affichées pendant de longues périodes (rémanentes).
Insignia NS-CL01 Radio reloj con estación de acoplamiento Insignia NS-CL01 Radio reloj con estación de acoplamiento para iPod® Contenido Bienvenido . . . . . . . . . . . . . . . . . . . . . . . . . . . . . . . . . . . . . . . 45 Información de seguridad . . . . . . . . . . . . . . . . . . . . . . . . . . . . 45 Medidas de seguridad importantes. . . . . . . . . . . . . . . . . . . . . 46 Características . . . . . . . . . . . . . . . . . . . . . . . . . . . . . . . . . . . .
Insignia NS-CL01 Radio reloj con estación de acoplamiento La figura de relámpago que termina en punta de flecha dentro de un triángulo tiene por finalidad alertarle de la presencia de voltaje peligroso sin aislamiento en el interior de su sistema de audio que podría tener potencia suficiente para constituir riesgo de choque eléctrico para las personas.
Insignia NS-CL01 Radio reloj con estación de acoplamiento • • • • • • • posterior del gabinete. No bloquee estas aberturas. Su radio reloj nunca se debe colocar cerca o sobre un radiador o calefactor. No coloque su radio reloj en una instalación empotrada, tal como un librero o estante, a menos que se proporcione la correcta ventilación o se hayan seguido las instrucciones del fabricante. Fuentes de alimentación – Use sólo el tipo de fuente de alimentación indicada en la etiqueta de marca.
Insignia NS-CL01 Radio reloj con estación de acoplamiento • • • • • Reparación – No trate de reparar su radio reloj usted mismo, ya que abrir o quitar las cubiertas puede exponerle a voltajes peligrosos o a otros peligros. Remita todas las reparaciones a personal de servicio calificado.
Insignia NS-CL01 Radio reloj con estación de acoplamiento El enchufe del adaptador de alimentación de CA se usa como dispositivo de desconexión. Debe permanecer preparado para utilizarse y no se debe obstruir durante el uso. Para desconectar completamente el radio reloj de la red eléctrica, se debe desconectar completamente el adaptador de alimentación de CA del tomacorriente. La placa de marca del adaptador de CA se encuentra en la parte inferior del adaptador.
Insignia NS-CL01 Radio reloj con estación de acoplamiento # Descripción Función 3 Botón de FUNCIÓN Permite seleccionar entre AM, FM, iPod®, Line-in (Entrada de línea), o Alarm on buzzer (Timbre de alarma). 4 Botón de Suspensión/ Encendido Permite encender el radio. Presione de nuevo para volver a poner el sistema en el modo de suspensión. 5 Botón de ALARMA 1 Permite seleccionar y cambiar los ajustes del modo de alarma 1. 6 Botón para bajar el volumen Permite bajar el volumen del radio.
Insignia NS-CL01 Radio reloj con estación de acoplamiento Panel posterior 2 1 3 # Descripción Función 1 Antena de FM Mejora la recepción de las transmisiones de FM. 2 Toma de la entrada de CC Inserte aquí el conector pequeño del adaptador de alimentación de CA. 3 Toma de entrada de línea Conecte un cable de una fuente de audio externa en esta toma de entrada para escuchar el sonido a través de su radio reloj.
Insignia NS-CL01 Radio reloj con estación de acoplamiento 2 Enchufe el enchufe de alimentación de CA en un tomacorriente de pared. Nota Sólo use el adaptador de alimentación de CA suministrado que tenga las siguientes especificaciones: CC = 6 V 1 A Desenchufe el enchufe de CC y el adaptador cuando no se esté utilizando. Cuando se usa el adaptador de CA, las pilas se desconectan automáticamente.
Insignia NS-CL01 Radio reloj con estación de acoplamiento Instalación de la pila de respaldo Una pila CR2025 puede ser usada como respaldo para la hora del reloj y de la alarma. Para instalar la pila de respaldo: 1 Abra la cubierta de la pila de respaldo girándola en el sentido horario y removiendo la puerta. 2 Inserte una pila CR2025 según se muestra, con el lado positivo (+) de la pila orientado hacia arriba. Inserte la pila según se muestra www.insignia-products.
Insignia NS-CL01 Radio reloj con estación de acoplamiento 3 Coloque la cubierta de la pila de respaldo en el compartimiento y gírela en el sentido horario hasta que se encaje. Cuidado Siga estas precauciones cuando use pilas en este dispositivo: 1. Use sólo el tamaño y tipo de pilas especificados. 2. Cuando instale las pilas, asegúrese de observar la polaridad correcta según lo indicado el compartimiento de la pila. Si invierte las pilas puede dañar el radio. 3. No combine diferentes tipos de pilas (por ej.
Insignia NS-CL01 Radio reloj con estación de acoplamiento Uso de su radio reloj Escuchando radio Para escuchar radio: 1 Presione (Suspensión/encendido) para encender el radio reloj. 2 Presione FUNCTION (Función) repetidamente para seleccionar la banda de radio que desea escuchar. 3 Presione TUNE UP/SKIP + (Sintonizar arriba/Saltar +) o TUNE DOWN/SKIP– (Sintonizar abajo/Saltar -) para sintonizar el radio hacia arriba o abajo y seleccionar la estación deseada.
Insignia NS-CL01 Radio reloj con estación de acoplamiento 6 Presione PRESET/MEMORY (Predefinida/Memoria) para confirmar el ajuste. La emisora queda almacenada en la memoria. 7 Repita los pasos 3 y 6 para guardar hasta 10 estaciones AM y 10 FM). 8 Para resaltar una estación predefinida, presione brevemente PRESET/MEMORY (Predefinida/Memoria) repetidamente hasta que alcance la estación deseada. Para escuchar otro dispositivo de audio: 1 Asegúrese de que el radio reloj esté apagado.
Insignia NS-CL01 Radio reloj con estación de acoplamiento 2 Presione el botón MIN para ajustar los minutos de la alarma y HR para ajustar la hora de la alarma. Asegúrese de seleccionar AM o PM correctamente. 3 Presione de nuevo ALARM 1 (Alarma 1) o ALARM 2 (Alarma 2) brevemente para guardar el ajuste. La pantalla deja de parpadear. 4 Para cancelar la alarma, presione ALARM 1 o ALARM 2 hasta que el indicador desaparezca de la pantalla.
Insignia NS-CL01 Radio reloj con estación de acoplamiento 4 Si presiona SNOOZE/SLEEP (Repetición de alarma/Apagado automático) dentro de esos cinco segundos, cada vez que presione el botón SNOOZE/SLEEP, el tiempo de repetición de alarma aumenta cinco minutos hasta 60 minutos. Después de ajustar la repetición de alarma, se mostrará el tiempo real. Presione repetidamente SNOOZE/SLEEP para ver el tiempo de repetición de alarma restante por cinco segundos.
Insignia NS-CL01 Radio reloj con estación de acoplamiento 3 Inserte el adaptador correspondiente y su iPod® en la estación de acoplamiento en la parte superior de su radio. Para escuchar el iPod®: 1 Asegúrese de que el radio esté apagado y que el adaptador de iPod® que coincide con su iPod® esté instalado. 2 Inserte su iPod® en la estación de acoplamiento. 3 Ajuste el volumen a un nivel cómodo presionando ya sea el botón VOLUME UP (Subir volumen) o VOLUME DOWN (Bajar volumen).
Insignia NS-CL01 Radio reloj con estación de acoplamiento Para cargar la batería del iPod®: • Asegúrese de que ha instalado el adaptador de iPod® correcto en la estación de acoplamiento del radio e inserte el iPod®. El indicador de batería cargando aparece en la pantalla del iPod®. iPod® Memoria iPod® mini 4 y 6 GB 3 iPod® de cuarta generación 20 GB/ Edición Especial U2 20 GB 4 40 GB 5 iPod® Foto/ 20 GB iPod® con 30 GB pantalla a color Edición especial U2 40 y 60 GB 60 No.
Insignia NS-CL01 Radio reloj con estación de acoplamiento Nota Los cinco adaptadores para iPod® incluidos con este radio son para este radio únicamente. No son estaciones de acoplamiento universales. El número de estación de acoplamiento universal se muestra en la parte frontal de cada estación (refiérase a la siguiente figura). 5 5 Cambio de cubierta Para extraer la cubierta: • Presione los seguros en los lados del radio y tire de la cubierta de la parte posterior del radio.
Insignia NS-CL01 Radio reloj con estación de acoplamiento Localización y corrección de fallas Cuidado No intente reparar el radio reloj usted mismo. Hacerlo anulará su garantía. Problema Causa probable Solución Se escucha ruido o sonido distorsionado en las transmisiones de radio AM o FM. FM — El cable de la antena no Extienda completamente la antena está extendido. de FM. AM — El radio no está posicionado correctamente. Gire el radio hasta que se obtenga la mejor recepción.
Insignia NS-CL01 Radio reloj con estación de acoplamiento Avisos legales FCC Parte 15 Este dispositivo satisface la parte 15 del reglamento FCC. La operación de este producto está sujeta a las dos condiciones siguientes: (1) Este dispositivo no puede causar interferencia dañina, y (2) este dispositivo debe aceptar cualquier interferencia recibida incluyendo interferencias que puedan causar una operación no deseada.
Insignia NS-CL01 Radio reloj con estación de acoplamiento 64 www.insignia-products.
Insignia NS-CL01 Radio reloj con estación de acoplamiento Garantía limitada de 90 días Insignia Products (“Insignia”) le garantiza a usted, el comprador original de este nuevo NS-CLO1 (“Producto”), que éste se encontrará libre de defectos de material o de mano de obra en su fabricación original por un período de 90 (noventa) días a partir de la fecha de compra del Producto (“Período de Garantía”).
Insignia NS-CL01 Radio reloj con estación de acoplamiento • • • • • • • Accidentes Mal uso Abuso Negligencia Uso comercial Modificación de alguna parte del Producto, incluyendo la antena Un panel de pantalla de plasma dañado por la persistencia de imágenes estáticas (sin movimiento), mostradas por periodos de tiempo extendido (efecto “burn-in”).
Insignia NS-CL01 Radio reloj con estación de acoplamiento www.insignia-products.
www.insignia-products.com (877) 467-4289 Distributed by Best Buy Purchasing, LLC 7601 Penn Avenue South, Richfield, MN USA 55423-3645 © 2008 Best Buy Enterprise Services, Inc. All rights reserved. INSIGNIA is a trademark of Best Buy Enterprise Services, Inc. Registered in some countries. All other products and brand names are trademarks of their respective owners. iPod® is a trademark of Apple Computer, Inc., registered in the U.S. and other countries.