NS-DPFC01 09-0621_MAN_ENG_V2.
NS-DPFC01 09-0621_MAN_ENG_V2.
NS-DPFC01 09-0621_MAN_ENG_V2.fm Page 3 Friday, July 24, 2009 12:14 PM Insignia NS-DPFC01 Clock Radio with LCD Photo Viewer Contents Welcome . . . . . . . . . . . . . . . . . . . . . . . . . . . . . . . . . . . . . . . . . . . . . . . . . . . . . . . . 3 Important safety instructions . . . . . . . . . . . . . . . . . . . . . . . . . . . . . . . . . . . . . 3 Features . . . . . . . . . . . . . . . . . . . . . . . . . . . . . . . . . . . . . . . . . . . . . . . . . . . . . . . . .
NS-DPFC01 09-0621_MAN_ENG_V2.fm Page 4 Friday, July 24, 2009 12:14 PM Insignia NS-DPFC01 Clock Radio with LCD Photo Viewer 10 Protect the power cord from being walked on or pinched particularly at plugs, convenience receptacles, and the point where they exit from the apparatus. 11 Only use attachments/accessories specified by the manufacturer. 12 Use only with the cart, stand, tripod, bracket, or table specified by the manufacturer, or sold with the apparatus.
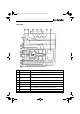
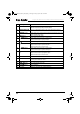
NS-DPFC01 09-0621_MAN_ENG_V2.fm Page 5 Friday, July 24, 2009 12:14 PM Insignia NS-DPFC01 Clock Radio with LCD Photo Viewer Top view 2 1 3 4 6 5 PHOTO MENU ZOOM 7 DEL/COPY 8 9 11 10 12 13 15 16 19 21 VOL+ PRESET+ 14 PHOTO DISPLAY SLEEP ALARM 1 TUNE+ PREV ENTER SNOOZE/DIMMER RADIO NEXT TUNE- 17 18 VOL- PRESET- MEMORY TIME SET ALARM 2 20 22 23 # Description Function 1 Photo display LCD screen where photos are displayed.
NS-DPFC01 09-0621_MAN_ENG_V2.fm Page 6 Friday, July 24, 2009 12:14 PM Insignia NS-DPFC01 Clock Radio with LCD Photo Viewer # Description Function 9 SLEEP button Press to set the sleep timer, which automatically turns off the radio after the time duration selected. Press repeatedly to select the duration. 10 PHOTO DISPLAY button Press once to turn the photo display on. Press again to turn the photo display off. 11 PRESET+ button In radio mode, press to select the next preset station.
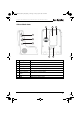
NS-DPFC01 09-0621_MAN_ENG_V2.fm Page 7 Friday, July 24, 2009 12:14 PM Insignia NS-DPFC01 Clock Radio with LCD Photo Viewer Side and back views 5 4 6 1 2 3 7 # Description 1 Card slot Plug an SD, MMC, MS, or XD card into this slot. 2 USB port Plug an external USB device into this port. 3 USB cable port Plug a USB cable from a computer into this port. 4 Backup battery slot Insert a backup battery into this opening. 5 Remote control Remotely control your radio with this remote control.
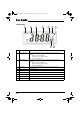
NS-DPFC01 09-0621_MAN_ENG_V2.fm Page 8 Friday, July 24, 2009 12:14 PM Insignia NS-DPFC01 Clock Radio with LCD Photo Viewer LCD display 1 2 3 4 7 6 5 8 9 # Description Function 1 Alarm 1 status icon Indicates the status of Alarm 1. The icon to the right of the status icon indicates your selection. • Bell icon–wake to buzzer • Music note icon–wake to radio • No icon–alarm 1 off 2 Alarm 2 status icon Indicates the status of Alarm 2.
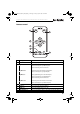
NS-DPFC01 09-0621_MAN_ENG_V2.fm Page 9 Friday, July 24, 2009 12:14 PM Insignia NS-DPFC01 Clock Radio with LCD Photo Viewer Remote control 1 PHOTO DISPLAY PHOTO MENU 6 TUNE+ 2 PREV 3 ENTER NEXT TUNE- 4 + 5 ROTATE ZOOM DEL/ COPY 7 # Description 1 PHOTO MENU button 2 PREV button In photo playback mode, press to select the previous photo. In photo zoom mode, press to pan left in the photo. In photo menu mode, press to move the cursor.
NS-DPFC01 09-0621_MAN_ENG_V2.fm Page 10 Friday, July 24, 2009 12:14 PM Insignia NS-DPFC01 Clock Radio with LCD Photo Viewer # Description Function 7 DEL/COPY button Press to delete or copy photos while in thumbnail picture mode. Setting up your clock radio Supplying power Your clock radio is powered by an AC adapter. Plugging in your clock radio To plug in your clock radio: 1 Place your clock radio in a convenient place and find an AC power outlet within range of the AC adapter.
NS-DPFC01 09-0621_MAN_ENG_V2.fm Page 11 Friday, July 24, 2009 12:14 PM Insignia NS-DPFC01 Clock Radio with LCD Photo Viewer 4 Plug in your radio. Cautions Follow these precautions when using a battery in this device: • Use only the size and type of battery specified. • Make sure that you follow the correct polarity as indicated in the battery compartment when installing the battery. A reversed battery may cause damage to the clock radio.
NS-DPFC01 09-0621_MAN_ENG_V2.fm Page 12 Friday, July 24, 2009 12:14 PM Insignia NS-DPFC01 Clock Radio with LCD Photo Viewer 2 Push the bracket upward from the bottom until it can be removed. Caution • We suggest that you keep the bracket installed. • If you decide to remove the bracket, you may need to push bracket hard to remove it • When you remove the bracket, keep your fingers and body clear above the bracket to avoid possible impact by the bracket, when it pops out.
NS-DPFC01 09-0621_MAN_ENG_V2.fm Page 13 Friday, July 24, 2009 12:14 PM Insignia NS-DPFC01 Clock Radio with LCD Photo Viewer 2 Press PREV or NEXT to highlight Photo Setup, then press ENTER to confirm. The Photo Setup menu opens. 3 Press TUNE+, or TUNE– to select LCD Setup, then press ENTER. The LCD Setup menu opens. 4 Press TUNE+, or Color. TUNE– to select Brightness, Contrast, or 5 Press PREV or NEXT to adjust your selection, then press ENTER when you are through to save your settings. www.
NS-DPFC01 09-0621_MAN_ENG_V2.fm Page 14 Friday, July 24, 2009 12:14 PM Insignia NS-DPFC01 Clock Radio with LCD Photo Viewer Using your clock radio Using the clock and alarm To set the clock: 1 Press and hold TIME SET until the hour blinks on the display. 2 Press TUNE+ or TUNE– to set the hour. 3 Press TIME SET. The minutes blink on the display. 4 Press TUNE+ or TUNE– to set the minutes. 5 Press TIME SET to store the setting.
NS-DPFC01 09-0621_MAN_ENG_V2.fm Page 15 Friday, July 24, 2009 12:14 PM Insignia NS-DPFC01 Clock Radio with LCD Photo Viewer Playing the radio To play the radio: 1 Press RADIO to turn on your clock radio. • To tune the radio up or down and select the station you want, press TUNE+ or TUNE–. • To auto search for stations, press and hold TUNE+ or TUNE– for more than two seconds. • To adjust the volume to a comfortable level, press either the VOL+ or VOL– button.
NS-DPFC01 09-0621_MAN_ENG_V2.fm Page 16 Friday, July 24, 2009 12:14 PM Insignia NS-DPFC01 Clock Radio with LCD Photo Viewer 2 Repeatedly press SLEEP to decrease the sleep timer in 10 minute increments. 3 To cancel the sleep function, repeatedly press SLEEP until “00” shows on the display. Adjusting the backlight To set the backlight level: 1 Make sure the power is connected. 2 Press SNOOZE/DIMMER to set the display backlight to a comfortable level, except when the alarm is on.
NS-DPFC01 09-0621_MAN_ENG_V2.fm Page 17 Friday, July 24, 2009 12:14 PM Insignia NS-DPFC01 Clock Radio with LCD Photo Viewer 3 When the computer recognizes the clock radio as a drive you can operate the clock radio as a USB drive. Notes • When your clock radio is connected to the computer with the USB cable,the large USB port of your clock radio cannot be used at the same time. • Your clock radio appears as a removable drive.
NS-DPFC01 09-0621_MAN_ENG_V2.fm Page 18 Friday, July 24, 2009 12:14 PM Insignia NS-DPFC01 Clock Radio with LCD Photo Viewer Changing the display To use the photo menu: 1 While in Photo mode, press PHOTO MENU to display the photo menu OSD (on-screen display). The following menu opens. 2 Press PREV or NEXT to highlight Photo Source, then press ENTER to confirm. The Photo Source menu opens. 18 www.insigniaproducts.
NS-DPFC01 09-0621_MAN_ENG_V2.fm Page 19 Friday, July 24, 2009 12:14 PM Insignia NS-DPFC01 Clock Radio with LCD Photo Viewer 3 Press PREV or NEXT to highlight the photo source you want, then press ENTER to confirm.The Thumbnails menu opens. 4 Press PREV, NEXT, TUNE+, or TUNE– to select the photo you want, then press ENTER to view the photo in full screen. Showing a slideshow To show a slideshow: 1 While in Photo mode, press PHOTO MENU to display the photo menu OSD (on-screen display).
NS-DPFC01 09-0621_MAN_ENG_V2.fm Page 20 Friday, July 24, 2009 12:14 PM Insignia NS-DPFC01 Clock Radio with LCD Photo Viewer 2 Press PREV or NEXT to highlight Photo Setup, then press ENTER to confirm. The Photo Setup menu opens. 3 Press TUNE+, or you want. 4 Press ENTER or TUNE– to select the slideshow/playback mode NEXT to open the submenu. 5 Press TUNE+, or TUNE– to select the setting you want, then press ENTER to confirm. 6 Press PHOTO MENU to exit the onscreen menus.
NS-DPFC01 09-0621_MAN_ENG_V2.fm Page 21 Friday, July 24, 2009 12:14 PM Insignia NS-DPFC01 Clock Radio with LCD Photo Viewer 2 Press DEL/COPY. The DEL/COPY popup appears on the screen. 3 Press TUNE+, or TUNE– to select Copy select or Copy all (for Memory Card or USB Device), or Delete select or Delete all (for Internal Memory) then press NEXT to display the options (No or Yes). Note When you select Internal Memory as the source, your only choices are Delete select or Delete all.
NS-DPFC01 09-0621_MAN_ENG_V2.fm Page 22 Friday, July 24, 2009 12:14 PM Insignia NS-DPFC01 Clock Radio with LCD Photo Viewer Troubleshooting Note Do not try to repair the clock radio yourself. Doing so will invalidate your warranty. Problem Solution The display is off Make sure that the AC power adapter is connected to radio and that the AC power adapter is plugged into an AC power outlet. No sound Increase the volume. Make sure that the radio is on and tuned to a radio station.
NS-DPFC01 09-0621_MAN_ENG_V2.fm Page 23 Friday, July 24, 2009 12:14 PM Insignia NS-DPFC01 Clock Radio with LCD Photo Viewer NOTE: This equipment has been tested and found to comply within the limits for a class B digital device, pursuant to Part 15 of the FCC Rules. These limits are designed to provide reasonable protection against harmful interference in a residential installation.
NS-DPFC01 09-0621_MAN_ENG_V2.fm Page 25 Friday, July 24, 2009 12:14 PM Insignia NS-DPFC01 Clock Radio with LCD Photo Viewer 90-day limited warranty Insignia Products (“Insignia”) warrants to you, the original purchaser of this new NS-DPFC01 (“Product”), that the Product shall be free of defects in the original manufacture of the material or workmanship for a period of 90 days from the date of your purchase of the Product (“Warranty Period”).
NS-DPFC01 09-0621_MAN_ENG_V2.fm Page 26 Friday, July 24, 2009 12:14 PM Insignia NS-DPFC01 Clock Radio with LCD Photo Viewer • Plasma display panel damaged by static (non-moving) images applied for lengthy periods (burn-in).
NS-DPFC01 09-0621_MAN_ENG_V2.fm Page 28 Friday, July 24, 2009 12:14 PM www.insigniaproducts.com (877) 467-4289 Distributed by Best Buy Purchasing, LLC 7601 Penn Avenue South, Richfield, MN USA 55423-3645 © 2009 Best Buy Enterprise Services, Inc. All rights reserved. INSIGNIA is a trademark of Best Buy Enterprise Services, Inc. Registered in some countries. All other products and brand names are trademarks of their respective owners.