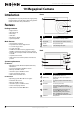
User Guide 10 Megapixel Digital Camera NS-DSC1110A
Contents Important safety instructions . . . . . . . . . . . . . . . . . . . . . . . . . . . . . . . . . . . . .1 Introduction . . . . . . . . . . . . . . . . . . . . . . . . . . . . . . . . . . . . . . . . . . . . . . . . . . . . .2 Features . . . . . . . . . . . . . . . . . . . . . . . . . . . . . . . . . . . . . . . . . . . . . . . . . . . . . . . . .2 Package contents . . . . . . . . . . . . . . . . . . . . . . . . . . . . . . . . . . . . . . . . . . . . . . . . Main features . . . . . . . . . . . . . .
Contents Turning the focus light on or off . . . . . . . . . . . . . . . . . . . . . . . . . . . . . . . . . 15 Setting the metering function . . . . . . . . . . . . . . . . . . . . . . . . . . . . . . . . . . . 16 Turning burst mode on or off . . . . . . . . . . . . . . . . . . . . . . . . . . . . . . . . . . . . 16 Using the Playback menu . . . . . . . . . . . . . . . . . . . . . . . . . . . . . . . . . . . . . . 17 Erasing photos and videos . . . . . . . . . . . . . . . . . . . . . . . . . . . . . . .
Contents iv www.insigniaproducts.
Important safety instructions Battery information Caution Danger of explosion if battery is incorrectly replaced. Replace only with the same or compatible type. The exclamation point within an equilateral triangle is intended to alert you to the presence of important operating and maintenance (servicing) instructions in the literature accompanying your camera. 1 2 3 4 5 6 7 Read these instructions. Keep these instructions. Heed all warnings. Follow all instructions. Do not use this apparatus near water.
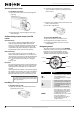
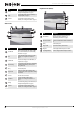
NS-DSC1110A 10 Megapixel Camera 10 Megapixel Camera Introduction Front Congratulations on your purchase of a high-quality Insignia product. Your NS-DSC1110A is designed for reliable and trouble-free performance. Features Package contents • • • • • • Digital camera AA batteries (2) Wrist strap USB cable CD with User Guide Quick Setup Guide Main features • • • • • 10 megapixel resolution 3x optical zoom and 5x digital zoom 1/2.3 inch image sensor 2.
10 Megapixel Camera Bottom # Item Description 6 4-way navigation button The Macro, Face Tracking, Self-Timer, and Flash buttons are also used to navigate through the on-screen menus. See “Navigating menus” on page 4. 7 MENU button Press to open or close the on-screen menu. Top # Item Description 1 Battery compartment Insert two AA batteries into this compartment. For more information, see “Installing the batteries” on page 3. 2 Tripod socket Use to mount the camera to a tripod.
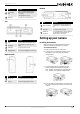
NS-DSC1110A 10 Megapixel Camera Attaching the wrist strap 2 Insert the SD or SDHC memory card into the card slot with the metallic part facing the back of the camera. To attach the wrist strap: 1 Insert the short loop on the strap through the strap ring. 3 Push the SD or SDHC memory card into the slot until it clicks into place. 4 Close the compartment. 2 Thread the large loop through the short loop, then pull tight.
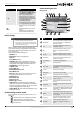
10 Megapixel Camera Item Understanding the LCD Description • In Photo mode, press to toggle the flash mode (Auto, Red-eye Reduction, Forced On, Slow Sync, and Forced Off).Flash modes are only available for photos. • In Playback mode, press to view the next image or video clip. Press and hold down to scroll rapidly through images and video clips. • In video Playback mode, press to fast-forward video playback. • In menu mode, press to enter the submenu or to navigate through the menu selections.
NS-DSC1110A 10 Megapixel Camera Playback mode (Photo) # Item Description 19 Metering Shows the metering setting. For more information, see “Setting the metering function” on page 16. 20 Quality Shows the quality setting. For more information, see “Setting the quality” on page 12. 21 Resolution Shows the image resolution setting. For more information, see “Setting the resolution” on page 13.
10 Megapixel Camera Changing the LCD configuration Playback mode (Video) You can change the type of information that is displayed on the LCD. Notes • • If the Face tracking, Flash, Self-timer, Macro, and Stabilizer features are turned on in Photo mode, or the Macro feature is turned on in Video mode, the icons are displayed even when the OSD is turned off. You cannot change the LCD configuration when recording or playing videos. To change the LCD configuration: • Press OK/DISP one or more times.
NS-DSC1110A 10 Megapixel Camera 2 Press / or / to select a language, then press OK/DISP. The Select Time and Date screen opens. Playback mode OSD on Full OSD on 3 Press / or / to set the hour, then press / to move to the minute field. Tip OSD off You can press and hold a navigation button to change the values continuously. Using your camera 4 Repeat Step 3 to select AM or PM and to enter the month, day, and year.
10 Megapixel Camera 5 Press / or / to highlight Simple Mode, then press OK/DISP to open the submenu. 6 Press / or / to highlight Off or On, then press OK/DISP to save the setting and exit to the previous menu. 7 Press MENU again to exit the on-screen menu and begin taking photos or video. 4 Press the shutter button down halfway. Your camera automatically adjusts the focus and exposure.
NS-DSC1110A 10 Megapixel Camera Your camera is equipped with five flash modes: Auto flash—Flash fires automatically when shooting conditions require extra lighting. Red-eye reduction—Flash fires twice--once to let the subject’s eyes adjust to the flash, then again to take the actual image. Using the macro feature Your camera is equipped with a macro feature that lets you focus on very close subjects. To use the macro feature: 1 Press on the navigation control. The macro icon appears on the LCD.
10 Megapixel Camera Recording video You can record videos with your camera. The available recording time depends on the available capacity of the internal memory or the memory card in use. Videos can be recorded until the maximum memory capacity has been reached. About 15 minutes of video can be recorded for every gigabyte of memory space. To record video: 1 Press MODE to switch to Video mode. 2 Focus your camera on the subject that you want to record.
NS-DSC1110A 10 Megapixel Camera Zooming photos in Playback mode The zoom view function works with photos only. 3 Press the delete button. A confirmation message appears on the LCD. To zoom photos in Playback mode: 1 Use standard procedures to select the photo you want to view, then press the zoom button (T) to zoom in or the zoom (W) button to zoom out. You can zoom in on an image up to 5×. 2 Press / , / , / , or / to view different sections of the zoomed image. 3 Press MENU to close the zoom view.
10 Megapixel Camera 3 Press / or / to highlight Quality, press OK/DISP to open the submenu. Photo mode Video mode 4 Press / or / to select the setting you want, then press OK/DISP. You can select: Super Fine 4x compression rate Fine 8x compression rate Normal 12x compression rate 5 Press MENU again to close the menu. Setting the resolution The Resolution function is used to set the resolution before you capture an image or a video clip.
NS-DSC1110A 10 Megapixel Camera Setting the color balance 5 Press MENU again to close the menu. Setting ISO The ISO function lets you adjust the ISO sensitivity for recording still images, based on the light levels of your surroundings. • Use a higher ISO setting in dim conditions and a lower ISO setting in brighter conditions. • As you move through the selections, the preview on the LCD monitor changes accordingly.
10 Megapixel Camera Turning the stabilizer function on or off The stabilizer function helps prevent blurred photos. This function is only available for capturing photos. If the stabilizer function is turned on, the stabilizer icon appears on the LCD, and the ISO setting is automatically set to Auto. To turn the stabilizer feature on or off: 1 Press MODE to switch to Photo mode. 2 Press MENU to open the Record menu. 3 Press / or / to highlight Stabilizer, then press OK/DISP to open the submenu.
NS-DSC1110A 10 Megapixel Camera Setting the metering function An icon that corresponds to the metering mode selected will appear on the left side of the LCD. This feature controls exposure metering in recording still images. Note The metering function can only be set when Simple mode is set to Off. To set the metering function: 1 Press MODE to switch to Photo mode. 2 Press MENU to open the Record menu. Metering icon 5 Press MENU again to close the menu.
10 Megapixel Camera When Burst Mode is turned on, an icon appears on the screen. Burst mode icon 4 Press / or / to select the option you want, then press OK/DISP. You can select: • Single—Erases the currently selected photo or video. • All—Erases all photos and videos. If you select this option, a message appears. Press / or / to highlight Yes, then press OK/DISP. Caution Selecting All will erase all files on the inserted card, not just photos and videos.
NS-DSC1110A 10 Megapixel Camera 3 Press / or / to highlight Copy to Card, then press / or OK/DISP to open the submenu. 3 Press / or / to highlight Copy to Card, then press / or OK/DISP to open the submenu. 4 Press / or / to highlight Single, then press OK/DISP. 5 Press / or / to select the photo or video you want to copy. 4 Press / or / to highlight All, then press OK/DISP. A confirmation message appears.
10 Megapixel Camera 3 Press / or / to highlight Slideshow, then press / or OK/DISP to open the submenu. Turning Quick View on or off The Quick View function lets you view a captured image right after shooting it. If Quick View is turned on, your camera will display the captured image for one second on the LCD. This function can only be turned on or off when Simple mode is set to Off. To turn Quick View on or off: 1 Turn on your camera, then press MODE to switch to Photo mode. 2 Press MENU.
NS-DSC1110A 10 Megapixel Camera To imprint the date and time on photos: 1 Turn on your camera, then press MODE to switch to Photo mode. 2 Press MENU. The on-screen menu opens. 3 Press / or / to select the (setup) tab. The Setup menu opens. 4 Press / or / to highlight Date & Time, then press / or OK/DISP to open the date and time screen. 5 Press / or / to set the hour, then press / to move to the minutes field. Tip 4 Press / or / to highlight Date Stamp, then press / or OK/DISP to open the submenu.
10 Megapixel Camera 3 Press / or / to select the The Setup menu opens. (setup) tab. 4 Press / or / to highlight Power Save, then press / or OK/DISP to open the submenu. 4 Press / or / to highlight Language, then press / or OK/DISP to open the submenu. 5 Press / or / to highlight the language you want, then press OK/DISP. 6 Press MENU to close the menu. Setting the battery type The battery type function lets you set the type of battery in use.
NS-DSC1110A 10 Megapixel Camera 5 Press / or / to highlight the battery type you are using, then press OK/DISP. 6 Press MENU to close the menu. 3 Press / or / to select the The Tools menu opens. (tools) tab. Turning help text on or off Turn on the help text function to display the help information for a highlighted menu option. Note The help text function can only be accessed when Simple mode is set to Off.
10 Megapixel Camera Transferring files to a computer Troubleshooting Problem You can transfer photos and video files to your computer. To transfer files to a computer: 1 Connect the camera to a camera using the supplied USB cable. 2 Turn on the camera. The computer detects the connection. Your camera's internal memory and memory card display as removable drives in the file manager. No image is displayed on the LCD. Cause and/or Action Camera does not turn on The batteries may be exhausted.
NS-DSC1110A 10 Megapixel Camera Specifications Sensor Lens LCD Focusing range Aperture Shutter File format Resolution (still image) Sensitivity Color balance Exposure compensation Exposure control Self-timer Flash Storage OSD language Interface Battery Operating temperature Operating humidity Microphone Speaker Dimensions Weight 24 Legal notices 10 Megapixels, Type: 1/2.3 Focal Length: F = 6.3 - 18.9 mm (optical zoom range 35.5 - 106.5 mm), 3× optical zoom, 5× digital zoom 2.
10 Megapixel Camera One-year limited warranty Insignia Products (“Insignia”) warrants to you, the original purchaser of this new product (“Product”), that the Product shall be free of defects in the original manufacture of the material or workmanship for a period of one (1) year from the date of your purchase of the Product (“Warranty Period”). This Product must be purchased from an authorized dealer of Insignia brand products and packaged with this warranty statement.
TM www.insigniaproducts.com (877) 467-4289 Distributed by Best Buy Purchasing, LLC 7601 Penn Avenue South, Richfield, MN USA 55423-3645 © 2010 BBY Solutions, Inc. All rights reserved. INSIGNIA is a trademark of BBY Solutions, Inc. Registered in some countries. All other products and brand names are trademarks of their respective owners.