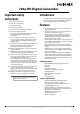
User Guide 720p HD Digital Camcorder NS-DV720PBL2
Contents Important safety instructions . . . . . . . . . . . . . . . . . . . . . . . . . . . . . . . . . . . . .1 Introduction . . . . . . . . . . . . . . . . . . . . . . . . . . . . . . . . . . . . . . . . . . . . . . . . . . . . .1 Features . . . . . . . . . . . . . . . . . . . . . . . . . . . . . . . . . . . . . . . . . . . . . . . . . . . . . . . . .1 Package contents . . . . . . . . . . . . . . . . . . . . . . . . . . . . . . . . . . . . . . . . . . . . . . . . System requirements . . . . . . . . . . .
Contents Resetting to factory defaults . . . . . . . . . . . . . . . . . . . . . . . . . . . . . . . . . . . . 18 Viewing movies and pictures on a TV . . . . . . . . . . . . . . . . . . . . . . . . . . . 18 Connecting to an HDMI enabled TV . . . . . . . . . . . . . . . . . . . . . . . . . . . . . 18 Connecting to a TV using the supplied A/V cable . . . . . . . . . . . . . . . . . 18 Viewing movies and pictures on a computer . . . . . . . . . . . . . . . . . . . . 19 Installing software . . . . . . . . .
Contents iv www.insigniaproducts.
720p HD Digital Camcorder Important safety instructions 1 2 3 4 5 6 7 8 9 10 11 12 13 14 Introduction Read these instructions. Keep these instructions. Heed all warnings. Follow all instructions. Do not use your camcorder near water. Clean only with a dry cloth. Do not block any ventilation openings. Install in accordance with the manufacturer's instructions.
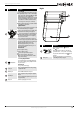
NS-DV720PBL2 720p HD Digital Camcorder Front Back 1 2 3 4 1 2 5 6 7 8 9 10 3 4 11 # Item Description 1 Lens Focuses the image when taking pictures or movies. Lets you view pictures and movies while you are capturing them. Lets you view stored pictures and movies. Displays camcorder status information. 2 LCD panel # Item 3 LED light Turns on when you press 4 Press down for one second to turn your camcorder on or off.
20p HD Digital Camcorder # Item Right Description In record mode Press to turn the light on and off. One press turns on the digital light, two presses tuns on the LED light, and three presses turns off the light. Note: The digital light function increases the sensitivity of the camcorder's imaging sensor, which increases the grain of the image. The LED light is the light on the front of the camcorder. It is excellent for dark environments and has a range of 2 to 4 feet (0.6 to 1.2 meters).
NS-DV720PBL2 720p HD Digital Camcorder Left LCD recording mode icons 7 1 8 1 2 3 10 9 11 4 2 12 5 13 6 14 # Item Picture resolution 1 2 # Item Description 1 Speaker In playback mode, plays the audio recorded with movies. 2 Microphone In record mode, records sound. Bottom 2592 x 1944 (5 megapixels) 71 If a memory card is inserted, indicates the number of pictures that can be taken at the current resolution with the card’s unused memory.
720p HD Digital Camcorder # Item # Item Movie resolution (Simple Mode on) Zoom meter: 4x digital zoom 11 HD SD 12 2009/05/19 1 : 00 PM Date and time Movie resolution (Simple Mode off) 4 HD 720p Battery power full SD wide Battery power medium 13 SD standard Battery power low QVGA Battery power depleted Color balance (Simple Mode off) AUTO 14 Indicates your camcorder is in movie playback mode. The icon on the right toggles between and each time you press .
NS-DV720PBL2 720p HD Digital Camcorder Setting up your camcorder Installing the battery Before using your camcorder, you need to install the battery. Inserting or removing an SD/SDHC memory card To insert or remove an SD/SDHC memory card: 1 Insert the card into the memory card slot with the arrow on the card pointing toward the slot and the label facing up. To install the battery: 1 Slide the battery cover off your camcorder. 2 Insert the battery.
720p HD Digital Camcorder Getting started Turning on your camcorder for the first time When you turn on your camcorder for the first time, you need to choose a menu language and set the date and time. Turning your camcorder on or off To turn your camcorder on or off: 1 Press down and hold (power) for one second. Or Open the LCD panel 90°. To choose a menu language and set the date and time: 1 Turn on your camcorder. The language screen opens.
NS-DV720PBL2 720p HD Digital Camcorder Initial settings Viewing movies When you turn on your camcorder for the first time, your camcorder will be in Simple Mode. Simple Mode hides advanced settings and makes your camcorder easier to operate. Your camcorder's default settings are: • Video Format: HD (1280 x 720p, 30 fps). This is the highest quality video resolution that your camcorder offers. You can switch it to SD (640 x 480p, 30 fps) mode.
720p HD Digital Camcorder 4 Press to highlight Delete. A message appears asking you to confirm the deletion. Viewing pictures You can view pictures stored on your camcorder or memory card. If a memory card is inserted, you can only view pictures stored on the memory card. To view pictures: 1 Press to switch to playback mode. The playback mode main menu opens. 5 Press or to highlight Yes, then press SET to delete the movie. Or, Press or to highlight No, then press SET to cancel the deletion.
NS-DV720PBL2 720p HD Digital Camcorder Deleting pictures To delete pictures: 1 Press to switch to playback mode. The playback mode main menu opens. Using camcorder features Using the light Your camcorder has a built-in light to provide lighting in low-light environments. To use the light: 1 Press on the five-way switch. The light turns on and (digital light) appears on the LCD. Digital light extends the dynamic range for backlight and provides high contrast so objects will be brighter and clearer.
720p HD Digital Camcorder Using zoom Turning operation sounds on or off Zoom magnifies images when recording movies or taking pictures. To use zoom: 1 Press T on the Tele/Wide button to zoom in. The maximum digital zoom is 4x. 2 Press W on the Tele/Wide button to zoom out. Adjusting camcorder settings By default, your camcorder makes sounds when you access key functions. You can turn the sounds off. To turn operation sounds on or off: 1 Press to enter Record mode.
NS-DV720PBL2 720p HD Digital Camcorder Setting the video format To set the video format: 1 Press to enter Record mode. The record/power indicator on the back of your camcorder lights blue. 2 Press SET. The Menu opens. 3 Press or to highlight the (movie) tab, then press to highlight Video Format. 4 Press SET or . The Video Format screen opens. Simple Mode Off • SD Std.—(Only accessible when Simple Mode is off ) SD Std. mode resolution is 640 x 480p, 4:3 format.
720p HD Digital Camcorder 3 Make sure that Simple Mode is off. See “Turning Simple Mode off” on page 11. 4 Press or to highlight the (movie) tab, press to highlight Motion Detection, then press SET or . The Motion Detection screen opens. • Backlight—Select this option when there is bright light behind the subject. • Night—Select this option for night scenes or low-light conditions. • Face—Select this option to make skin tones more natural. 6 Press to close the menu.
NS-DV720PBL2 720p HD Digital Camcorder Imprinting the date and time on pictures You can imprint the date or the date and time on pictures. Note Date and time cannot be imprinted on movies. To imprint the date and time on pictures: 1 Press to enter Record mode. The record/power indicator on the back of your camcorder lights blue. 2 Press SET. The menu opens. 3 Make sure that Simple Mode is off. See “Turning Simple Mode off” on page 11. 4 Press or to highlight the (settings) tab. The Settings menu opens.
720p HD Digital Camcorder Erasing an SD/SDHC memory card or the internal memory Card inserted If the files on an SD/SDHC memory card do not display smoothly and the LCD displays the “!” symbol, the card is formatted for low speed or has the wrong type of content on it. To correct this problem, format the card in your camcorder instead of in a computer. Caution When you use the Erase feature, all files stored on the card or in internal memory are deleted.
NS-DV720PBL2 720p HD Digital Camcorder 4 Press or to highlight the The Settings menu opens. (settings) tab. 5 Press to highlight Language, then press SET or . The Language screen opens. 5 Press to highlight Help Text, then press SET or . The Help Text screen opens. 6 Press SET. 7 Press or to highlight On or Off, then press to close the menu. Selecting the TV format If you connect your camcorder to a TV, you need to make sure that your camcorder is set to the correct TV standard.
720p HD Digital Camcorder 5 Press to highlight TV Format, then press SET or . The TV Format screen opens. Selecting the file format for movies To select the file format for movies: 1 Press to enter Record mode. The record/power indicator on the back of your camcorder lights blue. 2 Press SET. The menu opens. 3 Make sure that Simple Mode is off. See “Turning Simple Mode off” on page 11. 4 Press or to highlight the (settings) tab. The Settings menu opens.
NS-DV720PBL2 720p HD Digital Camcorder Resetting to factory defaults Note If you reset your camcorder to the default settings, you will have to select the menu language and set the date and time again. For more information, see “Turning on your camcorder for the first time” on page 7. To reset your camcorder to its original factory default settings: 1 Press to enter Record mode. The record/power indicator on the back of your camcorder lights blue. 2 Press SET. The menu opens.
720p HD Digital Camcorder 2 Set the TV's video input to the correct source. This may be called "AV,” "Composite,” or something else. Note When using the TV out jack on your camcorder, all movies will be output in an interlaced format. Viewing movies and pictures on a computer Installing software Mac OS 10.x and higher: Two new drive icons will appear on the desktop or in the sidebar if a card is inserted. Otherwise, one new drive icon appears. The internal memory drive will show up as DV.
NS-DV720PBL2 720p HD Digital Camcorder 3 In Windows, click Start, All Programs, click ArcSoft MediaImpression, then clickMediaImpression. The Welcome to ArcSoft MediaImpression screen opens. Troubleshooting Problem Image on the LCD is blurry 4 Click Make Movie. The Make Movie screen opens. Try switching between Macro and Normal mode. Use Macro mode for objects between 6 in. ~ 10 in. (15 cm ~ 25 cm) away. Use Normal mode for objects over 5 ft. (150 cm) away.
720p HD Digital Camcorder Specifications and default settings Specifications Specifications are subject to change without notice. Note The LCD screen is manufactured using extremely high-precision technology so over 99.99% of the pixels are operational for effective use. However, some tiny black or bright dots (white, red, blue, or green) may appear on the LCD screen. These dots are a normal result of the manufacturing process, and do not affect the recording.
NS-DV720PBL2 720p HD Digital Camcorder Legal notices FCC warning Changes or modifications not expressly approved by the party responsible for compliance with the FCC Rules could void the user’s authority to operate this equipment. FCC Part 15 This device complies with Part 15 of the FCC Rules.
720p HD Digital Camcorder One-year limited warranty Insignia Products (“Insignia”) warrants to you, the original purchaser of this new product (“Product”), that the Product shall be free of defects in the original manufacture of the material or workmanship for a period of one (1) year from the date of your purchase of the Product (“Warranty Period”). This Product must be purchased from an authorized dealer of Insignia brand products and packaged with this warranty statement.
TM www.insigniaproducts.com (877) 467-4289 Distributed by Best Buy Purchasing, LLC 7601 Penn Avenue South, Richfield, MN USA 55423-3645 © 2010 BBY Solutions, Inc. All rights reserved. INSIGNIA is a trademark of BBY Solutions, Inc. Registered in some countries. All other products and brand names are trademarks of their respective owners.