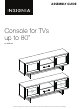
ASSEMBLY GUIDE Console for TVs up to 80” NS-HFMS80 Before using your new product, please read these instructions to prevent any damage.
Contents IMPORTANT SAFEGUARDS . . . . . . . . . . . . . . . . . . . . . . . . . . . . . . . . . . . . . . . . . . . . . . . . . . . . . . . . . . . . . . . . . . . . . . . . . . . . 3 Features . . . . . . . . . . . . . . . . . . . . . . . . . . . . . . . . . . . . . . . . . . . . . . . . . . . . . . . . . . . . . . . . . . . . . . . . . . . . . . . . . . . . . . . . . . . . . . 4 Dimensions. . . . . . . . . . . . . . . . . . . . . . . . . . . . . . . . . . . . . . . . . . . . . . . . . . . . . . . . . . . .
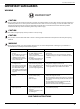
Console for TVs up to 80” IMPORTANT SAFEGUARDS WARNING Some steps are more easily handled with two adults. CAUTION The top surface of this stand is designed for use with a product weighing no more than 135 lbs. (61.2 kg) and having a width that permits it to sit evenly on the stand with no more than a one-inch overhang on each side of the shelf.
Features • • • • • • Interchangeable door fronts customize your stand’s look with either glass or wood insert panels Sturdy frame supports most flat screen TVs up to 80 in. (203.2 cm) and 135 lbs (61.
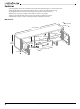
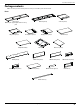
Console for TVs up to 80” Package contents Make sure that you have all the parts necessary to assemble your new TV stand.
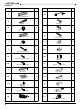
Hardware LABEL STAND PART U QTY. LABEL 20 HH 26 20 JJ 8 KK 6 LL MM 4 NN Washer head screw M3.5 x 15 mm 4 PP 2 QQ 16 RR 8 Zinc hinge screw M4 x 14 mm GG SS 1 Glue 8 TT 1 Touch-up pen 4 UU 2 Tipping restraint hardware kit Hinge 6 1 4 mm hex wrench Shelf support FF 2 Acrylic stopper PVC cover EE 8 Flat head screw M3 x 17 mm Door stopper DD 8 Plastic holder Flat head screw M3.
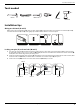
Console for TVs up to 80” Tools needed Phillips screwdriver Rubber mallet Hammer Pliers 1/8” drill bit Power drill Installation tips Gluing wood dowels (U and X) When using a wood dowel (U and X), put one drop of glue (SS) in the hole before you insert the wood dowel (U and X). Insert the wood dowel (U and X), then gently tap it with a rubber mallet to secure it in place.
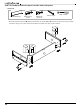
Assembling your stand Tip: Assemble your stand on a carpeted floor or the empty TV stand box to avoid scratching it. Note: Do not fully tighten all bolts until you finish assembling all of the parts. After assembly, go back and fully tighten all bolts. This will make the assembly easier.
Console for TVs up to 80” STEP 2: Install the small wood dowls You need: M Drawer back panel (1) N Drawer left side panel (1) P Drawer right side panel (1) X Wood dowel (8) SS Glue (1) • Glue eight small wood dowels (X) into the drilled holes on the ends of the drawer back panel (M) and drawer side panels (N and P). www.insigniaproducts.
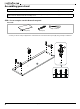
STEP 3: Assembly the drawer back panel and the drawer side panels You need: M Drawer back panel (1) N Drawer left side panel (1) P Drawer right side panel (1) Z 38 mm screws (4) Phillips screwdriver • Attach the drawer back panel (M) between the drawer side panels (N and P) with four 38 mm screws, using a Phillips screwdriver. The grooves in the drawer panels must line up with each other and face inward. Metal frame 10 www.insigniaproducts.
Console for TVs up to 80” STEP 4: Install the drawer bottom panel You need: Q Drawer bottom panel (1) • Slide the drawer bottom panel (Q) into the drawer assembly (N, P, and M) until fully inserted. www.insigniaproducts.
STEP 5: Install the drawer bottom support You need: Phillips screwdriver R Drawer bottom support (1) Z 38 mm screw (2) • Fasten the drawer bottom support (R) to the drawer back panel (M) with two 38 mm screws (Z). The cam screw holes should face upward. Cam screw holes 12 www.insigniaproducts.
Console for TVs up to 80” STEP 6: Install the drawer front You need: Y Small cam locks (6) Phillips screwdriver L Drawer front panel (1) • Stand the drawer assembly on its back and position the drawer front panel (L) onto the installed wood dowels. Fasten the drawer front panel in place with the small cam locks (Y). www.insigniaproducts.
STEP 7: Install the drawer handle You need: HH Drawer handle (1) II Handle bolts (2) Phillips screwdriver • Turn the drawer assembly upright and attach the drawer handle (HH) to the front of the drawer assembly with two handle bolts (II). 14 www.insigniaproducts.
Console for TVs up to 80” STEP 8: Assembling the metal base You need: S Metal base (2) T Metal stretcher (1) JJ 5/8” bolt (4) LL Lock washer (4) MM Flat washer (4) RR Hex wrench 4 mm (1) • Insert four 5/8” bolts (JJ) with four lock washers (LL) and flat washers (MM) through the holes in the metal stretcher (T), into the metal bases (S), then tighten the bolts with the 4 mm hex wrench (RR). www.insigniaproducts.
STEP 9: Attach the metal base to the bottom panel You need: KK 1-1/4” bolt (4) LL Lock washer (4) MM Flat washer (4) RR Hex key 4 mm (1) B Bottom panel (1) • Insert four 1/1/4” bolts (KK) with lock washers (LL) and flat washers (MM) through the holes on both bases (S), then tighten them into the threaded holes in the bottom panel (B) with the 4 mm hex wrench. RR RR 16 www.insigniaproducts.
Console for TVs up to 80” STEP 10: Prepare the bottom panel assembly You need: Phillips screwdriver V Cam pin (8) • Securely screw eight cam pins (V) into the indicated small holes in the bottom panel assembly, using a Phillips screwdriver. www.insigniaproducts.
STEP 11: Prepare the top panel and partition panels You need: V Cam pin (12) A Top panel (1) E Left partition panel (1) F Right partition panel (1) Phillips screwdriver • Securely screw twelve cam pins (V) into the indicated small holes in the top panel (A) and the partition panels (E and F) with a Phillips screwdriver. 18 www.insigniaproducts.
Console for TVs up to 80” STEP 12: Prepare the side panels, partition panels, and media shelf You need: C Left side panel (1) D Right side panel (1) E Left partition panel (1) U Wood dowel (20) SS Glue (1) F Right partition panel (1) G Media shelf (1) • Glue the large wood dowels (U) into the drilled holes on both ends of the side panels (C and D), partition panels (E and F), and media shelf (G). www.insigniaproducts.
STEP 13: Attach the partition panels to the media shelf You need: W Large cam lock (4) G Media shelf (1) E Left partition panel (1) F Right partition panel (1) Phillips screwdriver • Attach the media shelf (G) between the partition panels (E and F) by engaging four large cam locks (W). The cam screw holes must face inward Cam screw holes 20 www.insigniaproducts.
Console for TVs up to 80” STEP 14: Install the media shelf You need: Phillips screwdriver W Large cam lock (4) • Install the media shelf assembly to the bottom assembly by engaging four large cam locks (W), using a Phillips screwdriver. The drawer slide opening should face the front edge (without groove) of the bottom panel. The drawer slide opening www.insigniaproducts.
STEP 15: Attach the side panels You need: Phillips screwdriver W Large cam lock (4) C Left side panel (1) D Right side panel (1) • Attach the side panels (C and D) to the bottom assembly by engaging four large cam locks (W), using a Phillips screwdriver. The grooves in the side panels should line up with the groove in the bottom panel. Groove Groove 22 www.insigniaproducts.
Console for TVs up to 80” STEP 16: Install the back panel You need: K Back panel (1) • Unfold the back panel (K), then slide it into the grooves on both side panels (C and D) until fully inserted into the bottom panel assembly. Make sure that the adhesive tape faces backward. Adhesive tape Groove Groove www.insigniaproducts.
STEP 17: Install the door stoppers You need: CC Door stoppers (2) BB 15 mm screws (4) Phillips screwdriver • Using the pilot holes as a guide, fasten two door stoppers (CC) to the top panel (A) with two 15 mm screws (BB) in each, using a Phillips screwdriver. 24 www.insigniaproducts.
Console for TVs up to 80” STEP 18: Install the top panel You need: W Large cam lock (8) Phillips screwdriver A Top panel (1) 1 Using assistance, place the top panel (A) onto the wood dowels (U) on the vertical panels. Make sure that the back panel (K) fits securely into the groove of the top panel (A). 2 Secure the top panel (A) into place by inserting eight large cam locks (W) and tightening them with a Phillips screwdriver. www.insigniaproducts.
STEP 19: Secure the back panel to the partition panels You need: Phillips screwdriver AA Washer head screws (4) • Insert four washer head screws (AA) through the holes in the back panel (K) and screw them into the partition panels using a Phillips screwdriver. 26 www.insigniaproducts.
Console for TVs up to 80” STEP 20: Fasten the back panel You need: NN Plastic holders (8) PP 17 mm screws (8) Phillips screwdriver 1 Insert eight plastic holders (NN) evenly into the gaps between the back panel (K) and frame panels (A, B, C and D) as shown. 2 Secure the plastic holders into place with 17 mm screws (PP), using a Phillips screwdriver. Do not damage the edges. www.insigniaproducts.
STEP 21: Install the door hinges and handles You need: FF Zinc screws (8) GG Hinges (4) HH Handles (2) I Door (2) II Handle bolts (4) Phillips screwdriver 1 Extend two door hinges (GG) and rest the hinge cups onto the cutouts of each door (I). Secure the door hinges (GG) in place by using two zinc screws (FF) for each. 2 Attach one handle (HH) to the front side of the door (I) with two handle bolts (II). 3 Complete this step once again to assemble the other door (I). x2 28 www.insigniaproducts.
Console for TVs up to 80” STEP 22: Install the doors You need: Phillips screwdriver 1 Align one door (I) to the pre-attached bolts on the two hinges (GG) with the threaded holes on the hinge supports on the left side panel (C), then secure with a Phillips screwdriver. 2 Repeat the same process to attach the other door (I) to the right side panel (D). 3 Open and close the doors to make sure they are aligned and shut correctly. If necessary, adjust the screws on the hinge arm for a better fit. www.
STEP 23: Install the adjustable shelves You need: EE Shelf supports (8) H Adjustable shelves (2) DD PVC covers (16) 1 Place the PVC covers (DD) onto the visible cam locks to conceal them. 2 Open the doors (I) and insert four shelf supports (EE) into the holes at the desired height inside each side compartment. Make sure that you place the four shelf supports at the same level so the shelves are not tilted. Tilt and rest the adjustable shelves (H) onto the shelf supports. 30 www.insigniaproducts.
Console for TVs up to 80” STEP 24: Insert the drawer • Extend the ball bearing slide tracks on the partition panels (E and F) all the way forward (including ball bearing cart), then align the slide runners on the assembled drawer with the slide tracks and push the drawer carefully inside until it stops. Tip: If the drawer does not go in smoothly, take it out and repeat the step.
STEP 25: Attach the stopper to the top panel You need: QQ Acrylic stopper (2) Pliers If you place your TV on top of your console, you must follow these instructions to prevent your TV from tipping. Otherwise, skip to STEP 27: Position the TV console and install the tipping restraint on page 34. If your TV has one stand: 1 Remove the paper backing from the stopper (QQ), then place it in the stopper cut-out template on the top panel (A). Press down on the stopper (QQ) to help it stick.
Console for TVs up to 80” STEP 26: Change the door panel You need: Phillips screwdriver J Wood panels (2) Follow these steps if you want to change your console’s door panels from glass to wood. Otherwise, skip this step. 1 Rotate the clips to remove the old panel. Loosen the screw on each of the clips if necessary 2 Insert the new panel, then rotate the clips and tighten the screws to secure the panel in the door frame. 3 Repeat this process to replace the other door panel.
STEP 27: Position the TV console and install the tipping restraint You need: Drill UU Tipping restraint (2) Rubber mallet Drill bit Drill 1 Position the assembled console against the wall where you plan to use it. 2 Adjust the leveling feet to level the TV console. 3 Follow the instructions printed on the bag containing the tipping restraint hardware kit (UU) to attach the restraint hardware to the wall and the console. WARNING: It is very important that the tipping restraint be installed correctly.
Console for TVs up to 80” Maintaining your TV console Wood/Laminate • Use your favorite type of furniture polish. • Do not spray polish directly onto the stand. Spray onto a soft cloth, then wipe the stand. • Always test any polish in a discrete location first, such as the back of the stand, to make sure that there is no adverse reaction. • Dust frequently with a soft cloth. • Never slide objects across surfaces.
ONE-YEAR LIMITED WARRANTY Definitions: The Distributor* of Insignia branded products warrants to you, the original purchaser of this new Insignia-branded product (“Product”), that the Product shall be free of defects in the original manufacturer of the material or workmanship for a period of one (1) year from the date of your purchase of the Product (“Warranty Period”).
www.insigniaproducts.com 1-877-467-4289 (U.S. and Canada) or 01-800-926-3000 (Mexico) INSIGNIA is a trademark of Best Buy and its affiliated companies. Distributed by Best Buy Purchasing, LLC 7601 Penn Ave South, Richfield, MN 55423 U.S.A. ©2021 Best Buy. All rights reserved.