USER GUIDE 1.6 Cu. Ft. Portable Top-Load Washer NS-TWM16WH9 Before using your new product, please read these instructions to prevent any damage.
Contents Introduction . . . . . . . . . . . . . . . . . . . . . . . . . . . . . . . . . . . . . . . . . . . . . . . . . . . . . . . . . . . . 3 IMPORTANT SAFETY INSTRUCTIONS . . . . . . . . . . . . . . . . . . . . . . . . . . . . . . . . . . . . . 3 Features . . . . . . . . . . . . . . . . . . . . . . . . . . . . . . . . . . . . . . . . . . . . . . . . . . . . . . . . . . . . . . .10 Package contents . . . . . . . . . . . . . . . . . . . . . . . . . . . . . . . . . . . . . . . . . . . . . . . . . .
SAFETY and PRECAUTIONS 1.6 Cu. Ft. Portable Top-Load Washer 1.6 Cu. Ft. Portable Top-Load Washer Introduction Congratulations on your purchase of a high-quality Insignia product. Your NS-TWM16WH9 represents the state of the art in top-load washing machine technology and is designed for reliable and trouble-free performance. IMPORTANT SAFETY INSTRUCTIONS SAVE THESE INSTRUCTIONS This User Guide contains important information on the installation, use, and care of your appliance.
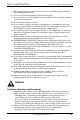
SAFETY and PRECAUTIONS This symbol indicates that there are important operating and maintenance instructions in the literature accompanying your washing machine. State of California Proposition 65 Warnings The California Safe Drinking Water and Toxic Enforcement Act requires the Governor of California to publish a list of substances known to the State of California to cause cancer, birth defects, or other reproductive harm, and requires businesses to warn of potential exposure to such substances.
SAFETY and PRECAUTIONS 7 8 9 10 11 12 13 14 15 16 17 18 19 20 1.6 Cu. Ft. Portable Top-Load Washer Before the appliance is removed from service or discarded, remove the lid of the washing compartment. Do not reach into the appliance if the tub is moving. Do not install or store this appliance where it will be exposed to the weather or freezing temperatures. Do not tamper with the controls.
SAFETY and PRECAUTIONS 3 4 5 6 7 8 9 10 11 12 13 14 • Failing to do so may result in electric shock or fire. Plug the power plug into the wall socket in the right direction so that the cord runs towards the floor. • If you plug the power plug into the socket in the opposite direction, the electric wires within the cable may be damaged and this may result in electric shock or fire. Plug the power plug into the wall socket firmly.
SAFETY and PRECAUTIONS 4 5 6 7 8 9 10 11 12 13 14 15 16 17 18 19 1.6 Cu. Ft. Portable Top-Load Washer Do not force the washer lid open while the washer is operating (high-temperature washing, drying, or spinning). • Water flowing out of the washer may cause burns or cause the floor to be slippery. This may result in injury. • Forcing the lid open can damage the product or cause injury. Make sure to remove the packaging (sponge, styrofoam) attached to the bottom of the washer before using it.
SAFETY and PRECAUTIONS 20 Do not clean the appliance by spraying water directly onto it. 21 Do not use benzene, thinner, or alcohol to clean the appliance. This may result in discoloration, deformation, damage, electric shock, or fire. 22 Unplug the power plug when the appliance is not being used for long periods 23 24 25 26 27 28 29 30 31 32 33 34 35 36 37 38 39 8 of time or during a thunder/lightning storm. Failure to do so may result in electric shock or fire.
SAFETY and PRECAUTIONS 1.6 Cu. Ft. Portable Top-Load Washer 40 Do not operate the washer when the detergent dispenser is removed. This may result in electric shock or injury due to water leakage. 41 Do not insert your hand into the detergent dispenser after opening it. This may result in injury because your hand may be caught. 42 Do not place any non-laundry objects, such as shoes, food waste, or animals into 43 44 45 46 47 48 49 50 51 52 the washer.
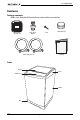
NS-TWM16WH9 Features Package contents Make sure that the following items came with your washer: Bottom cover Single faucet adapter Screw Water supply hoses (2) Water intake cap User Guide Front Top lid Frame Control panel Cabinet Base 10 www.insigniaproducts.
1.6 Cu. Ft. Portable Top-Load Washer Back Top lid Water inlet Drain hose Power cord Pump filter Rollers www.insigniaproducts.
NS-TWM16WH9 Control panel # ITEM 1 Procedure button 2 Digital display 3 Delay button 4 Load Size button 5 Temp button 12 DESCRIPTION Press to select the steps included in the washing cycle. If the LED next to the step is lit, the step will be included in the washing cycle. The step will not be included if the LED is not lit. The initial display is the total time for the cycle you select. While your washer is running, the display shows the cycle process and time remaining in the cycle.
1.6 Cu. Ft. Portable Top-Load Washer # ITEM 6 Child lock 7 Program button 8 Extra Rinse button /Start Pause 9 button 10 |On/Off button DESCRIPTION After starting your washer, press and hold the Temp. and Program buttons at the same time for three seconds to turn on the child lock function. Press and hold these buttons again for three seconds to turn off the function. When the child lock function is turned on, the only button that works is the |On/Off button and the Temp. and Program buttons.
NS-TWM16WH9 • Remove the packing box and lift the washer up and away from the foam base cushion. Open the lid of the washer to take out all accessories including the protective foam. Protective foam Foam base cushion Choosing a location Warning: • Do not install your washer in areas where water may freeze, because your washer always retains some water in its water valve, pump, and hose areas. Frozen water can damage the belts, pump, hoses, and other components.
1.6 Cu. Ft. Portable Top-Load Washer Washer dimensions and installation measurements 20.7 in. (52.5 cm) 36.6 in. (93 cm) 47.9 in. (121.5 cm) 20.3 in. (51.5 cm) www.insigniaproducts.
NS-TWM16WH9 If you install your washer in an alcove or closet, the front of the closet must have two unobstructed air openings for a combined minimum total area of 72 sq.in. (465 sq.cm) with a minimum clearance of 3 in. (7.6 mm) at the top and bottom. A slatted door with equivalent space clearance is acceptable. 3 in. (7.6 cm) 48 square inches (310 cm²) 24 square inches (155 cm²) 3 in. (7.6 cm) 16 www.insigniaproducts.
1.6 Cu. Ft. Portable Top-Load Washer Installing in an alcove or closet Minimum clearances between your washer and adjacent walls or other surfaces are: • • • • Either side: 1 in. (2.5 cm) Rear: 6 in. (15.2 cm) Closet Front: 2 in. (5.1 cm) Top: 24 in. (61 cm) 24 in. (61 cm) If you install your washer and dryer side-by-side in a closet, the closet front must have an unobstructed air opening of at least 72 square inches (465 square cm). 1 in. 2.5 cm 20.3 in. (51.5 cm) 1 in. 2.5 cm 2 in. 5.1 cm 20.
NS-TWM16WH9 You must ground your washer. In the event of a malfunction or breakdown, grounding reduces the risk of electric shock by providing a path of least resistance for the electric current. Your washer is equipped with a power cord with a three-pronged grounding plug for use in a correctly installed and grounded outlet. The outlet must be correctly installed and grounded in accordance with all local codes and ordinances.
1.6 Cu. Ft. Portable Top-Load Washer Installing your washer Tools you will need Pliers Phillips screwdriver Level Step-by-Step instructions Step 1: Select a location Before you install your washer, make sure that the location: • Is a hard, level surface without carpeting or soft flooring that can obstruct ventilation. • Is away from direct sunlight. • Has adequate ventilation. • Is not exposed to freezing temperatures (32° F or 0° C). • Is away from heat sources such as oil or gas.
NS-TWM16WH9 Step 4a: Connect to water with a single faucet Caution: Do not connect multiple water supply hoses together to increase the length of the hose. Hoses connected this way can leak and cause electrical shock. If a hose is too short, replace the hose with a longer, high-pressure hose. The single faucet adapter allows you to connect your washer to a single faucet.
1.6 Cu. Ft. Portable Top-Load Washer Step 4b: Connect to water with separate faucets Caution: Do not connect multiple water supply hoses together to increase the length of the hose. Hoses connected this way can leak and cause electrical shock. If a hose is too short, replace the hose with a longer, high-pressure hose. 1 Make sure that there are rubber washers inside the fittings at both ends of each water hose. Installing the water supply hoses without rubber washers can cause water leakage.
NS-TWM16WH9 3 Place the unconnected ends of the hoses into a bucket and turn on the faucets connected to the water supply hoses for 10 or 15 seconds to remove any foreign substances. Turn off the faucets. 4 Connect the ends of the water supply hoses to the water supply intake connections at the top of the washer. Make sure that the rubber washers are in place.
1.6 Cu. Ft. Portable Top-Load Washer 5 Tighten the fittings by hand until they are snug, then tighten them an additional two-thirds of a turn with a wrench. Caution: • Do not overtighten the fittings or apply tape or sealant to the faucets or water supply intakes. This can damage the fittings. • Make sure that the water supply hoses are not twisted or bent. A bent or twisted hose can leak and cause an electric shock due to the water leakage.
NS-TWM16WH9 Step 5: Connect the drain hose • Position the loose end of the drain hose in one of the following ways: Caution: Make sure that the connection between the drain hose and the wash basin, standpipe, or laundry tub is not airtight. • Over the edge of a wash basin - Secure the guide to the side of the basin wall with a hook, tape it, or tie it with a piece of cord to prevent the drain hose from moving. • In a standpipe - The standpipe must be no shorter than 32 in.
1.6 Cu. Ft. Portable Top-Load Washer • In a laundry tub - The laundry tub must be no shorter than 32 in. (81 cm) and no higher than 39 in. (100 cm). 39 in. (100 cm) max. 32 in. (81 cm) min. Hose retainer Tie strap Step 6: Level your washer Caution: Do not use your washing machine without leveling. If your washer is not level, it may: • Vibrate excessively which can cause your washer to malfunction • Make excessive noise. • Indicate error codes E3 or E4 when the washer is running.
NS-TWM16WH9 2 Open the lid of the washer, then pour water into the tub to the leveling circle. If the washer is level the water will touch the leveling circle all the way around. If the washer is not level, the water will only touch part of the leveling circle. Leveling circle Washer is level - the water Washer not level - the water touches the leveling circle does not touch the leveling all the way around. circle all the way around. Add water to the washer until it reaches the leveling circle.
1.6 Cu. Ft. Portable Top-Load Washer Step 8: Run a test cycle Run a test cycle to make sure that your washer is properly installed. 1 2 3 Press the |On/Off button to turn on your washer. Use the Procedure and Program buttons on the control panel to select Rinse & Spin. Press the /Start Pause button to start the test cycle. Your washer should not rock or vibrate excessively when water fills the tub, or when washing or spinning. The washer should drain well during the spin cycle.
NS-TWM16WH9 2 Fill the tub with dry, unfolded clothes. Notes: • Overloading may reduce washing efficiency, cause excess wear, and possibly cause creasing or wrinkling of the load. • Wash delicate items such as bras, hosiery, and other lingerie on the Delicate cycle with similar lightweight items. • When washing big, bulky items (such as rugs or pillows) or a few smaller items (such as stuffed toys or one or two sweaters) that do not fill the tub completely, add a few towels to improve spin performance.
1.6 Cu. Ft. Portable Top-Load Washer Step 5: (Optional) Set a delayed start time You can program a wash cycle, then set a time when you want a wash cycle to begin. 1 Press the Delay button to turn on the delay start time function. 2 Press the Delay button repeatedly to select the delay time you want. The delay start time, in hours, will be shown on the display, in sequence, from 0 to 24, then the washing cycle display time and back to 0.
NS-TWM16WH9 Step 7: Unload your laundry When the wash cycle is complete, your washer buzzes six times. • Open the lid and remove your laundry. Setting the child lock Your washer has a child lock function to prevent children from playing with your washer. When you turn on the child lock, the only buttons that work are the |On/Off button and the Temp. and Program buttons you use to turn off the child lock. 1 Press and hold both the Temp. and Program buttons for three seconds.
1.6 Cu. Ft. Portable Top-Load Washer Notes: • Normal/Eco is the recommended wash cycle to wash up to a full load of normally soiled cotton or linen clothing. • The cycle (Normal/Eco on large load size and cold water temperature) has a much longer spin time (44 minutes) than other cycles, which removes more water from your clothes than other cycles, providing you with energy savings when drying your clothes in your dryer. • Hot and warm water temperatures are the same when using Normal/Eco.
NS-TWM16WH9 Cleaning the pump filter Your washer has a built-in pump filter that helps protect the pump during the washing cycle. It is recommended to clean the pump filter once every month. 1 Remove the pump filter from your washer, the clean it with water. 2 Reinsert the pump filter into your washer. Storing your washer You can damage your washer if you do not remove water from hoses and internal components before storage.
1.6 Cu. Ft. Portable Top-Load Washer Troubleshooting Caution: Do not try to repair your washer yourself. Doing so invalidates the warranty. PROBLEM Washer does not start SOLUTION • • • • • • • • Make sure that your washer is plugged in. Make sure that the lid is closed. Make sure that the water source faucets are open. Make sure that you press the /Start Pause button to start your washer.
NS-TWM16WH9 PROBLEM SOLUTION Washer does not drain or spin • Check the fuse or reset the circuit breaker. • Close the lid, then press the /Start Pause button to start your washer. For your safety, your washer does not spin unless the lid is closed. • Make sure that the drain hose is not kinked. Straighten as necessary. • Make sure that the height of the drain hose is within specified limits. See Drainage requirements on page 18. • The pipes to your sewer system may be clogged.
1.6 Cu. Ft. Portable Top-Load Washer PROBLEM SOLUTION Clothes are staining • Remove your clothes from the washer as soon as the cycle is complete. • Always wash dark colors separately from light colors and whites. • Never wash heavily-soiled clothes with lightly-soiled clothes. Clothes are wrinkling • Remove your clothes from the washer as soon as the cycle is complete. • Do not pack your clothes tightly into the washer. The lid should close easily.
NS-TWM16WH9 ONE-YEAR LIMITED WARRANTY Definitions: The Distributor* of Insignia branded products warrants to you, the original purchaser of this new Insignia-branded product (“Product”), that the Product shall be free of defects in the original manufacturer of the material or workmanship for a period of one (1) year from the date of your purchase of the Product (“Warranty Period”).
1.6 Cu. Ft. Portable Top-Load Washer • • • • • • • Connection to an incorrect voltage or power supply Attempted repair by any person not authorized by Insignia to service the Product Products sold “as is” or “with all faults” Consumables, including but not limited to batteries (i.e. AA, AAA, C etc.
www.insigniaproducts.com 1-877-467-4289 (U.S. and Canada) or 01-800-926-3000 (Mexico) INSIGNIA is a trademark of Best Buy and its affiliated companies. Distributed by Best Buy Purchasing, LLC 7601 Penn Ave South, Richfield, MN 55423 U.S.A. ©2019 Best Buy. All rights reserved.