
Installation Guide

Mounting Adaptor (#11599)
Installation Instructions
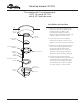
1. Insert six screws (1) through the sink
bowl connection lip, flat gasket (2) and
mounting flange (3). With screws
protruding through the mounting
flange (3), attach six washers (4) and six
nuts (5). Tighten all screws evenly.
2. Position the disposer for plumbing
hookup and check the location of the
keyhole slots in the disposer body flange.
3. Attach two screws (7) through opposite
holes in the mounting gasket (6), and
into the threaded fasteners in the
mounting flange (3). The screws (7)
should be protruding approximately
1/4 inch below the mounting gasket (6).
4. Position the disposer beneath the
mounting gasket (6) and engage the two
protruding screws in the keyhole slots
in the disposer body flange. Assemble
the remaining four screws (7). Tighten
all screws evenly to secure the unit.
Part No. 13966-L October 2007
This adaptor will fit a sink opening of:
4-1/2" I.D. and 6-1/2" O.D.
with 5-1/2" bolt hole circle
(1) Screw
(#1491)
(2) Flat Gasket
(#11292-C)
(3) Mounting Flange
(#11189-A)
(4) Washer
(#11180)
(5) Nut
(#11179)
(6) Mounting Gasket
(#11016)
(7) Screw
(#1491)
Disposer
Body Flange
Threaded Fasteners
Sink Bowl
Connection Lip
Keyholes
Sink