
Use and Care Manual


16
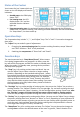
In order to get a feel for your Instant Pot before jumping in with your favorite recipe, it’s a great
idea to take it for a test run. This will help you to become familiar with your Instant Pot, make sure
that your unit is working perfectly and also clean the unit of possible residues in the process. This
test run can be accomplished in about 15 minutes. It’s oponal but recommended.
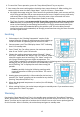
1. Make sure the steam release handle and oat valve are unobstructed and clean and that the
sealing ring is properly seated.
2. Insert the inner pot in the cooker base and add water to the
“3” mark on the inner pot.
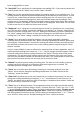
3. Close the lid. Make sure that the steam release handle is
poinng to "Sealing" mark on the lid.
4. Press the "Steam" buon, and press the “-“ buon to change
the me to 2 minutes.
5. In 10 seconds, your Instant Pot will go into the preheang cycle
(display showing “On”). Within a few minutes steam will start
coming out for a minute or two unl the Float Valve pops up
and seals the cooker. Within another minute or two the
working pressure will be reached and the countdown mer will begin. Once the countdown
is nished, your Instant Pot will beep and automacally go into the “Keep Warm” mode.
That’s it. The test is complete. Press the “Keep-Warm/Cancel” buon and/or unplug the unit.
Once the pot cools down, you can open it and are ready to try your favorite recipe.
Regular care or maintenance is essenal in ensuring that this product is safe for use. If any of
the following circumstances take place, please stop using the appliance immediately and contact
Instant Pot support team.
Power cord and plug suer from expansion, deformaon, discoloraon, damages, etc.
A poron of power cord or the plug gets hoer than usual.
Electric pressure cooker heats abnormally, eming a burnt smell.
When powered on, there are unusual sounds or vibraons.
If there is dust or dirt on the plug or socket, please remove dust or dirt with a dry brush.
Cauon: please make sure the appliance has cooled down and is unplugged before cleaning.
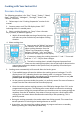
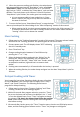
1. Clean the product aer each use. Wipe the black inner housing rim and slot dry with cloth to
prevent rusng on the exterior pot rim.
2. Remove the lid and take out the inner pot, wash them with detergent, rinse with clear water
and then wipe dry with a so cloth. The stainless steel inner pot is also dishwasher safe.
3. Use water to clean the lid, including the sealing ring (which can be removed), exhaust valve,
an-block shield, and wipe them clean with dry so cloth. Do not take apart the steam