Programmable Electric Pressure Cooker User Manual Model: IP-LUX60 V3 October 2016 (Pictures in the manual are for reference only. Please refer to the actual product.) Thank you for purchasing the multi-functional Instant Pot®. Please read the User Manual carefully before use and keep it in a convenient place for future reference.
Table of Contents IMPORTANT SAFEGUARDS .............................................................................................. 3 Special Cord Set Instructions...................................................................................... 4 Product Introduction ....................................................................................................... 4 Product Features ........................................................................................................
IMPORTANT SAFEGUARDS Your Instant Pot® cooks with pressure. When using pressure cookers, basic safety precautions should always be followed. PLEASE READ ALL INSTRUCTIONS. 1. Do not touch hot surfaces of pressure cooker. Use handles only. 2. This appliance should not be used near children or by individuals with disabilities or limited knowledge in using pressure cookers. 3. Do not place the pressure cooker in a heated oven or any hot surfaces. 4.
Special Cord Set Instructions To reduce the risk of electric shock, plug the power cord into a grounded (earthed) electrical outlet that is easily accessible. This plug is intended to fit into a polarized outlet in only one way. If the plug does not fit into the outlet, flip the plug. Do not attempt to modify the plug in any way. For safety reasons, the power supply cord is designed to be short to minimize the possibility of entanglement or tripping. WARNING: Spilled food can cause serious burns.
Product Features • High safety standards: 10 safety mechanisms and UL safety certification. Please visit www.InstantPot.com for detailed information. • Multi-functional: Braising, pressure cooking, stewing, steaming, simmering, slow cooking, sautéing/browning, cake baking, and keeping warm. • 10 built-in, convenient cooking programs: Simply press one of the function keys to start cooking. The microprocessor inside the cooker does your job to control the time, cooking pressure and temperature.
Product Accessories Included Accessories Included Images Descriptions • 3-ply bottom for even heating • Food grade 304 (18/8) stainless steel • Mirror-polished surface for easy cleaning • Dishwasher safe Stainless Steel Inner Pot • Durable food safe silicone passing FDA standards • Dishwasher safe • Replace every 18-24 months or when deformation is noticed Sealing Ring • Stainless steel trivet to elevate food from water for steaming program Stainless Steel Trivet • Rice paddle for scooping out rice
Product Accessories for Purchase Accessories for Purchase Tempered Glass Lid Silicone Mini Mitt Silicone Cover Stainless Steel Steam Rack with Handle Images Descriptions • 9-inch diameter fits most electric pressure cooker inserts • Professional grade tempered glass with steam release vent and stainless steel rim • Colorless glass for clear viewing • Dishwasher safe • • • • Food grade silicone passing FDA standards Dishwasher safe Ridged gripping surface, non-stick Comfortable and easy to put on • Cr
Before the First Use Before the first use, please take out all accessories from the package and read this manual carefully. Please pay particular attention to operational instructions and cautions to avoid any injury or property damage. Please wash the inside of the lid and the inner pot with warm soapy water, rinse, and dry thoroughly. Clean the outside of the cooker base with a clean damp cloth. Never immerse the cooker base in water or any other liquid. Never clean the cooker base in the dishwasher.
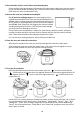
Safe Lid Opening 1. Make sure the pressure cooking program is complete or press“Keep-Warm/Cancel” to terminate the program. 2. Release pressure by one of the following approaches: Quick Release: • Turn the pressure release handle to the "Venting" position to let out steam until the float valve drops down. Caution: • Please keep hands and face away from the opening on the top of the pressure release handle when using Quick Release. The escaping steam is hot and can cause scalding.
2. Check whether all parts on the lid are assembled properly Check the float valve and pressure release valve for obstructions. Make sure that the sealing ring is well seated inside its holding rack. The anti-block shield is installed properly and the float valve can move up and down easily. 3. Remove the inner pot, and add food and liquid For all pressure cooking programs, the total amount of precooked food and liquid in the inner pot should NEVER pass the 2/3 line.
6. Position the pressure release handle properly Please note that it is perfectly normal and necessary for the pressure release handle to be loose. It works by weight and simply rests on top of the pressure release outlet. It can also be removed for washing if necessary by pulling it straight out.
States of the Cooker Your Instant Pot® has 3 states which are shown on the LED display and function indicators. • Standby state: the LED display shows “OFF”. • Pre-heating state: the LED display shows “On” and the activated function indicator lights up. • Program operating state: the activated function indicator lights up and the LED display shows time. For pressure cooking, slow cooking and delay start functions, the time counts down. For “Keep Warm”, the time counts up.
Warning: the stainless steel inner pot is not ideal for baking. For best results, use a ceramic inner pot that is available as an Instant Pot® accessory, or line the interior bottom of the stainless steel inner pot with parchment paper. The “Egg” key is programmed to cook eggs with the results of boiled eggs.
The time you are setting is the delayed time before the program starts. Please allow sufficient cooking time and cooling down time before serving. The time delay can be adjusted with the “+” or “-“ key for up to 24 hours. Please see the “Delayed Cooking with Delay Start” section for details. Cooking with Your Instant Pot® Initial Test Run In order to familiarize yourself with the Instant Pot® and start cooking with your favourite recipe, it is highly recommended for first time users to do a test run.
and “Rice” functions) to adjust cooking time. Press the "Adjust" key repeatedly to change between “Normal”, “More" and “Less" modes which will light up on the display. • Change the cooking time with “+” and “-“. Press and hold the “+” or “-“ key for faster changes. • The built-in cooking time is suitable for most type of food. Please use the cooking time table in the recipe book to determine the appropriate cooking time based on the food type, the quantity of food and your texture preference. 5.
Slow Cooking 1. Follow steps in the "Cooking Preparation" section of this manual. The pressure release handle should be at the "Venting" positions. An optional glass lid can also be used. 2. Connect the cooker to the power outlet. The LED display shows “OFF” indicating that it’s in standby state. 3. Press “Slow Cook” key. 4. Change cooking time between 0.5 and 20 hours by pressing the "+" or "-" key. 5. Select the desired cooking mode with the “Adjust” key.
Sautéing 1. Follow steps in the "Cooking Preparation" section of this manual. Never close the lid when using the Sauté function as this may cause pressure to build up inside the pressure cooker. An optional glass lid can be used. 2. Connect the cooker to the power outlet. The LED display shows “OFF” indicating that it’s in standby state. 3. Press “Sauté” key. For safety reasons, the maximum operation time of one “Sauté” cycle is 30 minutes. 4.
Care and Maintenance Regular care and maintenance are essential to ensuring that this product is safe for use. If any of the following circumstances happen, please stop using the appliance immediately and contact the Instant Pot customer care team. • Power cord and plug appear worn out, deformed, discoloured or damaged. • A portion of power cord or the plug gets hotter than usual. • The cooker heats abnormally or emits a burnt smell.
Troubleshooting Table Problem 1 Difficult to close the lid Difficult to open the lid 4 Steam leaks from the side of the lid Steam leaks from float valve for over 2 minutes 5 Float valve unable to rise 6 Steam comes out from th6e pressure release valve non-stop 7 Sealing ring not installed properly Float valve in the popped-up position Pressure exists inside the cooker 2 3 Possible Reason D7isplay flashes “Lid” Solution Position the sealing ring well Slightly press the float valve downward
Troubleshooting Table (Continued) Problem 8 Display remains 9blank after connecting the power cord C1 code C2 code 9 All LEDs flash with a code appearing on screen C5 code C6 code Possible Reason Bad power connection or no power.
Limited Warranty Instant Pot Company (the “IPC”) warrants this appliance to be free from defects in workmanship and material, under normal residential use, for a period of one (1) year from the date of purchase. This warranty extends only to the original purchaser and use in USA and Canada. A purchase receipt, purchase order number or other proof of date of original purchase is required before warranty service is performed.
All contents in this document have been checked carefully. Instant Pot Company reserves the right to interpret any printing mistake or misunderstanding of content. For any technical improvement or change in appearance or name plate, changes shall be placed in the revised manual without further notice. In case of changes in appearance and color, please refer to the actual product for detailed information. Standards: UL 1026, Fifth Edition CAN/CSA-C22.2 No.1335.1-93 CAN/CSA-C22.2 No.1335.2.