Motion Sensor Owner’s Manual
Contents Getting Started Device Overview Installation Battery Micro USB Power Mounting Options Tabletop 4 5 6 Corner Mount Flexible Mount Basic Linking Control an Insteon Device with Motion Sensor Control Multiple Insteon Devices with Motion Sensor Removing Control of an Insteon Device From Motion Sensor Removing Control of Multiple Insteon Devices From Motion Sensor Insteon app for iPhone, iPad and iPod touch Add to the Insteon Hub Configure Motion Sensor Configure Motion Sensor
Getting Started Everything you need to quickly get up and running.
Device Overview Set Button Motion Override Button Tap to send on/off commands to linked devices. Tap to toggle motion detection enable/disable. All other sensor features are not affected. Motion detection will automatically resume after 12 hours. On Off Link: press & hold until LED blinks green. Unlink: press & hold until LED blinks green. Press and hold again until LED blinks red.
Installation Battery Remove the battery tab to power Motion Sensor. Micro USB Power Motion Sensor can be powered using a right-angled Micro USB Cable (2822-222) and standard USB power adapter.
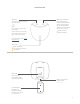
Mounting Options Tabletop To place Motion Sensor on a tabletop or other flat surface, leave the flat battery cover in place. Corner Mount To mount Motion Sensor in a corner, leave the flat battery cover in place and apply the two adhesive strips. Ensure the wall surface is clean before mounting. Motion Sensor must be unmounted when replacing battery. Adhesive strips are designed to be reusable for this purpose.
Basic Linking Configure Insteon Motion Sensor without Insteon Hub; do not use these instructions if you intend to use Motion Sensor with Insteon Hub or other Insteon management software.
Control an Insteon Device with Motion Sensor 1 On Motion Sensor, press and hold the set button until its LED begins blinking green. 2 On the device that you would like Motion Sensor to control, turn on the device and adjust it to the desired brightness, if applicable. 3 Press and hold the set button until you hear a double-beep.* *For Insteon bulbs, remove from power and then return to power. For devices that do not have a beeper, look for their status LED to flash and return to normal.
Control Multiple Insteon Devices with Motion Sensor 1 On Motion Sensor, press and hold the set button until its LED begins blinking green then tap the set button. A 3 2 B One at a time, press and hold the set button on each device until it doublebeeps.* 4 Adjust each device to their desired state: On, off, or brightness level if dimming. 50% 72% 30% ON Lamp 1 Lamp 2 Lamp 3 Appliance Tap the set button on Motion Sensor to exit multi-link mode.
Removing Control of an Insteon Device From Motion Sensor 1 On Motion Sensor, press and hold the set button until its LED begins blinking green. 2 Press and hold the set button again until its LED begins blinking red. 3 Press and hold the controlled device’s set button until the device double-beeps. *For Insteon bulbs, remove from power and then return to power. For devices that do not have a beeper, look for their status LED to flash and return to normal.
Removing Control of Multiple Insteon Devices From Motion Sensor 1 On Motion Sensor, press and hold the set button until its LED begins blinking green. 2 Press and hold the set button again until its LED begins blinking red then tap the set button. A 3 One at a time, press and hold the set button on each device until it doublebeeps.* 4 B Tap the set button on Motion Sensor to exit multi-unlink mode. *For Insteon bulbs, remove from power and then return to power.
Insteon app for iPhone, iPad and iPod touch Use the Insteon app to configure and control Motion Sensor.
Add to the Insteon Hub iPhone, iPad and iPod touch Launch the Insteon App Tap the drawer icon or swipe from the right edge of the display to open the drawer Tap Add a Device When prompted, press and hold the set button on Motion Sensor until the device beeps then tap the set button A Tap Motion Sensor X B You can now manage Motion Sensor with the Insteon app.
Configure Motion Sensor iPhone, iPad and iPod touch Optionally set a unique name, icon, and room membership (default room membership is Favorites) To make a Motion Sensor control another device, a scene must be created. Follow the next few steps first before creating a scene Tap Alerts to configure email and/or push notifications to be sent when Motion Sensor is activated Motion Alert is sent when Motion Sensor sees motion.
Configure Motion Sensor iPhone, iPad and iPod touch Motion LED – This option turns off the light that flashes in the front of the Motion Sensor when it detects motion (It will still operate during setup) Night Only – Tells the Motion Sensor that you want it to work only at night Motion Countdown – After motion stops the amount of time that the Motion Sensor will wait before telling linked devices to turn off Light Sensitivity – How sensitive the Motion Sensor is to detecting light.
Control a Device with Motion iPhone, iPad and iPod touch Tap the drawer icon or swipe from the right edge of the display to open the drawer Tap Create a Scene Give the scene a unique name and select icon and room memberships. It won’t be necessary to create a schedule since you will be using motion as your controller.
Control a Device with Motion iPhone, iPad and iPod touch To change how your devices respond tap the green button for each responder. Dimmable devices can be set to brightness level as well as fade on/off speed. Tap Done to begin creating the scene X When prompted, press and hold the set button on the Motion Sensor Your Motion Sensor is now configured to control a device.
Insteon app for Android Use the Insteon app to configure and control Motion Sensor.
Add to the Insteon Hub Android Launch the Insteon App Navigate to Settings by tapping Edit Settings from the Settings button Tap Devices When prompted, press and hold the set button on Motion Sensor until the device beeps then tap the set button A Tap the Add button Tap Motion Sensor X B You can now manage Motion Sensor with the Insteon app.
Configure Motion Sensor Android Optionally set a unique name, icon, and room membership To make a Motion Sensor control another device, a scene must be created. Follow the next few steps first before creating a scene. Tap Alerts to configure email and/ or push notifications to be sent when Motion Sensor is activated Motion Alert is sent when Motion Sensor sees motion. End of Motion Alert is sent when Motion Sensor stops seeing motion and the countdown ends.
Configure Motion Sensor Android Motion LED – This option turns off the light that flashes in the front of the motion sensor when it detects motion (It will still operate during setup) Night Only – Tells the motion sensor that you want it to work only at night Motion Countdown – The amount of time that a motion sensor will wait before telling linked devices to turn off Light Sensitivity – How sensitive the Motion Sensor is to detecting light.
Control a Device with Motion Android Navigate to Settings by tapping Edit Settings from the Settings button Tap Scenes Tap the Add button Give the scene a unique name and select icon and room memberships. It wont be necessary to create a schedule since you will be using motion as your controller.
Configure Arm and Disarm Android Ensure devices that you want to control are set as Responder. If it says Controller or Both tap the button to change it to Responder To change how your devices respond tap the green button for each responder. Dimmable devices can be set to brightness level as well as fade on/off speed. Tap Done to begin creating the scene X Follow on-screen instructions Your Motion is now configured to control a device.
Local Programming Use local the local programming programming to link to link Insteon Insteon devices devices together together withwith the the set button. set button.
NEW About Local Programming Local Programming The Local Programming Flowchart is a visual representation of the device’s settings. Many device features can be configured using this diagram. Some devices have more options than others but the Local Programming Flowchart presents even the most complicated devices with a straightforward, navigable path. Using a Central Controller If using the Insteon Hub or any other central controller, it is strongly advised that you not use Local Programming.
Local Programming Flow Chart At Rest Press Linking Mode Press Unlinking Mode Tap Tap Multi-Linking Mode MultiUnlinking Mode Exit Tap Exit Tap 26
Factory Reset A factory reset will erase all links stored in the device’s database as well as any customized properties.
Factory Reset 1 3 Slide off the battery cover and remove Motion Sensor’s battery Continue holding the set button until Motion Sensor stops beeping 2 Simultaneously press and hold the set button while reinstalling the battery 4 When the reset is complete, Motion Sensor will double-beep X Motion Sensor has been restored to factory settings.
Appendix Everything else you might need to know about your Insteon product.
Specifications General Available Colors White Brand: Insteon FCC ID SBP28442 Industry Canada Manufacturer Product No.: Patent No.: 5202A-28442 2844-222 Protected under US and Foreign Patents (see www.insteon.
Mechanical Dimensions Enclosure Material Mounting Operating Environment Operating Humidity Range Operating Temperature Range Set Button Storage Temperature Range Weight 1.9” H x 2.13” W x 1.79” D 49mm H x 54.2mm W x 45.5mm D UV stabilized plastic Tabletop, flexible mount or corner mount Indoors and outdoors 0-85% relative humidity, non-condensing 32º to 104º F 0º to 40º C Yes -4º to 158º F -20º to 70º C 3.
Troubleshooting Motion Sensor won’t link to other Insteon devices Your Motion Sensor may be out of range of a dual-band Insteon device or your network may be powerline-only. Try this: • If your Insteon network lacks any dual-band devices, add a Range Extender or other dual-band Insteon device near your Motion Sensor to bridge the Insteon RF and powerline networks. • Motion Sensor must be placed within 100’ of a dual-band device. Radio interference and building construction may reduce range.
Certifications and Warnings Read and understand these instructions before installing and retain them for future reference. • Each Insteon product is assigned a unique Insteon ID, which is printed on the product’s label. This device complies with FCC Rules and Industry Canada license-exempt RSS standard(s).
Product Warranty Limited Warranty Seller warrants to the original consumer purchaser of this product that, for a period of two years from the date of purchase, this product will be free from defects in material and workmanship and will perform in substantial conformity to the description of the product in this Owner’s Manual. This warranty shall not apply to defects or errors caused by misuse or neglect.