
Quick-Start Guide

Page 1 of 1
Rev. 04-06-2009
Timer Dial
Installation
1) Install Door Strike to your door/gate’s jam, replacing the existing door strike (where door latch locks into door jam)
2) Using wire nuts, butt connectors or electrical tape, connect Door Strike leads to included Extension Wire
3) Run other end of Extension Wire to the indoor location where I/O Linc, Power Supply and Delay Timer will be installed
4) Using a wire stripper, cut off the connector at the end of Power Supply’s wire and strip leads back about ½”
5) Using a wire stripper, cut off about 6” from the end of Power Supply’s wire and strip leads back about ½”
6) Using the 6” wire from Step 5, tear leads apart and ensure both ends of one of the wires are stripped back about ½”. This will be your jumper used in Step 7
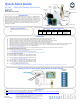
7) Using jumper from Step 6, both Extension Wires and Power Supply leads, connect I/O Linc, Timer Relay and Power Supply as shown in Figure 1
8) Plug your I/O Linc and Power Supply into a nearby, un-switched outlet
I/O Linc’s Status LED will turn on
9) Using Delay Timer’s timer dial and JP1 jumper, set the desired amount of time you want door to be unlocked each time it is activated
Link INSTEON Controller/Sensor to I/O Linc
10) Press & hold the Set button on the INSTEON device you want to unlock the door
Controller’s Status LED will begin blinking
11) Press & hold I/O Linc’s Set button until it beeps (about 3 seconds)
I/O Linc will beep once again to confirm linking; Controller’s LED will stop blinking
Set I/O Linc into Momentary Mode B
12) Press & hold I/O Linc’s Set button until it beeps (about 3 seconds)
13) Press & hold I/O Linc’s Set button until it beeps (about 3 seconds)
14) Press & hold I/O Linc’s Set button until it beeps (about 3 seconds)
I/O Linc’ Status LED will stop blinking
15) Press & hold I/O Linc’s Set button until it beeps (about 3 seconds)
16) Press & hold I/O Linc’s Set button until it beeps (about 3 seconds)
17) Press & hold I/O Linc’s Set button until it beeps (about 3 seconds)
I/O Linc’ Status LED will stop blinking
18) Test by turning INSTEON Controller On (or Off)
Door strike should click and remain unlocked for the duration set in Step 9 above. Door will unlock in response to either an On or an Off
Introduction
Add access control to your INSTEON network by using an I/O Linc - INSTEON Remote
Control Door Strike Kit which provides secure entry to or exit from your premises. The
electric door strike module attaches to the frame of an existing door or gate and uses an
electro-mechanical release mechanism that can be triggered to lock or unlock from any
INSTEON controller. This kit is ideal for large homes, homes where the front door is on a
different level than the main living area, or homes with remote gate entry. It can be a
tremendous aid for those that have a difficult time answering the door such as the
handicapped or disabled.
Quick-Start Guide
I/O Linc
TM
– INSTEON Remote Control Door
Strike Kit
Model: 51901
Remote Door Strike Control
SmartLabs Limited Warranty – SmartLabs warrants to original consumer of this product for a
period of 2 years from date of purchase, this product will be free from defects in material &
workmanship & will perform in substantial conformity with its owner's manual. Warranty shall
not apply to defects caused by misuse or neglect.
U.S. Patent No. 7,345,998, International patents pending ©Copyright 2008
SmartLabs, 16542 Millikan Ave., Irvine, CA 92606, 1-800-SMARTHOME (800-762-7846)
Power
Supply
Extension Wires
I/O Linc Terminals
Door Strike Leads
Status LED
Delay Timer
Questions?
Click: For Advanced Features and X10 compatibility, refer to I/O Linc’s Owner’s Manual:
http://wiki.smarthome.com/index.php?title=I/O_Linc_-_INSTEON_Low_Voltage_/_Contact_Closure_Interface_Owner%27s_Manual
Call:
Friendly tech support @ 1-800-SMARTHOME (800-762-7846)
I/O Linc’s Screw Terminals
5V GND Sense N/C N/O Common
5
Volts
Ground
Sensor
Input
Normally
Closed
Normally
Open
Switches
between N/O
and N/C
Items you will Need
1) 2 small wire nuts, butt connectors or electrical
tape
Figure 1
Door Strike
Wiring I/O Linc to Door Strike, Relay Board, & Power Supply
Power Supply
Leads
N/O / Common
Terminals
Delay Timer’s
Terminals
I/O Linc
(screwdriver
included)