Venstar INSTEON Thermostat Owner’s Manual INSTEON® Remote Control Venstar Thermostat Model #s - 2491T1E, 2491T7E Page 1 of 8 ®
Venstar INSTEON Thermostat Congratulations on purchasing the Venstar INSTEON thermostat. Now you can use the power of INSTEON to control the temperature of your home, from anywhere in the house, or the world. Recall stored setpoints and mode settings from any INSTEON controller to maintain comfort and save energy.
Installation IMPORTANT: If you are not knowledgeable about and comfortable with electrical circuitry or HVAC installation, you should have a qualified electrician install a compatible thermostat for you. Install the thermostat by following the enclosed Venstar documentation. Note: This thermostat is not compatible with Venstar accessories that connect via the phone-style jack on bottom of Venstar products.
i. Tap thermostat mode button until only heat setpoint is displayed. Fan: Turns responders on when the fan is turned on via INSTEON or when the thermostat turns fan on via timer or when the user sets fan to always on mode (and off when the reverse happens). i. Open thermostat door and tap the Fan button until “Fan On” is displayed on the LCD. Press and hold thermostat’s INSTEON Set button until LCD screen flashes. Thermostat’s INSTEON LED will blink green.
1 2) Press and hold the scene button until controller beeps again. Controller’s LED will continue blinking. 3) Press and hold Set button on thermostat until it double-beeps (about 3 seconds). Thermostat’s LCD will flash all its characters twice. Thermostat’s LED will flash once and return to steady green. Controller’s LED stop blinking. 4) Confirm that Unlinking was successful by tapping the button you just unlinked from on the controller. Thermostat will no longer respond.
report to any automation controller or interface you link, check with the manufacturer’s documentation to confirm support of this feature. To enable change reports 1. Press the thermostat mode button until the thermostat mode (and LED) turns off 2. Press and hold the Set button on thermostat for 3 seconds The thermostat LED will begin blinking green. 3. Press and hold the Set button on the desired responder for 3 seconds The thermostat LED will stop blinking. To disable change reports 1.
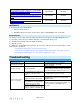
Report readings of mode, temperature, and humidity to automation controller / software Not Available Available Fine-tune thermostat setpoints by a single degree at a time Not Available Available Off button functionality to link to OFF commands, as well as ON commands Not Available Available INSTEON I.D. To find the thermostat’s INSTEON I.D.: 1. Open the thermostat door. 2. INSTEON I.D can be found on another sticker in the format ##.##.##, such as”12.34.45.
Problem Thermostat is taking a long time to respond to a controller. Thermostat changed “all by itself.” Thermostat is locked up. Possible Cause The controller may be sending commands to a responder that is no longer in use. Commands for the unused responder are being resent and loading down the signal. Solution Unlink any unused responders from the controller. HINT: If you are using home automation software such as HouseLinc, you can easily check scene membership and eliminate unnecessary links.